Quantcast
Channel: GameDev.net
Viewing all 17925 articles
Browse latest View live

From User Input to Animations Using State Machines

$
0
0
Performing smooth animation transitions in response to user input is a complicated problem. The user can press any button at any time. You have to check that the character can do the requested move, and depending on currently displayed state, switch to the new animation at exactly the right moment. You also have to track how things have changed, to be ready for the next move of the user.

In all, a rather complicated sequence of checks, actions, and assignments that need to be handled. The sequence quickly runs out of hand with a growing number of moves, game states, and animations. Lots of combinations have to be checked. While writing it once is hard enough, if you have to update or modify it later, finding all the right spots to change without missing one, is the second big problem.

By using state machines, it becomes possible to express precisely what may happen in an orderly way. One state machine only describes the animations and their transitions. A second state machine describes user interaction with the game character, and updates the game character state. By keepinh animation state and game character state separate, things get much easier to understand, and to reason about. Later changes also get simpler as it avoids duplication.

While having such state machines on paper is already quite helpful in understanding, there is also a straight forward implementation path, which means you can plug your state machines into the game, and run them.

Audience, or what you should know before reading


This article briefly touches on what state machines are and how they work, before jumping into the topic at hand. If you don't know about state machines, it is probably a good idea to read about them first. The state machines here are somewhat different, but it helps if the state machine concept is not entirely new. The References section below lists some starting points, but there are many more resources available at the all-knowing Internet.

The article concentrates on using state machines for describing allowed behavior, and how the state machines synchronize. While it has an example to demonstrate the ideas, the article does not discuss the environment around the state machines at length. That is, how to make user input and game state available to the state machine condition, or how to start and run animations. The implementation of the synchronizing state machines is also not shown in full detail.

State machines


A state machine is a way to describe behavior (activities that are being done for a while), and how you can switch between different activities. Each activity is called a state. Since this is so awfully abstract, let's try to describe your behavior right now. You are currently reading (this text). Reading is a state. It's an activity that you do for a while. Now suppose you get a phone call. You stop reading, and concentrate on the conversation. Talking on the phone is another activity that you do for a while, a second state. Other states of you are Walking, Running, Sleeping, and a lot more.


Attached Image: you.png


The activity that you are doing now is special in the description. The state associated with the current activity is called current state (not indicated in the figure). It is a "you are doing this" pointer.

Having states is nice, but so far it's just a list of activities you can do, and a current state, the activity you are doing right now. What is missing, is structure between the states. You can go from Running directly to Sleeping or to any other activity. It is not a very good description of how activities relate. This is where edges come in. Edges define how you can switch from one state to the next. You can see an edge as an arrow, starting at one state, and pointing to the next state. The rule is that you can only change the current state by following an edge from the current state to the state where the edge leads to. The latter state then becomes the new current state (your new activity).

By adding or removing edges between the states, you can influence how the current state can switch between different activities. For example, if you don't have a Running to Sleeping edge, and add a Running to Showering edge and a Showering to Sleeping edge, you can force the current state through the Showering state while going from Running to Sleeping.


Attached Image: you_edges.png


Defining game character behavior


You can apply the same ideas to your game character (or your AI character). Game characters are a lot simpler than real world persons to describe. You can see an example below.


Attached Image: char_states.png


This game character can do just four activities. It can stand (on a platform for example), run, jump, and crawl. The edges say how you can change between states. It shows for example, that you have to go from Crawling to Standing to Running. You cannot go directly from Crawling to Running.

Defining animation sequences


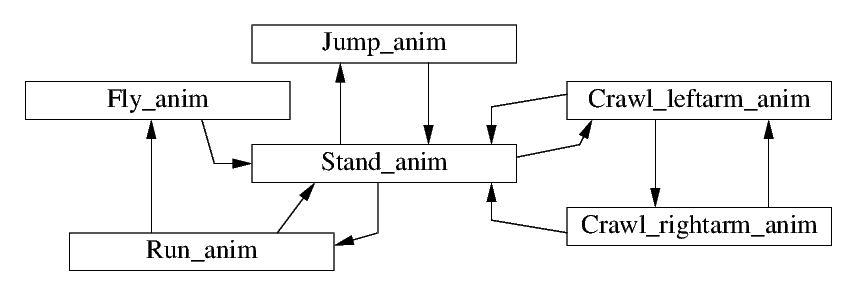
Game character states are kind of obvious, but you can use state machines for a lot more. If you see displaying a (single) animation as an 'activity that is being done for a while' (namely showing all the frames one by one until the end of the animation), you can consider displaying an animation to be a state, and switching between animations an edge, and you can draw a diagram like below.
Attached Image: anim_states.png

You have a state for each animation, and the current state here is the animation currently playing. Edges define how you can go from one animation to the next. Since you want smooth animation, you only add edges from one animation to the next, where the animations 'fit' (more on the precise timing of this below, when discussing conditions of edges).

If you compare the character states with the animation states, you see there is a lot of overlap, but not entirely. The Crawling character state has been expanded to Crawl_leftarm_anim (crawling with your left arm on the floor), and Crawl_rightarm_anim (crawling with your right arm on the floor). From the standing animation you always start with Crawl_leftarm_anim, and you can go back and forth between the left arm and right arm animation, thus slowly crawling across the screen. The Jumping character state has also been split, if you run before jumping, you get a different (flying) animation.

Each state machine should only care about its own data. The game character state machine handles user input, and updates game character state; the animations state machine deals with animations, frame rates, and frames. The computer handles synchronization between both state machines, as discussed below.

Synchronizing behavior


So far so good. We have a state machine describing how the game character behaves, and we have a state machine describing how to play animation sequences.

Now it would be quite useful if the current state of the game character and the current state of the animations match in some way. It looks very weird if the game character state is Standing, while the current animation displays Running_anim. You want to display the running animation only when the game character state is Running too, display one of the crawling animations when the game character state is Crawling, and so on. In other words, both state machines must be synchronized in some way.

The simplest form of synchronization is fully synchronized on state. In that case, each game character state has one unique animation state. When you change the game character state, you also change the animation state in the same way. In fact, if you have this, the game character state machine and the animation state machine are exactly the same! (The technical term is isomorphic.) You can simply merge both state machines into one, and get a much simpler solution.

However, in the example, full synchronization on state fails. There are two animation states for crawling, and the Fly_anim does not even have a game character state in the example.

What is needed in the example is a bit more flexibility. The animation state machine should for example be allowed to switch between the Crawl_leftarm_anim and Crawl_rightarm_anim animations without bothering the game character state machine about it. Similarly, the Jumping state should not care whether a Fly_anim or Jump_anim is displayed. On the other hand, if you go from Running to Standing in the game character state machine, you do want the animation state machine to go to Stand_anim too. To make this possible, all edges (arrows) must get a name. By using the same name for edges in different state machines, you can indicate you want those edges be taken together at the same time.

Edge synchronization


To synchronize edges, all edges must get a name. As an edge represents a instantaneous switch, it is best if you can find names for edges that represent a single point in time, like start or touch_down. The rule for synchronization of edges is that each state machine may take an edge with a given name, only if all other state machines that have edges with the same name, also do that. State machines that do not have any edge with that name do nothing, and keep their current state. Since this rule holds for all state machines, edges with a name that occur in several state machines are either not taken, or all state machines involved take the edge.

To make it more concrete, below are the same state machines as above, but edges now also have names.


Attached Image: char_states_edges.png
Attached Image: anim_states_edges.png


Example 1

Let's start simple. Assume the animations current state is Crawl_leftarm_anim. From that state, it can take the stop edge to Stand_anim, or the right_crawl edge to Crawl_rightarm_anim. Assume the latter is preferred. The rule about edges says that it can take that edge only when all other state machines with a right_crawl edge also take that edge now. As there are no such other state machines, the condition trivially holds, and the animations current state can be moved to Crawl_rightarm_anim without doing anything with the current state of the game character.

Example 2

The case where both state machines synchronize on an edge is a bit longer, but the steps are the same. Let's consider the Running game character state. From the Running current state, are two edges available. One edge is labeled take_off and leads to the Jumping state. The other edge is labeled stop, leading to the Standing state.

Suppose I want it to take the take_off edge here. The rule about edges says that I can only do that if all other state machines that have a take_off edge anywhere in their description, also take it. That implies that the current state of the animations must be Run_anim (else there is no edge take_off that the animations state machine can take).

Also, the animations state machine must be willing to take the take_off edge, and not the stop edge. Assuming both state machines want to do the take_off edge. There are no other state machines with a take_off edge, and the conclusion is that the edge can be taken, since all state machines with such an edge participate. At that moment, the game character current state moves to Jumping, and the animations current state moves to Fly_anim at the same time.

Connecting to the rest of the game


So far, we have been talking about state machines, with current states, and edges that they can be taken together or alone, based on their name. It's all nice pictures, but it still needs to be connected somehow to the other code. Somewhere you need to make a choice when to take_off.

There are two parts to connecting. The first part is about deciding which edges are available, that is, from the current state of both state machines, which edges can be taken now (separately for each state machine). The second part is about changes in the state of the game character and the animations. When you take the take_off edge, and reach the Fly_anim state, you want the game character to know it flies, and you want the animation engine to display the flying animation. Actions (assignments) need to be performed when a current state changes to make that happen.

Edge conditions


Starting with the first part, each edge must 'know' if it is allowed to be taken. This is done by adding conditions to each edge. The additional rule about edges is that the conditions of an edge must hold (must return true) before you can take the edge. Edges without conditions may always be taken (or equivalently, their edges always hold). If you want to write the conditions near the edge on paper, by convention such conditions are near the back of the edge (close to the state that you leave), as the conditions must be checked before you may traverse the edge.

For example, in the Running state of the game character, you could add a JumpButtonPressed() test to the take_off edge. Similarly, the stop edge could get a not SpaceBarPressed() condition. When the game character current state is Running and the player keeps the space bar pressed down, the not SpaceBarPressed() test fails, which means the state machine cannot take the stop edge. Similarly, the JumpButtonPressed() test also fails, as the user did not press the jump key yet. As a result, the game character state machine cannot change its current state, and stays in the Running state. The animation state machine cannot move either (Run_anim state needs co-operation of the game character state machine to get out of the state), and continues to display the running animation.

When the user now presses the jump button (while still holding the space bar), the JumpButtonPressed() test becomes true, and the take_off edge can be taken as far as the game character state machine is concerned. However, since the animations state machine also has a take_off edge, the condition of the latter edge must also yield true. If it does, both edges are taken at the same time, and the current states of the game character becomes Jumping while the animations state machines changes to the Fly_anim state.

The latter additional check in the animations state machine opens useful additional opportunities. Remember we wanted to have smooth animation transitions? In that case, you cannot just switch to a different animation when the user wants. You need to time it such that it happens at exactly the right frame in the animation.

With the latter additional check, that is relatively easy to achieve. Just add a condition to the take_off edge in the animations state machine that it can only change to the next state when the right frame in the running animation is displayed.

When the user presses the jump button, the game character state machine allows taking the take_off edge (JumpButtonPressed() holds), but the same edge in the animation state machine refuses it until the right frame is displayed. As a result, the edge is not taken (the jump button is ignored), until both the jump button is pressed and the right frame is displayed. At that moment, the conditions of both edges hold, and both state machines take their take_off edge, making the game character fly away (until it lands again).

Edge assignments


The second part is that moving to a new current state should have an effect in the game. Some code needs to be executed to display a flying animation when you reach Fly_anim.

To achieve that statements are added to an edge. When the conditions of an edge hold, and the other state machines take an edge with the same name as well, you take the edge, and execute the statements. For example, in the animations state machine, you could add the statement StartAnimation(Flying) to the edge named take_off. By convention, such statements are written near the front of the edge (near the arrow head), as you perform them just before you reach the new current state. In this article, only edges have statements. However, there exist a number of extensions, which ease writing of the state machines. You may want to consider adding such extensions. They are discussed below.

When you have several edges leading to the same state, as in the Crawl_leftarm_anim state, you will find that often you need to perform the same code at each edge to that state, for example StartAnimation(LeftCrawl). To remedy this duplication, you can decide to add code to the new current state, which is executed at the moment enter the new state (just after executing the code attached to the edge). If you move common code like the StartAnimation(LeftCrawl) statement to it, it gets run no matter by which edge you arrive there.

A second extension is that sometimes you need to perform some code for every frame while you are in a state. You can add such code in the state as well. Create an OnEveryLoop function for the states that gets called as part of the game loop.

As an example of the latter, imagine that in the Jumping state, the game character must go up a little bit and then descend. You can do this by having a variable dy in the game character code representing vertical speed, and setting it to a small positive value when you enter the jumping state (assuming positive y is up). In the OnEveryLoop function of the jumping state, do

        y += dy; // Update y position of the character.
        dy--;    // Vertical speed decreases.

Each loop, the above statements are executed, and the game character will slow down going up, and then descend (faster and faster and faster and ...). The land edge condition should trigger when the game character hits a platform, which resets the dy variable back to 0, and we have touch down.

Implementation


The state machines are quite useful as method of describing what can happen, and how game character states and animation states relate, but seeing them in action is worth a thousand pictures, if not more. First the algorithm is explained in pseudo-code, a discussion about more realistic implementations follows.

Luckily implementing synchronous state machines is not too difficult. First, you implement the game character state machine and the animations state machines. In the code below, functions GetGameCharacterStateMachine() and GetAnimationsStateMachine() construct both state machines (in the algorithm they are quite empty). Strings are used to denote the states and edge names. There is a function GetFeasibleEdgenames(<state-machine>, <current-state>, <edge-name-list>) that returns a list of edge names that can be taken at this time (by testing conditions of edges with the given names that leave from the current state). There is also a function TakeEdge(<state-machine>, <current-state>, <edge-name>) that takes the edge with the given name in the state machine, performs the assignments, and returns the new current state. The GetCommonNames(<name-list>, <name-list>) returns the edge names that occur in both given lists (like intersection). Finally, len(<name-list>) returns the number of elements in the list (used for testing whether the list is empty).

In the initialization, construct both state machines, and initialize them to their first current state. Also setup lists of shared edge names, and non-shared edge names.

gsm = GetGameCharacterStateMachine();
asm = GetAnimationsStateMachine();

// Set up current states.
current_gsm = "Standing";
current_asm = "Stand_anim";

// Set up lists of edge names.
shared_names = ["take_off", "land", "stop", "jump", "run", "crawl"];
gsm_names    = [];                            // gsm has no non-shared edge names
asm_names    = ["left_crawl", "right_crawl"];

Somewhere in the game loop, you try to advance both state machines.

gsm_common = GetFeasibleEdgenames(gsm, current_gsm, shared_names);
asm_common = GetFeasibleEdgenames(asm, current_asm, shared_names);
common = GetCommonNames(gsm_common, asm_common);

if len(common) &gt; 0 then
  current_gsm = TakeEdge(gsm, current_gsm, common[0]); // Found a synchronizing edge, take it
  current_asm = TakeEdge(asm, current_asm, common[0]); // and update the current states.

else
  gsm_only = GetFeasibleEdgenames(gsm, current_gsm, gsm_names);
  if len(gsm_only) &gt; 0 then
    current_gsm = TakeEdge(gsm, current_gsm, gsm_only[0]); // Take edge in game character only.
  end

  asm_only = GetFeasibleEdgenames(asm, current_asm, asm_names);
  if len(asm_only) &gt; 0 then
    current_asm = TakeEdge(asm, current_asm, asm_only[0]); // Take edge in animations only.
  end
end

As synchronizing edges need co-operation from both state machines, they take precedence over non-synchronizing edges in each individual state machine. The gsm_common and asm_common variables contain edge names that each state machine can take. After filtering on the common values with GetCommonNames() the first common synchronizing edge is taken if it exists. If it does not exist, each state machine is tried for edge names that are not synchronized, and if found, the edge is taken.

Note that to take a synchronized edge, the edge name must appear in both gsm_common and asm_common. That means the conditions of both edges are checked and both hold. When you take the edge, TakeEdge performs the assignments of both edges, starting with the game character state machine. This code thus combines both edges, performs all checks, and performs all assignments.

In this example, gsm_names is empty, which means there will never be an edge that is taken by the game character state machine on its own. In the general case however, there will be edge names (and if not, you can simply remove that part of the algorithm).

Real implementations


The algorithm above aims to make the explanation as clear as possible. From a performance point of view, it is horrible or worse.

It is quite tempting to make lots of objects here. For the gsm and asm state machines, this would be a good idea. They can act as container for the GetFeasibleEdgenames and TakeEdge functions. Since these functions have conditions and assignments about the other parts of the game, the containers will need some form of embedding to get access to the variables and functions they use.

A state object would contain only the edge information to the next states, and the assignments to perform. The latter makes each state object unique code-wise. Edges have a similar problem, they contain their name, a reference to the next state, the conditions that must hold before you may take it, and assignments that you perform when you take the edge. The conditions and assignments make again each object unique in code.

One way out of this is to make lots of classes with inline code. Another option is to make arrays with the static data, and use integers for the current states. The condition checks could be dispatched through a switch on the current state. Assignments performed in the new state could also be done in a switch.

The key problem here is finding the common[0] value (if it exists). The algorithm above queries each state machine separately. Instead, you could feed the gsm_common answer into the asm_common computation. The GetCommonNames will never return anything outside the gsm_common set no matter what asm_common contains.

To get fast edge name matching, make edge names an integer value, and return an array of edges that can be taken from the GetFeasibleEdgenames(gsm, current_gsm, shared_names) call. Length of the array is the number of edge names that exist, and edge names that have no valid edge are null. The GetFeasibleEdgenames(asm, current_asm, shared_names) function would need to be renamed, and rewritten to use that array to find a common synchronizing edge name. It can stop at the first match.

If there is no synchronizing edge name, the algorithm uses the same generic GetFeasibleEdgenames and TakeEdge functions to perform a non-synchronizing edge. In a real implementation, you can combine both calls into one function. If you split edges with synchronizing names from edges with non-synchronizing names, you can make a new function that sequentially inspects the latter edges, and if the conditions hold, immediately also take it, and return.

More state machines


In this article, two state machines are used, one for the game character, and one for the animations. However, there is no fundamental reason why you could not extend the idea to more than two state machines. Maybe you want a state machine to filter player input. The rules do not change, but the implementation gets more involved, as there are more forms of synchronizing events in such a case.

References


The state machines described in this article are based on automata normally found in Controller design of Discrete Event systems. There is a large body of literature about it, for example


Introduction to Discrete Event Systems, second edition
by Christos G. Cassandras and Stéphane Lafortune
Springer, 2008


This theory does have edge names (called 'events'), but no conditions or assignments, as they are not embedding the state machines into a context. Conditions and assignments are used in languages/tools like Modelica or Uppaal.
Links to other resources

Versions


How to Design the Data Structure for a Turn Based Game

$
0
0
One of the recurring questions I get is how to exactly make a turn-based game that has a coherent data structure.

Because you're already great coding features for your games, all you may need is a little guidance on how to organize your design to make the things you want actually work.

When you see the following example, you’ll see how easy it is.

Stuff needed to build a turn-based game


To keep things simple, let’s say you want to build a classic tic-tac-toe game. What features should be expected from a game like this?
  • Multiple simultaneous games. Players should be able to have multiple games with different opponents taking place at the same time.
  • Different game status. Every game should have a status that indicates what to expect. Waiting, created, running, finished or cancelled.
  • Play with listed friends. You could have the option to challenge your friends to a game or add new friends to the list.
  • Play with random users. You may want to play with people you don’t know.
  • Play same skill users. You might want to play against random players that have a similar skill as you do.
Luckily, making a game with all these features is quite easy!

All you need to know is how to lay out the features to make them work like you want.

Here are a few questions you should be able to answer.

#1 How are you going to store data?


In this case, I assume a NoSQL database. There, game data is stored in collections, which is like a table in an SQL database.

There are some differences though. In a collection you store objects with a similar concept, but they don’t need to have the same number of “columns”. In fact, in a collection, objects have attributes instead of columns.
  • How many collections does the tic-tac-toe game need?
  • What information should we store in every object?
  • How does every process work inside the game?
To know these, first we have to determine the data structure of a game (match).

Designing the game structure


Our “games” will be objects stored inside a collection we can name GAMES.

Every “game” object has these features:
  • It is shared by two (or more) players
  • Allows players to make moves only on their turns
  • It has a winning condition
  • It has a winner
  • All players in it can update the “game” object
We’ll store all these features in GAMES collection, which must be readable and writeable by any player so they can work properly.

#2 How will the game structure look like?


Obviously it will depend on the kind of game you’d like to make, but in the tic-tac-toe example we’re doing you’ll need:
  • Users. Players involved in each game.
  • Status. Whether it is a waiting, created, running, finished or cancelled “game”.
  • Current turn. In tic-tac-toe, there will be a maximum of six turns between both players.
  • Current user. Which player has the active turn and can make a move.
  • Movements. List every move, which must be ordered by turn and has to contain the information about:
    • User who made the move
    • Position occupied on the board {x,y} when the move is made


how-design-data-structure-for-turn-based


This is how the structure of a turn based game looks like.

Most games will have a more elaborate board than we’re dealing with in this example, so you’ll need a complex matrix of coordinates, and so on. But for this example, the board can be represented by a simple array of positions.

Let’s see our board of coordinates so we can represent movements in the “game”.


0,21,22,2
0,11,12,1
0,01,02,0

The format of the objects used here is JSON, so every “game” will have this structure:

{
  'users':{
      // 'user1': id_of_user1
      '1': 55448343d3655,
      '2': 33129821c1233
  },
  'status': 'running',
  'currentturn': 3,
  'currentuser': '1',
  'movements': {
      '1': {'user': 55448343d3655, 'position':[0,0]},
      '2': {'user': 33129821c1233, 'position':[0,1]}
  },
}

#3 How will you manage the users?


Regardless of the method any user starts a session with (email, Facebook, silent) he or she will always need a profile. Every user has to be assigned a unique user id for the profile, where you can store any additional info you need.

Important notice. This profile is public for every other user that asks for it.

You should create a collection for "Users", and store there all their profile information for your game.

User public information


In the user profile we are going to store the following information that can be seen by the rest of users:
  • Nickname. The name the user wants to be listed as.
  • Avatar. The name of the image she is using as avatar. The fastest method is referencing an image already in the game package. The alternatives are URL of the file, or ID of the downloadable file in you storage.
  • Friend list. The list of user id’s that are in the friend list.

Adding new users to the friend list


We’ll have to create a screen flow that allows the players to search for other players in the game and add them to their friend list.

The best way to add a new user to the friend list would be to store the user id of the entity, not the nickname, not the avatar, or any other concepts.

Important notice. Every object stored should have been assigned a unique id, which is what you should use to look for the whole entity information when you need to challenge friends.

#4 How to play with random users of same skill?


Players will be able to play with random players around the world. Or, to be precise, players in your game database.

Now you know all these you’re ready to create any asynchronous game you want.

How can we make two players find each other and play a game?

The most common solution would be to create a collection named “random”, or “randomqueue” and make it readable and writeable by all users: Own(er) users and Other users.

When a user wants to play with a random opponent we will need him to create an object on that collection indicating he is “waiting” for another user to join. Besides, we’ll need to store specific data that lets the user who wants to join the game decipher whether she is an opponent of same skill.

This is what you should store for this tic-tac-toe example:
  • User id. Object id of the waiting user because the opponent must be able to download the whole profile if needed.
  • Nickname. So it can be shown on screen easily.
  • Avatar. To have the picture shown on screen easily.
  • Skill. To find the right opponent and offer a balanced gameplay.
Should we create a new object every time a user wants to play random opponents? Not really!

The algorithm to implement should be something like this:
  1. Make a search on the “random queue” collection looking for
    • a user that is not me, and
    • whose skill is close to my skill rating
  2. If the result is empty, create my own object on the queue for which I will be waiting
  3. If there are results:
    • pick one
    • create a game
    • send a notification to the opponent via server script

Calculate the user skill rating


In order to foster a balanced matchmaking system, it might be a good idea to have players of similar skill play each other. One way to calculate the skill level of a user is to design a system similar to an Elo rating system.

With a system like this, you can have a more balanced gameplay.

#5 How to notify users about their turn?


There are different ways to create a notification mechanism to alert users it is their turn to move or any other game event. Our preferred method are push notifications, though you may want to have an alternative mechanism just in case push are blocked by the user.

Push notifications


To let users know it’s their turn, we’ll create a server hook post-save script for the collection GAMES. This means every time a user creates or modifies a “game” object the script will run on the server side to send that notification.

The script we’ll add does a very simple thing:

  1. If the match status is waiting:
    • Pick the current user id
    • Send the user a push saying "It’s your turn"
  2. If the match status is created:
    • Pick the user who doesn’t Own (didn’t create) the match
    • Send the user a push saying "Mary is challenging you"

Alternatives to notify users


How can you notify users it’s their turn if they blocked push notifications?

One option you have is to create a pulling system. This is how it’d work: If your game detects push notifications are blocked, you can ask the server about your “games” status with an established frequency. You can do this by searching the GAMES collection or by creating a custom script that returns the information you need.

If changes to the “game” are found, you can update the scene, and if there aren’t the player can continue playing.

To sum up


You have to determine a few key things to build your turn-based game:
  • How to store data
  • How to structure a game
  • How to manage users
Now you know all these you’re ready to create any basic asynchronous game you want.

Don't hesitate to post questions in the comments section!


This was originally posted in Gamedonia blog.

A Spin-off: CryEngine 3 SDK Checked with PVS-Studio

$
0
0
We have finished a large comparison of the static code analyzers Cppcheck, PVS-Studio and Visual Studio 2013's built-in analyzer. In the course of this investigation, we checked over 10 open-source projects. Some of them do deserve to be discussed specially. In today's article, I'll tell you about the results of the check of the CryEngine 3 SDK project.

CryEngine 3 SDK


Wikipedia: CryEngine 3 SDK is a toolset for developing computer games on the CryEngine 3 game engine. CryEngine 3 SDK is developed and maintained by German company Crytek, the developer of the original engine CyrEngine 3. CryEngine 3 SDK is a proprietary freeware development toolset anyone can use for non-commercial game development. For commercial game development exploiting CryEngine 3, developers have to pay royalties to Crytek.

PVS-Studio


Let's see if PVS-Studio has found any interesting bugs in this library.

True, PVS-Studio catches a bit more bugs if you turn on the 3rd severity level diagnostics.

For example:

static void GetNameForFile(
  const char* baseFileName,
  const uint32 fileIdx,
  char outputName[512] )
{
  assert(baseFileName != NULL);
  sprintf( outputName, "%s_%d", baseFileName, fileIdx );
}

V576 Incorrect format. Consider checking the fourth actual argument of the 'sprintf' function. The SIGNED integer type argument is expected. igame.h 66

From the formal viewpoint, the programmer should have used %u to print the unsigned variable fileIdx. But I'm very doubtful that this variable will ever reach a value larger than INT_MAX. So this error will not cause any severe consequences.

Analysis results


My brief comment on the analysis results is, developers should use static analysis. There will be much fewer bugs in programs and I will drop writing articles like this one.

Double check


void CVehicleMovementArcadeWheeled::InternalPhysicsTick(float dt)
{
  ....
  if (fabsf(m_movementAction.rotateYaw)>0.05f ||
      vel.GetLengthSquared()>0.001f ||
      m_chassis.vel.GetLengthSquared()>0.001f ||
      angVel.GetLengthSquared()>0.001f ||
      angVel.GetLengthSquared()>0.001f) 
  ....
}

V501: There are identical sub-expressions 'angVel.GetLengthSquared() > 0.001f' to the left and to the right of the '||' operator. vehiclemovementarcadewheeled.cpp 3300

The angVel.GetLengthSquared()>0.001f check is executed twice. One of them is redundant, or otherwise there is a typo in it which prevents some other value from being checked.

Identical code blocks under different conditions


Fragment No. 1.

void CVicinityDependentObjectMover::HandleEvent(....)
{
  ....
  else if ( strcmp(szEventName, "ForceToTargetPos") == 0 )
  {
    SetState(eObjectRangeMoverState_MovingTo);
    SetState(eObjectRangeMoverState_Moved);
    ActivateOutputPortBool( "OnForceToTargetPos" );
  }
  else if ( strcmp(szEventName, "ForceToTargetPos") == 0 )
  {
    SetState(eObjectRangeMoverState_MovingTo);
    SetState(eObjectRangeMoverState_Moved);
    ActivateOutputPortBool( "OnForceToTargetPos" );
  }
  ....
}

V517: The use of 'if (A) {...} else if (A) {...}' pattern was detected. There is a probability of logical error presence. Check lines: 255, 261. vicinitydependentobjectmover.cpp 255

I suspect that this piece of code was written through the Copy-Paste technique. I also suspect that the programmer forgot to change some lines after the copying.

Fragment No. 2.

The ShouldGiveLocalPlayerHitableFeedbackOnCrosshairHoverForEntityClass() function is implemented in a very strange way. That's a real name!

bool CGameRules::
ShouldGiveLocalPlayerHitableFeedbackOnCrosshairHoverForEntityClass
(const IEntityClass* pEntityClass) const
{
  assert(pEntityClass != NULL);

  if(gEnv->bMultiplayer)
  {
    return 
      (pEntityClass == s_pSmartMineClass) || 
      (pEntityClass == s_pTurretClass) ||
      (pEntityClass == s_pC4Explosive);
  }
  else
  {
    return 
      (pEntityClass == s_pSmartMineClass) || 
      (pEntityClass == s_pTurretClass) ||
      (pEntityClass == s_pC4Explosive);
  }
}

V523: The 'then' statement is equivalent to the 'else' statement. gamerules.cpp 5401

Other similar defects:
  • environmentalweapon.cpp 964
  • persistantstats.cpp 610
  • persistantstats.cpp 714
  • recordingsystem.cpp 8924
  • movementtransitions.cpp 610
  • gamerulescombicaptureobjective.cpp 1692
  • vehiclemovementhelicopter.cpp 588

An uninitialized array cell


TDestructionEventId destructionEvents[2];

SDestructibleBodyPart()
  : hashId(0)
  , healthRatio(0.0f)
  , minHealthToDestroyOnDeathRatio(0.0f)
{
  destructionEvents[0] = -1;
  destructionEvents[0] = -1;
}

V519: The 'destructionEvents[0]' variable is assigned values twice successively. Perhaps this is a mistake. Check lines: 75, 76. bodydestruction.h 76

The destructionEvents array consists of two items. The programmer wanted to initialize the array in the constructor, but failed.

A parenthesis in a wrong place


bool ShouldRecordEvent(size_t eventID, IActor* pActor=NULL) const;

void CActorTelemetry::SubscribeToWeapon(EntityId weaponId)
{
  ....
  else if(pMgr->ShouldRecordEvent(eSE_Weapon), pOwnerRaw)
  ....
}

V639: Consider inspecting the expression for 'ShouldRecordEvent' function call. It is possible that one of the closing ')' brackets was positioned incorrectly. actortelemetry.cpp 288

It's a rare and interesting bug - a closing parenthesis is written in a wrong place.

The point is that the ShouldRecordEvent() function's second argument is optional. It turns that the ShouldRecordEvent() function is called first, and then the comma operator , returns the value on the right. The condition depends on the pOwnerRaw variable alone.

Long story short, the whole thing is darn messed up here.

A function name missing


virtual void ProcessEvent(....)
{
  ....
  string pMessage = ("%s:", currentSeat->GetSeatName());
  ....
}

V521: Such expressions using the ',' operator are dangerous. Make sure the expression '"%s:", currentSeat->GetSeatName()' is correct. flowvehiclenodes.cpp 662

In this fragment, the pMessage variable is assigned the value currentSeat->GetSeatName(). No formatting is done, and it leads to missing the colon ':' in this line. Though a trifle, it is still a bug.

The fixed code should look like this:

string pMessage =
  string().Format("%s:", currentSeat->GetSeatName());

Senseless and pitiless checks


Fragment No. 1.

inline bool operator != (const SEfResTexture &m) const
{
  if (stricmp(m_Name.c_str(), m_Name.c_str()) != 0 ||
      m_TexFlags != m.m_TexFlags || 
      m_bUTile != m.m_bUTile ||
      m_bVTile != m.m_bVTile ||
      m_Filter != m.m_Filter ||
      m_Ext != m.m_Ext ||
      m_Sampler != m.m_Sampler)
    return true;
  return false;
}

V549: The first argument of 'stricmp' function is equal to the second argument. ishader.h 2089

If you haven't noticed the bug, I'll tell you. The m_Name.c_str() string is compared to itself. The correct code should look like this:

stricmp(m_Name.c_str(), m.m_Name.c_str())

Fragment No. 2.

A logical error this time:

SearchSpotStatus GetStatus() const { return m_status; }

SearchSpot* SearchGroup::FindBestSearchSpot(....)
{
  ....
  if(searchSpot.GetStatus() != Unreachable ||
     searchSpot.GetStatus() != BeingSearchedRightAboutNow)
  ....
}

V547: Expression is always true. Probably the '&&' operator should be used here. searchmodule.cpp 469

The check in this code does not make any sense. Here is an analogy:

if (A != 1 || A != 2)

The condition is always true.

Fragment No. 3.

const CCircularBufferTimeline *
CCircularBufferStatsContainer::GetTimeline(
  size_t inTimelineId) const
{
  ....
  if (inTimelineId >= 0 && (int)inTimelineId < m_numTimelines)
  {
    tl = &m_timelines[inTimelineId];
  }
  else
  {
    CryWarning(VALIDATOR_MODULE_GAME,VALIDATOR_ERROR,
               "Statistics event %" PRISIZE_T 
               " is larger than the max registered of %" 
               PRISIZE_T ", event ignored",
               inTimelineId,m_numTimelines);
  }
  ....
}

V547: Expression 'inTimelineId >= 0' is always true. Unsigned type value is always >= 0. circularstatsstorage.cpp 31

Fragment No. 4.

inline typename CryStringT<T>::size_type
CryStringT<T>::rfind( value_type ch, size_type pos ) const
{
  const_str str;
  if (pos == npos) {
    ....
  } else {
    if (pos == npos)
      pos = length();
  ....
}

V571: Recurring check. The 'if (pos == npos)' condition was already verified in line 1447. crystring.h 1453

The pos = length() assignment will never be executed.

A similar defect: cryfixedstring.h 1297

Pointers


Programmers are very fond of checking pointers for being null. Wish they knew how often they do it wrong - check when it's too late.

I'll cite only one example and give you a link to a file with the list of all the other samples.

IScriptTable *p;
bool Create( IScriptSystem *pSS, bool bCreateEmpty=false )
{
  if (p) p->Release();
  p = pSS->CreateTable(bCreateEmpty);
  p->AddRef();
  return (p)?true:false;
}

V595: The 'p' pointer was utilized before it was verified against nullptr. Check lines: 325, 326. scripthelpers.h 325

The list of other 35 messages: CryEngineSDK-595.txt

Undefined behavior


void AddSample( T x )
{
  m_index = ++m_index % N;
  ....
}

V567: Undefined behavior. The 'm_index' variable is modified while being used twice between sequence points. inetwork.h 2303

One-time loops


void CWeapon::AccessoriesChanged(bool initialLoadoutSetup)
{
  ....
  for (int i = 0; i < numZoommodes; i++)
  {
    CIronSight* pZoomMode = ....
    const SZoomModeParams* pCurrentParams = ....
    const SZoomModeParams* pNewParams = ....
    if(pNewParams != pCurrentParams)
    {
      pZoomMode->ResetSharedParams(pNewParams);
    }
    break;
  }
  ....
}

V612: An unconditional 'break' within a loop. weapon.cpp 2854

The loop body will be executed only once because of the unconditional statement break, while there are no continue operators around in this loop.

We found a few more suspicious loops like that:
  • gunturret.cpp 1647
  • vehiclemovementbase.cpp 2362
  • vehiclemovementbase.cpp 2382

Strange assignments


Fragment No. 1.

void CPlayerStateGround::OnPrePhysicsUpdate(....)
{
  ....
  modifiedSlopeNormal.z = modifiedSlopeNormal.z;
  ....
}

V570: The 'modifiedSlopeNormal.z' variable is assigned to itself. playerstateground.cpp 227

Fragment No. 2.

const SRWIParams& Init(....)
{
  ....
  objtypes=ent_all;
  flags=rwi_stop_at_pierceable;
  org=_org;
  dir=_dir;
  objtypes=_objtypes;
  ....
}

V519: The 'objtypes' variable is assigned values twice successively. Perhaps this is a mistake. Check lines: 2807, 2808. physinterface.h 2808

The objtypes class member is assigned values twice.

Fragment No. 3.

void SPickAndThrowParams::SThrowParams::SetDefaultValues()
{
  ....
  maxChargedThrowSpeed = 20.0f;
  maxChargedThrowSpeed = 15.0f;
}

V519: The 'maxChargedThrowSpeed' variable is assigned values twice successively. Perhaps this is a mistake. Check lines: 1284, 1285. weaponsharedparams.cpp 1285

A few more similar strange assignments:
  • The bExecuteCommandLine variable. Check lines: 628, 630. isystem.h 630
  • The flags variable. Check lines: 2807, 2808. physinterface.h 2808
  • The entTypes Variable. Check lines: 2854, 2856. physinterface.h 2856
  • The geomFlagsAny variable. Check lines: 2854, 2857. physinterface.h 2857
  • The m_pLayerEffectParams variable. Check lines: 762, 771. ishader.h 771

Careless entity names


void CGamePhysicsSettings::Debug(....) const
{
  ....
  sprintf_s(buf, bufLen, pEntity->GetName());
  ....
}

V618: It's dangerous to call the 'sprintf_s' function in such a manner, as the line being passed could contain format specification. The example of the safe code: printf("%s", str); gamephysicssettings.cpp 174

It's not quite an error, but a dangerous code anyway. Should the % character be used in an entity name, it may lead to absolutely unpredictable consequences.

Lone wanderer


CPersistantStats::SEnemyTeamMemberInfo
*CPersistantStats::GetEnemyTeamMemberInfo(EntityId inEntityId)
{
  ....
  insertResult.first->second.m_entityId;
  ....
}

V607: Ownerless expression 'insertResult.first->second.m_entityId'. persistantstats.cpp 4814

An alone standing expression doing nothing. What is it? A bug? Incomplete code?

Another similar fragment: recordingsystem.cpp 2671

The new operator


bool CreateWriteBuffer(uint32 bufferSize)
{
  FreeWriteBuffer();
  m_pWriteBuffer = new uint8[bufferSize];
  if (m_pWriteBuffer)
  {
    m_bufferSize = bufferSize;
    m_bufferPos = 0;
    m_allocated = true;
    return true;
  }
  return false;
}

V668: There is no sense in testing the 'm_pWriteBuffer' pointer against null, as the memory was allocated using the 'new' operator. The exception will be generated in the case of memory allocation error. crylobbypacket.h 88

The code is obsolete. Nowadays, the new operator throws an exception when a memory allocation error occurs.

Other fragments in need of refactoring:
  • cry_math.h 73
  • datapatchdownloader.cpp 106
  • datapatchdownloader.cpp 338
  • game.cpp 1671
  • game.cpp 4478
  • persistantstats.cpp 1235
  • sceneblurgameeffect.cpp 366
  • killcamgameeffect.cpp 369
  • downloadmgr.cpp 1090
  • downloadmgr.cpp 1467
  • matchmakingtelemetry.cpp 69
  • matchmakingtelemetry.cpp 132
  • matchmakingtelemetry.cpp 109
  • telemetrycollector.cpp 1407
  • telemetrycollector.cpp 1470
  • telemetrycollector.cpp 1467
  • telemetrycollector.cpp 1479
  • statsrecordingmgr.cpp 1134
  • statsrecordingmgr.cpp 1144
  • statsrecordingmgr.cpp 1267
  • statsrecordingmgr.cpp 1261
  • featuretester.cpp 876
  • menurender3dmodelmgr.cpp 1373

Conclusions


No special conclusions. But I wish I could check the CryEngine 3 engine itself, rather than CryEngine 3 SDK. Guess how many bugs I could find there?

May your code stay bugless!

Particle Systems using Constrained Dynamics

$
0
0
Simulating physics can be fairly complex. Spatial motion (vehicles, projectiles, etc.), friction, collision, explosions, and other types of physical interactions are complicated enough to describe mathematically, but making them accurate when computed adds another layer on top of that. Making it run in real time adds even more complexity. There is lots of active research into quicker and more accurate methods. This article is meant to showcase a really interesting way to simulate particles with constraints in a numerically stable way. As well, I'll try to break down the underlying principles so it's more understandable by those who forgot their physics.

Note: the method presented in this article is described in the paper "Interactive Dynamics" and was written by Witkin, Gleicher, and Welch. It was published in ACM in 1990.

A posted PDF of the paper can be found here: http://www.cs.cmu.edu/~aw/pdf/interactive.pdf
A link to another article by Witkin on this subject can be found here: https://www.cs.cmu.edu/~baraff/pbm/constraints.pdf

Physical Theory


Newton's Laws


Everyone's familiar with Newton's second law: \( F = ma\). It forms the basis of Newtonian mechanics. It looks very simple by itself, but usually it's very hard to deal with Newton's laws because of the number of equations involved. The number of ways a body can move in space is called the degrees of freedom. For full 3D motion, we have 6 degrees of freedom for each body and thus need 6 equations per body to solve for the motion. For the ease in explaining this method, we will consider translations only, but this can be extended for rotations as well.

We need to devise an easy way to build and compute this system of equations. For a point mass moving in 3D, we can set up the general equations as a matrix equation:
\[ \left [ \begin{matrix} m_1 & 0 & 0 \\ 0 & m_1 & 0 \\ 0 & 0 & m_1 \\ \end{matrix} \right ] \left [ \begin{matrix} a_{1x} \\ a_{1y} \\ a_{1z} \\ \end{matrix} \right ] = \left [ \begin{matrix} F_{1x} \\ F_{1y} \\ F_{1z} \\ \end{matrix} \right ]\]
This can obviously be extended to include accelerations and net forces for many particles as well. The abbreviated equation is:
\[ M \ddot{q} = F \]
where \(M\) is the mass matrix, \(\ddot{q}\) is acceleration (the second time derivative of position), and \(F\) is the sum of all the forces on the body.

Motivating Example


One of the problems with computing with Newton-Euler methods is that we have to compute all the forces in the system to understand how the system will evolve, or in other words, how the bodies will move with respect to each other. Let's take a simple example of a pendulum.

Attached Image: pendulum.png


Technically, we have a force on the wall by the string, and a force on the ball by the string. In this case, we can reduce it to the forces shown and solve for the motion of the ball. Here, we have to figure out how the string is pulling on the ball ( \( T = mg \cos{\theta}\) ), and then break it into components to get the forces in each direction. This yields the following:
\[ \left [ \begin{matrix} m & 0 \\ 0 & m \\ \end{matrix} \right ] \left [ \begin{matrix} \ddot{q}_x \\ \ddot{q}_y \\ \end{matrix} \right ] = \left [ \begin{matrix} -T\sin{\theta} \\ -mg+T\cos{\theta} \\ \end{matrix} \right ]\]
We can then model this motion without needing to use the string. The ball can simply exist in space and move according to this equation of motion.

Constraints and Constraint Forces


One thing we've glossed over without highlighting in the pendulum example is the string. We were able to ignore the fact that the mass is attached to the string, so does the string actually do anything in this example? Well, yes and no. The string provides the tension to hold up the mass, but anything could do that. We could have had a rod or a beam hold it up. What it really does is define the possible paths the mass can travel on. The motion of the mass is dictated, or constrained, by the string. Here, the mass is traveling on a circular path about the point where the pendulum hangs on the wall. Really, anything that constrains the mass to this path with no additional work can do this. If the mass was a bead on a frictionless circular wire with the same radius, we would get the same equations of motion!

If we rearrange the pendulum's equations of motion, we can illustrate a point:
\[ \left [ \begin{matrix} m & 0 \\ 0 & m \\ \end{matrix} \right ] \left [ \begin{matrix} \ddot{q}_x \\ \ddot{q}_y \\ \end{matrix} \right ] = \left [ \begin{matrix} 0 \\ -mg \\ \end{matrix} \right ] + \left [ \begin{matrix} -T\sin{\theta} \\ T\cos{\theta} \\ \end{matrix} \right ]\]
In our example, the only applied force on the mass is gravity. That is represented as the first term on the right hand side of the equation. So what's the second term? That is the constraint force, or the other forces necessary to keep the mass constrained to the path. We can consider that a part of the net forces on the mass, so the modified equation is:
\[ M_{ij} \ddot{q}_j = Q_j + C_j \]
where \(M\) is the mass matrix, \(\ddot{q}\) is acceleration (the second time derivative of position), \(Q\) is the sum of all the applied forces on the body, and \(C\) is the sum of all the constraint forces on the body. Let's note as well that the mass matrix is basically diagonal. It's definitely sparse, so that can work to our advantage later when we're working with it.

Principle of Virtual Work


The notion of adding constraint forces can be a bit unsettling because we are adding more forces to the body, which you would think would change the energy in the system. However, if we take a closer look at the pendulum example, we can see that the tension in the string is acting perpendicular (orthogonal) to the motion of the mass. If the constraint force is orthogonal to the displacement, then there is no additional work being done on the system, meaning no energy is being added to the system. This is called d'Alembert's principle, or the principle of virtual work.

Believe it or not, this is a big deal! This is one of the key ideas in this method. Normally, springs are used to create the constraint forces to help define the motion between objects. For this pendulum example, we could treat the string as a very stiff spring. As the mass moves, it may displace a small amount from the circular path (due to numerical error). Then the spring force will move the mass back toward the constraint. As it does this, it may overshoot a little or a lot! In addition to this, sometimes the spring constants can be very high, creating what are aptly named stiff equations. This causes the numerical integration to either take unnecessarily tiny time steps where normally larger ones would suffice. These problems are well-known in the simulation community and many techniques have been created to avoid making the equations of motion stiff.

As illustrated above, as long as the constraint forces don't do any work on the system, we can use them. There are lots of combinations of constraint forces that can be used that satisfy d'Alembert's principle, but we can illustrate a simple way to get those forces.

Witkin's Method


Constraints


Usually a simulation has a starting position \(q = \left [ \begin{matrix} x_1 & y_1 & z_1 & x_2 & y_2 & z_2 & \cdots \\ \end{matrix} \right ] \) and velocity \(\dot{q} = \left [ \begin{matrix} \dot{x}_1 & \dot{y}_1 & \dot{z}_1 & \dot{x}_2 & \dot{y}_2 & \dot{z}_2 & \cdots \\ \end{matrix} \right ] \). The general constraint function is based on the state \(q(t)\) and possibly on time as well: \(c(q(t))\). The constraints need to be implicit, meaning that the constraints should be an equation that equals zero. For example, the 2D implicit circle equation is \(x^2 + y^2 - R^2 = 0\).

Remember there are multiple constraints to take into consideration. The vector that stores them will be denoted in an index notation as \(c_i\). Taking the total derivative with respect to time is:
\[\dot{c}_i=\frac{d}{dt}c_i(q(t),t)=\frac{\partial c_i}{\partial q_j}\dot{q}_j+\frac{\partial c_i}{\partial t}\]
The first term in this equation is actually a matrix, the Jacobian of the constraint vector \(J = \partial c_i/\partial q_j\), left-multiplied to the velocity vector. The Jacobian is made of all the partial derivatives of the constraints. The second term is just the partial time derivative of the constraints.

Differentiating again to get \(\ddot{c_i}\) yields:
\[\ddot{c}_i = \frac{\partial c_i}{\partial q_j} \ddot{q}_j + \frac{\partial \dot{c}_i}{\partial q_j} \dot{q}_j + \frac{\partial^2 c_i}{\partial t^2}\]
Looking at the results, the first term is the Jacobian of the constraints multiplied by the acceleration vector. The second term is actually the Jacobian of the time derivative of the constraint. The third term is the second partial time derivative of the constraints.

The formulas for the complicated terms, like the Jacobians, can be calculated analytically ahead of time. As well, since the constraints are position constraints, the second time derivatives are accelerations.

Newton's Law with Constraints


If we solve the matrix Newton's Law equation for the accelerations, we get:
\[\ddot{q}_j = W_{jk}\left ( C_k + Q_k \right )\]
where \(W = M^{-1}\), the mass matrix inverse. If we were to replace this with the acceleration vector from our constraint equation, we would get the following:
\[\frac{\partial c_i}{\partial q_j} W_{jk}\left ( C_k + Q_k \right ) + \frac{\partial \dot{c}_i}{\partial q_j} \dot{q}_j + \frac{\partial^2 c_i}{\partial t^2} = 0\]
\[JW(C+Q) + \dot{J} \dot{q} + c_{tt} = 0\]
Here, the only unknowns are the constraint forces. From our discussion before, we know that the constraint forces must satisfy the principle of virtual work. As we said before, the forces need to be orthogonal to the displacements, or the legal paths. We will take the gradient of the constraint path to get vectors orthogonal to the path. The reason why this works will be explained later. Since the constraints are placed in a vector, the gradient of that vector would be the Jacobian matrix of the constraints: \(\partial c/\partial q\). Although the row vectors of the matrix have the proper directions to make the dot product with the displacements zero, they don't have the right magnitudes to force the masses to lie on the constraint. We can construct a vector of scalars that will multiply with the row vectors to make the magnitudes correct. These are known as Lagrange multipliers. This would make the equation for the constraint forces as follows:
\[C_j = \lambda_i \frac{\partial c_i}{\partial q_j} = J^T \lambda_i\]
Plugging that equation back into the augmented equation for Newton's law:
\[ \left ( -JWJ^T \right ) \lambda = JWQ + \dot{J}\dot{q} + c_{tt}\]
Note that the only unknowns here are the Lagrange multipliers.

Attempt at an Explanation of the Constraint Force Equation


If you're confused at how Witkin got that equation for the constraint forces, that's normal. I'll attempt to relate it to something easier to visualize and understand: surfaces. Let's take a look at the equation of a quadric surface:
\[Ax^2+By^2+Cz^2+Dxy+Eyz+Fxz+Gx+Hy+Iz+J=0\]
The capital letters denote constants. Notice also the equation is implicit. We can see the equation for an ellipse is a quadric surface:
\[f(x,y,z) = (1/a^2)x^2+(1/b^2)y^2+(1/c^2)z^2-1=0\]
For a point (x,y,z) to be on the surface, it must satisfy this equation. To put it into more formal math terms, we could say the surface takes a point in \(\mathbb{R}^3\) and maps it to the zero vector in \(\mathbb{R}\), which is just 0. Any movement on this surface is "legal" because the new point will still satisfy the surface equation. If we were to take the gradient of this ellipse equation, we'd get:
\[ \left [ \begin{matrix} \frac{\partial f}{\partial x} \\ \frac{\partial f}{\partial y} \\ \frac{\partial f}{\partial z} \\ \end{matrix} \right ] = \left [ \begin{matrix} \frac{2x}{a^2} \\ \frac{2y}{b^2} \\ \frac{2z}{c^2} \\ \end{matrix} \right ] \]
This vector is the normal to the surface at the given (x,y,z) coordinates. If we were to visualize a plane tangent to the ellipse at that point, the dot product of the normal and the tangent plane would be zero by definition.

With this same type of thinking, we can see the constraints as a type of algebraic surface since they're also implicit equations (it's hard to visualize these surface's geometrically since they can be n-dimensional). Just like with the geometry example, if we were to take the gradient of the constraints the resulting vector would be orthogonal to a tangent plane on the surface. In more formal math terms, the constraints/surfaces can be called the null space since it contains all the points (vectors) that map to the zero vector. The gradients/normals to these constraints is termed the null space complement. The constraint force equation produces vectors that lie in the null space complement, and are therefore orthogonal to the constraint surface.

The purpose of these math terms are to help generalize this concept (which is simple to understand geometrically) for use in situations where the problems are not easy to visualize or intuitively understand.

Calculating the State


With these equations in place, the process of calculating the system state can now be summed up as follows:

  1. Construct the \(W\), \(J\), \(\dot{J}\), \(c_{tt}\) matrices.
  2. Multiply and solve the \(Ax=b\) problem for the Lagrange multipliers \(\lambda\).
  3. Compute the constraint accelerations using \(C = MJ^T \lambda\).
  4. Compute the accelerations using \(\ddot{q} = W(C+Q)\).
  5. Integrate the accelerations to get the new velocities \( \dot{q}(t) \) and positions \( q(t) \).

This process can be optimized to take advantage of sparsity in the matrices. The Jacobian matrix wll generally be sparse since the constraints won't generally depend on a large number of particles. The inverse of the mass matrix This can help with the matrix multiplication on both sides. The main challenge will be in building these matrices.

Feedback


Due to numerical error, there will be a tendency to drift away from the proper solution. Recall that in order to derive the modified Newton's law equation above, we forced \( c_i = 0 \) and \( \dot{c_i} = 0 \). Numerical error can produce solutions that won't satisfy these equations within a certain tolerance, so we can use a method used in control systems engineering: the PID loop.

In most systems we want to control, there are inputs to the system (force, etc.) and measurements of a system's state (angle, position, etc.). A PID loop feeds the error in the actual and desired state back into the force inputs to drive the error to zero. For example, the human body has many different inputs to the force on the muscles when we stand upright. The brain measures many different things to see if we're centered on our feet or if we're teetering to one side or another. If we're falling or we're off-center, the brain makes adjustments to our muscles to stay upright. A PID loop does something similar by measuring the error and feeding that back into the inputs. If done correctly, the PID system will drive the error in the measured state to zero by changing the inputs to the system as needed.

Here, we use the error in the constraint and the constraint derivative to feedback into the system to better control the numerical drift. We augment the forces by adding terms that account for the \(c_i =0\) and \(\dot{c_i}=0\):
\[ F_j = Q_j + C_j + \alpha c_i \frac{\partial c_i}{\partial q_j} + \beta \dot{c_i} \frac{\partial c_i}{\partial q_j} \]
This isn't a true force being added since these extra terms will vanish when the forces are correct. This is just to inhibit numerical drift, so the constants \(\alpha\) and \(\beta\) are "magic", meaning that they are determined empirically to see what "fits" better.

Conclusion


Witkin's method for interactive simulations is pretty widely applicable. Although this can be obviously used for movable truss structures and models of Tinkertoys, he also talks about using them for deformable bodies, non-linear optimization and keyframe animation as well. There are lots of applications of this method. Hopefully this showcase of Witkin's method will help make this interesting solution more accessible to anyone doing any type of simulation engines.

Article Update Log


27 Aug 2015: Initial release

A Rudimentary 3D Game Engine, Built with C++, OpenGL and GLSL

$
0
0
“What we’ve got here is failure to communicate. Some men you just can’t reach.” - The Captain, Cool Hand Luke

Introduction


In a way, this article is the continuation of the post I published about a year ago, on my little self inflicted course on game development, which I had embarked on despite all advice to the contrary. I had been told that using a ready-made game engine was the way to go for starters. At the time I had gotten down all the basics for rendering and animating a model of a goat I had created in Blender.

The Concept


What has happened between then and now is that I have completed the game, making the goat controllable via the keyboard, adding a flying bug that chases it and developing the game logic, together with sound, collision detection and a tree, to make the 3D scene a bit more interesting. So as to be able to reuse a lot of the code I have written, I have reorganised the project, converting it from a one-off game codebase to a little game engine (I have named it small3d) which comes packaged with the game as its sample use case. So we now have a full game:


The engine abstracts away enough details for me to be able to play around with some effects, like rapid nightfall:


Just to see if the camera is robust or if I was just lucky positioning it in the right place, I have also tried sticking it on the bug, so as to see the scene through its eyes, as it chases the goat:


I suppose it can be said that small3d is not really a game engine but a renderer packed with some sound and collision detection facilities. This is the current list of features:
  • Developed in C++
  • Using OpenGL (v3.3 if available, falling back to v2.1 if not)
  • Using GLSL (no fixed pipeline)
  • Plays sounds
  • Offers bounding box collision detection
  • Reads models from Wavefront files and renders them
  • Provides animation out of a series of models
  • Textures can be read from PNG files and mapped to the models
  • Alternatively the models can be assigned a single colour
  • PNG files can also be rendered as independent rectangles
  • Provides text rendering
  • Provides basic lighting
  • Provides camera positioning
  • It has been released with a permissive license (3 – clause BSD) and only libraries with the same or similar licenses are referenced
  • Allows for cross-platform compilation. It has been tested on Windows 7, 8 and 10, OSX and Debian.
  • It is available via a dependency manager
The codebase is relatively small and easy to understand. Once you have gotten the hang of it, you can either choose to keep using it and maybe even contribute, use parts of it, or abandon it altogether and start doing your own thing, using what you have learned.

Design & Architecture


These are the main classes that make up the engine:


Attached Image: design.png


A <SceneObject> is any solid body that appears on the screen, be that a character (like the goat) or an inanimate object, like the tree. The <SceneObject> is represented visually by <Models>, which are loaded from <WaveFront> files by the <WaveFrontLoader>. <ModelLoader> is a generalisation of <WaveFrontLoader>, which provides the option of developing loaders for other file formats in the future, always conforming to the same interface. The <SceneObject> can also accept an <Image> to be mapped on the <Model>. Finally, if some boxes are created in a tool like Blender, properly positioned over a model and exported to a separate Wavefront file, the <SceneObject> can pick them up using the <BoundingBoxes> class and provide some basic collision detection.

The <Renderer> can render <Models> provided by the <SceneObjects>. It uses the <Image> class, either for holding textures to be mapped to the <Models>, or to be rendered as separate rectangles. These rectangles work as objects of the scene themselves and can be used for representing the ground, the sky, splash screens, etc.

The <Text> class can be used to load text and display it on the screen, via the <Renderer>.

The <Sound> class works as a sound library, loading sounds into <SoundData> objects and playing them when given the relevant instruction.

Finally, the <Exception> and <Logger> classes are used throughout the engine for reporting errors and logging, as their names imply. They can also be used by the code of each game being developed with the engine.

Even though I have avoided utilising a lot of pre-developed game facilities, some library dependencies were necessary. This is what a typical game would look like in relation to the engine and these referenced components:


Attached Image: components.png


There is no limitation for the game code to only go through the engine for everything it is developed to do. This allows for flexibility and, as a matter of fact, sometimes it is necessary to use some of the features from the libraries directly. For example, the engine does not provide user input facilities. The referenced SDL2 library is very good at that so it is left to the developer to use it directly.

Dependency Management


An interesting feature I was able to experiment with and provide for this project, is dependency management. I have discovered a service called Biicode, which allowed me to do that.

Biicode can receive projects that support CMake, with minor and (if done well) non-intrusive modifications to their CMakeFile.txt. Each project can reference other projects (library source code in effect) hosted on the service, and Biicode will analyse the dependencies and automatically download and compile them during builds. All the developer has to do is add an #include statement with the address of a desired .h file from a project hosted on the service and Biicode will do the rest. I suppose it can be said that it is an equivalent of Nuget or Maven, but for C++.

The reason I have chosen to use this service, even though it is relatively new, was speed of development. CMake is fantastic on its own as well, but setting up and linking libraries is a time-consuming procedure especially when working cross-platform or switching between debug and release builds. Since Biicode will detect the files needed from each library and download and compile them on the fly, the developer is spared the relevant intricacies of project setup.

I am not mentioning all of this to advertise the service. I find it very useful but my first commitment is to the game engine. Biicode is open source, so even if the service in its present form were to become unavailable at some point, I would either figure out how to set it up locally, go back to plain vanilla CMake (maybe with ExternalProject_Add, which would still be more limited feature-wise) or look for another dependency manager. But the way things stand right now, it is the best solution for my little project.

Conclusion


This article does not contain any step-by-step instructions on using the engine because, looking through the code which I have uploaded, I believe that a lot of things will be made very clear. Also, see the references below for further documentation.

You will need to get started with Biicode in order for the code to compile (or convert the project to a simple CMake project, even though that will take more time).

I hope that the provided code and information will help some developers who have chosen to do things the slow way move faster in their learning than I had to. There is a lot of information available today about how to set up OpenGL, use shaders and the like. The problem is that it might be too much to absorb on one go and little technical details, like which data types to use when pushing triangles to the GPU, or C++ command differences between different operating systems, can take a long time to sort out.

Using my code, you can either develop your own little game quickly, help me improve this engine, or keep going on your own learning path, referring here from time to time when something you read in a book or tutorial does not work out exactly the way it is supposed to. I am using this engine to develop my own games so, whatever its disadvantages, I am putting a lot of effort into maintaining it operational at all times.

References


[1] small3d.org
[2] Version of small3d, corresponding to this article, on Biicode

Math for Game Developers: Advanced Vectors

$
0
0
Math for Game Developers is exactly what it sounds like - a weekly instructional YouTube series wherein I show you how to use math to make your games. Every Thursday we'll learn how to implement one game design, starting from the underlying mathematical concept and ending with its C++ implementation. The videos will teach you everything you need to know, all you need is a basic understanding of algebra and trigonometry. If you want to follow along with the code sections, it will help to know a bit of programming already, but it's not necessary. You can download the source code that I'm using from GitHub, from the description of each video. If you have questions about the topics covered or requests for future topics, I would love to hear them! Leave a comment, or ask me on my Twitter, @VinoBS

Note:  
The video below contains the playlist for all the videos in this series, which can be accessed via the playlist icon at the top of the embedded video frame. The first video in the series is loaded automatically


Advanced Vectors


Problems Found in Appleseed Source Code

$
0
0
The majority of the projects we report about in these articles contain dozens of PVS-Studio analyzer warnings. Of course we choose just a small portion of data from the analyzer report to be in our articles. There are some projects though, where the quantity of warnings is not that high and the number of some interesting "bloomers" is just not enough for an article. Usually these are small projects, which ceased developing. Today I'm going to tell you about Appleseed project check, the code of which we found quite high-quality, from the point of view of the analyzer.

Introduction


Appleseed is a modern, open source, physically-based rendering engine designed to produce photorealistic images, animations and visual effects. It provides individuals and small studios with an efficient, reliable suite of tools built on robust foundations and open technologies.

This project contains 700 source code files. Our PVS-Studio analyzer found just several warnings of 1st and 2nd level that could be of interest to us.

Check Results


V670 The uninitialized class member m_s0_cache is used to initialize the m_s1_element_swapper member. Remember that members are initialized in the order of their declarations inside a class. animatecamera cache.h 1009

class DualStageCache
  : public NonCopyable
{
  ....
    S1ElementSwapper    m_s1_element_swapper;     //<==Line 679
    S1Cache             m_s1_cache;

    S0ElementSwapper    m_s0_element_swapper;
    S0Cache             m_s0_cache;               //<==Line 683
};

FOUNDATION_DSCACHE_TEMPLATE_DEF(APPLESEED_EMPTY)
DualStageCache(
    KeyHasherType&      key_hasher,
    ElementSwapperType& element_swapper,
    const KeyType&      invalid_key,
    AllocatorType       allocator)
  : m_s1_element_swapper(m_s0_cache, element_swapper)//warning...
  // warning: referring to an uninitialized member
  , m_s1_cache(m_s1_element_swapper, allocator)
  , m_s0_element_swapper(m_s1_cache)
  , m_s0_cache(key_hasher, m_s0_element_swapper, invalid_key)
{
}

The analyzer found a possible error in the constructor class initialization. Judging by the comment: "warning: referring to an uninitialized member", which has already been in the code, we see that the developers know that for the m_s1_element_swapper field initialization another uninitialized m_s0_cache field may be used. They are not correcting it though. According to the language standard, the order of initialization of the class members in the constructor goes in their declaration order in the class.

V605 Consider verifying the expression: m_variation_aov_index < ~0. An unsigned value is compared to the number -1. appleseed adaptivepixelrenderer.cpp 154

size_t m_variation_aov_index;
size_t m_samples_aov_index;

virtual void on_tile_end(
                         const Frame& frame,
                         Tile& tile,
                         TileStack& aov_tiles) APPLESEED_OVERRIDE
{
  ....
  if (m_variation_aov_index < ~0)                           //<==
    aov_tiles.set_pixel(x, y, m_variation_aov_index, ....);

  if (m_samples_aov_index != ~0)                            //<==
    aov_tiles.set_pixel(x, y, m_samples_aov_index, ....);
  ....
}

The inversion result of ~0 is -1, having the int type. Then this number converts into an unsigned size_t type. It's not crucial, but not really graceful. It is recommended to specify a SIZE_MAX constant in such expression right away.

At first glance there is no evident error here. But my attention was drawn by the usage of two different conditional operators, though both conditions check the same. The conditions are true if the variables are not equal to the maximum possible size_t type value (SIZE_MAX). These checks are differently written. Such a code looks very suspicious; perhaps there can be some logical error here.

V668 There is no sense in testing the 'result' pointer against null, as the memory was allocated using the 'new' operator. The exception will be generated in the case of memory allocation error. appleseed string.cpp 58

char* duplicate_string(const char* s)
{
    assert(s);

    char* result = new char[strlen(s) + 1];

    if (result)
        strcpy(result, s);

    return result;
}

The analyzer detected a situation when the pointer value, returned by the new operator, is compared to null. We should remember, that if the new operator could not allocate the memory, then according to the C++ language standard, an exception std::bad_alloc() would be generated.

Thus in the Appleseed project, which is compiled into Visual Studio 2013, the pointer comparison with null will be meaningless. One day such function usage can lead to an unexpected result. It is assumed that the duplicate_string() function will return nullptr if it can't create a string duplicate. It will generate an exception instead, that other parts of the program may be not ready for.

V719 The switch statement does not cover all values of the 'InputFormat' enum: InputFormatEntity. appleseed inputarray.cpp 92

enum InputFormat
{
    InputFormatScalar,
    InputFormatSpectralReflectance,
    InputFormatSpectralIlluminance,
    InputFormatSpectralReflectanceWithAlpha,
    InputFormatSpectralIlluminanceWithAlpha,
    InputFormatEntity
};

size_t add_size(size_t size) const
{
    switch (m_format)
    {
      case InputFormatScalar:
        ....
      case InputFormatSpectralReflectance:
      case InputFormatSpectralIlluminance:
        ....
      case InputFormatSpectralReflectanceWithAlpha:
      case InputFormatSpectralIlluminanceWithAlpha:
        ....
    }

    return size;
}

And where is the case for InputFormatEntity? This switch() block contains neither a default section, nor a variable action with the InputFormatEntity value. Is it a real error or did the author deliberately miss the value?

There are two more fragments (cases) like that:
  • V719 The switch statement does not cover all values of the InputFormat enum: InputFormatEntity. appleseed inputarray.cpp 121
  • V719 The switch statement does not cover all values of the InputFormat enum: InputFormatEntity. appleseed inputarray.cpp 182
If there is no default section and handling of all variable values, you may possibly miss the code addition for a new InputFormat value and not be aware of that for a very long time.

V205 Explicit conversion of pointer type to 32-bit integer type: (unsigned long int) strvalue appleseed snprintf.cpp 885

#define UINTPTR_T unsigned long int

int
portable_vsnprintf(char *str, size_t size, const char *format,
                                                    va_list args)
{
  const char *strvalue;
  ....
  fmtint(str, &len, size,
              (UINTPTR_T)strvalue, 16, width,               //<==
              precision, flags);
  ....
}

Finally we found quite a serious error that shows up in a 64-bit version of the program. Appleseed is a cross-platform project that can be compiled on Windows and Linux. To get the project files we use Cmake. In the Windows compilation documentation it is suggested to use "Visual Studio 12 Win64" that's why except the general diagnostics (GA, General Analysis), I've also looked through the diagnostics of 64-bit errors (64, Viva64) of the PVS-Studio analyzer.

The full identification code of UINTPTR_T macro looks like this:

/* Support for uintptr_t. */
#ifndef UINTPTR_T
#if HAVE_UINTPTR_T || defined(uintptr_t)
#define UINTPTR_T uintptr_t
#else
#define UINTPTR_T unsigned long int
#endif /* HAVE_UINTPTR_T || defined(uintptr_t) */
#endif /* !defined(UINTPTR_T) */

The uintptr_t is an unsigned, integer memsize-type that can safely hold a pointer no matter what the platform architecture is, although for Windows compilation was defined unsigned long int type. The type size depends on the data model, and unlike Linux OS, the long type is always 32-bits in Windows. That's why the pointer won't fit into this variable type on Win64 platform.

Conclusion


All in all the Appleseed project, which is quite a big one, contains only a few analyzer's warnings. That's why it proudly gets a medal "Clear Code" and can no longer be afraid of our unicorn.


Attached Image: image2.png

Preview: Reliable UDP implementation, lockstep, LAN, and parity bit checking

$
0
0

Introduction


Whether you're interested in making an FPS or RTS, you've probably heard that you should use UDP. It's probably because of its speed. Using TCP with the TCP_NODELAY option (which means it doesn't wait for enough data to be buffered before sending) may not be enough as TCP also does congestion control and you may want to do voice chat, which is better done using a lossy protocol like UDP. TCP doesn't allow you to adjust the “sliding window”, which means you might not reach the full speed of the communication channel if it has a high delay (search for “bandwidth-delay factor” for more information). If one packet doesn't arrive in TCP and is lost, TCP stops all traffic flow until it arrives, resulting in pauses. The packet header in TCP is also 20 bytes, as opposed to 6 bytes in UDP plus a few for reliability. Combining TCP and UDP is not an option as one induces packet loss in the other. So you should use UDP, but how do you guarantee packets are delivered and in the order they were sent in? Also, if you're making an RTS, how do you make sure that clients are running exactly the same simulation? A small change can cause a butterfly effect and be the difference between one player winning and losing. For this you need reliable UDP (RUDP) and lockstep. In addition, you probably want to use the latest client-server methodology, which allows the game to not be held back by the slowest player, as is done in the older peer-to-peer model. Along the way we'll cover parity bit checking to ensure packet correctness and integrity. We'll also cover LAN networking and setting up a matchmaking server.

Note:  This free article version covers only the UDP implementation. If you are interested in the full-breadth of the topic discussed above, you can purchase the complete 70-page PDF document on the GDNet Marketplace.


Library


The library that I use for networking is SDL2_net. This is just abstraction of networking to allow us to deploy to different platforms like Windows, Linux, iPhone, and Android. If you want, you can use WinSock or the native networking functions of Linux. They're all pretty much the same, with a few differences in initialization and function names. But I would recommand SDL2_net as that is cross-platform. Watch for a possible article on setting up and compiling libraries for details on how to set up SDL2_net for use in your projects if you aren't able to do this yourself. By the way, if you're doing voice chat, try PortAudio for getting microphone input on Windows, Mac, and Linux. For transmitting you'd need Speex or the newer Opus speech codec for encoding the data.

Packet Header


So let's jump in. The way you will keep track of the order packets are sent in and also guarantee delivery is by using an ack or sequence number. We will make a header that will be at the beginning of each packet we send. We also need to know what kind of packet this is.

struct PacketHeader
{
	unsigned short type;
	unsigned short ack;
};

To make sure the compiler packs the packet data as tightly as possible, to reduce network data usage, we can remove byte padding by putting this around all of our packet definitions.

// byte-align structures
#pragma pack(push, 1)

//.. packets go here ÃÃÃâÃÃÃæ

// default alignment
#pragma pack(pop)

By the way, they're not really packets; packets are what we use in TCP, but the subset in UDP is called a datagram. UDP stands for “user datagram protocol”. But I call them packets.

Control/Protocol Packets


Let's define some control/protocol packets that will be part of our reliable UDP protocol.

#define PACKET_NULL						0
#define PACKET_DISCONNECT				1
#define PACKET_CONNECT					2
#define PACKET_ACKNOWLEDGMENT			3
#define PACKET_NOCONN					4
#define PACKET_KEEPALIVE					5
#define PACKET_NACK						6

struct BasePacket
{
	PacketHeader header;
};

typedef BasePacket NoConnectionPacket;
typedef BasePacket AckPacket;
typedef BasePacket KeepAlivePacket;

struct ConnectPacket
{
	PacketHeader header;
	bool reconnect;
	unsigned short yourlastrecvack;
	unsigned short yournextrecvack;
	unsigned short yourlastsendack;
};

struct DisconnectPacket
{
	PacketHeader header;
};

We will send a ConnectPacket to establish a new connection to a computer that is listening on a certain port. If you're behind a router and have several computers behind it, your router doesn't know which computer to forward an incoming connection to unless that computer has already sent data from that port outside. This is why a matchmaking server is needed, unless playing on LAN. More will be covered later.

We will send a DisconnectPacket to end a connection. We need to send an AckPacket (acknowledgment) whenever we receive a packet type that is supposed to be reliable (that needs to arrive and be processed in order and cannot be lost). If the other side doesn't receive the ack, it will keep resending until it gets one or times out and assumes the connection to be lost. This is called “selective repeat” reliable UDP.

Occasionally, we might not need to send anything for a long time but tell the other side to keep our connection alive, for example if we've connected to a matchmaking server and want to tell it to keep our game in the list. When this happens, we need to send a KeepAlivePacket.

Almost all of these packets are reliable, as defined in the second paragraph on this page, except for the AckPacket and NoConnectionPacket. When we're first establishing a connection, we will use the ack number to set as the start of our sequence. When there's an interruption and the other side has dropped us due to timeout, but we still have a connection to them, they will send a NoConnectionPacket, which is not reliable, but is sent every time we receive a packet from an unknown source (whose address we don't recognize as having established a connection to). Whenever this happens, we have to do a full reconnect as the sequence/ack numbers can't be recovered. This is important because we will have a list of packets that we didn't get a reply to that we will resend that need to be acknowledged. You will understand more as we talk about how ack/sequence numbers work.

Lastly, the AckPacket's ack member is used to tell the other side which packet we're acknowledging. So an ack packet is not reliable, and is sent on an as-needed basis, when we receive a packet from the other side.

User Control/Protocol Packets


The rest of the packet types are user-defined (that's you) and depend on the type of application needed. If you're making a strategy game, you'll have a packet type to place a building, or to order units around. But there are also some control/protocol packets needed that are not part of the core protocol. These are packets for joining game sessions, getting game host information, getting a list of game hosts, informing a game client that the game room is full or that his version is older. Here are some suggested packet types for a multiplayer RTS or any kind of strategy game, but may also apply to FPS. These are used after a connection has been established.

#define PACKET_JOIN						7
#define PACKET_ADDSV					8
#define PACKET_ADDEDSV					9
#define PACKET_GETSVLIST					10
#define PACKET_SVADDR					11
#define PACKET_SVINFO					12
#define PACKET_GETSVINFO					13
#define PACKET_SENDNEXTHOST				14
#define PACKET_NOMOREHOSTS				15
#define PACKET_ADDCLIENT					16
#define PACKET_SELFCLIENT				17
#define PACKET_SETCLNAME				18
#define PACKET_CLIENTLEFT				19
#define PACKET_CLIENTROLE				20
#define PACKET_DONEJOIN					21
#define PACKET_TOOMANYCL				22
#define PACKET_MAPCHANGE				23
#define PACKET_CLDISCONNECTED			24
#define PACKET_CLSTATE					25
#define PACKET_CHAT						26
#define PACKET_MAPSTART					27
#define PACKET_GAMESTARTED				28
#define PACKET_WRONGVERSION				29
#define PACKET_LANCALL					30
#define PACKET_LANANSWER				31

Lockstep Control Packets


Once a game has been joined and started, RTS games also need to control the simulation to keep it in sync on all sides. A class of packet types that control the lockstep protocol we will call the lockstep control packets.

#define PACKET_NETTURN					29
#define PACKET_DONETURN					30

User Command / In-Game Packets


Any user command or input that effects the simulation needs to be bundled up inside a NetTurnPacket by the host and sent to all the clients as part of lockstep. But first it is sent to the host on its own. More on this later. Here are some example packets I use.

#define PACKET_PLACEBL					32
#define PACKET_CHVAL					33
#define PACKET_ORDERMAN					34
#define PACKET_MOVEORDER				35
#define PACKET_PLACECD					36

Initialization


You should really read some C/C++ UDP or SDL2_net UDP example code before you try to proceed with this, and the basics of that are not what I'm covering here. But nevertheless, I will mention that you need to initialize before you use SDL2_net or WinSock.

	if(SDLNet_Init() == -1) 
	{ 
		char msg[1280]; 
		sprintf(msg, "SDLNet_Init: %s\n", SDLNet_GetError());
		SDL_ShowSimpleMessageBox(SDL_MESSAGEBOX_ERROR, "Error", msg, NULL);
	}


Here are some examples for low-level (not using SDL) UDP networking:

https://www.cs.rutgers.edu/~pxk/417/notes/sockets/udp.html
http://www.binarytides.com/programming-udp-sockets-c-linux/
http://www.codeproject.com/Articles/11740/A-simple-UDP-time-server-and-client-for-beginners

They all cover the same material. You just need to know the basics of how to intialize, send data, and receive data using UDP (not TCP).

Net Update Loop


So somewhere in your frame loop, where you update your game state and render everything, you will add a call to UpdNet, which will process received packets. The skeleton of it will look roughly like this.

//Net input 
void UpdNet() 
{ 
	int bytes; 

	UDPpacket *in; 

	UDPsocket* sock = &g_sock; 

	if(!sock) 
		return; 

	in = SDLNet_AllocPacket(65535); 

	do 
	{ 
		in->data[0] = 0; 

		bytes = SDLNet_UDP_Recv(*sock, in); 

		IPaddress ip; 

		memcpy(&ip, &in->address, sizeof(IPaddress)); 

		if(bytes > 0) 
			TranslatePacket((char*)in->data, bytes, true, &g_sock, &ip); 
	} while(bytes > 0); 

	SDLNet_FreePacket(in); 
}

Following, inside the do-while loop, is the equivalent code in regular Berkeley sockets using recvfrom, in case you're not using SDL2_net:

//Net input 
void UpdNet() 
{ 
	int bytes; 

	int* sock = &g_sock; 

	if(!sock) 
		return; 

	do 
	{
		struct sockaddr_in from; 
		socklen_t fromlen = sizeof(struct sockaddr_in); 
		char buffer[65535]; 
		bytes = recvfrom(g_socket, buffer, 65535, 0, (struct addr *)&from, &fromlen); 

		if(bytes > 0) 
			TranslatePacket(buffer, bytes, true, &g_sock, &ip); 
	} while(bytes > 0); 
}

This basically loops while we still have data to process in the buffer. If we do, we send it to the TranslatePacket function, which takes as parameters:

  • the buffer of data (“buffer”)
  • the number of bytes received (“bytes”)
  • whether we want to check the acknowledgement/sequence number and process it in order (“checkprev”), as we might choose to send a dummy packet that we stored to reuse our command switch functionality for lockstep batch packets, or whether we want to process it right away
  • the socket (“sock”)
  • and the IP address and port it came from (“from”).

void TranslatePacket(char* buffer, int bytes, bool checkprev, UDPsocket* sock, IPaddress* from)

We will get to TranslatePacket next, but first take a look at these function calls we will also have at the end of the UpdNet function.

	KeepAlive(); 
	CheckConns(); 
	ResendPacks(); 

#ifndef MATCHMAKER 
	CheckAddSv(); 
	CheckGetSvs(); 
#else 
	SendSvs(); 
#endif 

KeepAlive() tries to keep connections alive that are about to time out. CheckConns() checks for connections that we've closed or that have timed out from unresponsiveness and recycles them. ResendPacks() tries to resend packets that we haven't received an acknowledgement for, once they've waited long enough.

Then we have a preprocessor check to see whether we're compiling for the matchmaking server or the client program/app. If we're a game client or host, we only care about CheckAddSv() and CheckGetSv().

CheckAddSv() checks whether our game host address is up on the matchmaker list and getting the information on each one of the received hosts. It also removes hosts from our list that we have lost a connection too (due to time out).

CheckGetSv() makes sure the matchmaker will send us the next host from its list if we've requested to get a host list.

If we're the matchmaker however, we only care about SendSvs(), which sends the next host in the list for each requesting client when the last one has been ack'd.

Connection Class


Because there's no concept of a connection in UDP, we need to make it ourselves.

class NetConn
{
public:
	unsigned short nextsendack;
	unsigned short lastrecvack;
	bool handshook;
	IPaddress addr;
	//TODO change these to flags
	bool isclient;	//is this a hosted game's client? or for MATCHMAKER, is this somebody requesting sv list?
	bool isourhost;	//is this the currently joined game's host? cannot be a host from a server list or something. for MATCHMAKER, it can be a host getting added to sv list.
	bool ismatch;	//matchmaker?
	bool ishostinfo;	//is this a host we're just getting info from for our sv list?
	//bool isunresponsive;
	unsigned long long lastsent;
	unsigned long long lastrecv;
	short client;
	float ping;
	bool closed;
	bool disconnecting;

	void expirein(int millis);

#ifdef MATCHMAKER
	int svlistoff;	//offset in server list, sending a few at a time
	SendSvInfo svinfo;
#endif
	//void (*chcallback)(NetConn* nc, bool success);	//connection state change callback - did we connect successfully or time out?

	NetConn()
	{
		client = -1;
		handshook = false;
		nextsendack = 0;
		//important - reply ConnectPacket with ack=0 will be
		//ignored as copy (even though it is original) if new NetConn's lastrecvack=0.
		lastrecvack = USHRT_MAX;
		isclient = false;
		isourhost = false;
		ismatch = false;
		ishostinfo = false;
		//isunresponsive = false;
		lastrecv = GetTicks();
		lastsent = GetTicks();
		//chcallback = NULL;
#ifdef MATCHMAKER
		svlistoff = -1;
#endif
		ping = 1;
		closed = false;
	}
};

“nextsendack” is the outgoing sequence number that the next reliable packet will have. We increment it by one each time and it wraps around from 0 when it maxes out.

“lastrecvack” is the inbound sequence number of the last received reliable packet (the next one will be greater until it wraps around). Because we can send and receive independently, we keep two acks/sequences.

When we start a connection, “nextsendack” is 0 (for the first packet sent, the ConnectPacket), and “lastrecvack” is 65535, which is the maximum unsigned short value, before it wraps around to 0. Although nextsendack can be set to anything (and should) as long as we set the ack of the first ConnectPacket to that, and that is more secure, as it is harder to predict or crack and probably protects data better (but I haven't tried it).

“handshook” tells us whether the other side has acknowledged the ConnectPacket (and therefore created an accompanying NetConn connection instance for us). When we receive a ConnectPacket, we set “handshook” to true and acknowledge them, recording the inbound ack and setting “nextsendack” to 0. If “handshook” is true, it tells us that we can now send reliable packets on the connection to this address, as the sequence numbers are in place.

IPaddress is the SDL2_net IP address and port structure, the equivalent of sockaddr_in in regular Berkeley sockets.

Translating Packets


This is what TranslatePacket does. When we “translate” or process the packet we want to know if it's an old packet that we've already processed once or if it's ahead of the next expected packet, if it's meant to be reliable as defined previously. We also acknowledge any packets that are reliable. And then finally we execute them. The game host does an extra part in beginning of the function, checking if any client connections are unresponsive or have become responsive again and relays that information to other clients, so the blame can be pinned on the lagger.

The TranslatePacket() function has this basic outline:

1. Match address to a connection
2. Update last received timestamp if match found
3. Check packet type if we need to check sequence number or if we process it right away
4. Check sequence number for one of three cases (behind, current, or future)
5. Acknowledge packet if needed
6. If we don't recognize the connection and it's supposed to be reliable, tell the other side that we don't have a connection with them
7. Execute the packet
8. Execute any buffered packets after the current one (in order)
9. And update the last received sequence number to the last packet executed

Step by step, the function is:

void TranslatePacket(char* buffer, int bytes, bool checkprev, UDPsocket* sock, IPaddress* from)
{
	//1. Match address to a connection
	PacketHeader* header = (PacketHeader*)buffer;

	NetConn* nc = Match(from);

We pass an IPaddress struct pointer to Match which returns the matching connection or NULL on failure.

Then, if we got a match, we update the last received time for the connection. If the connection is associated with client in the game room, and that client was previously unresponsive, we can mark it as responsive again and tell the other clients.

	//If we recognize this connection...
	if(nc)
	{
		//2. Update the timestamp of the last received packet
		nc->lastrecv = GetTicks();

#ifndef MATCHMAKER
		//check if was previously unresponsive
		//and if (s)he was, tell others that (s)he
		//is now responsive.
		if(nc->client >= 0)
		{
			Client* c = &g_client[nc->client];

			//was this client unresponsive?
			if(c->unresp)
			{
				//it's now responsive again.
				c->unresp = false;

				//if we're the game host
				if(g_netmode == NETM_HOST)
				{
					//inform others
					ClStatePacket csp;
					csp.header.type = PACKET_CLSTATE;
					csp.chtype = CLCH_RESP;
					csp.client = nc->client;

					//send to all except the original client (nc->addr)
					SendAll((char*)&csp, sizeof(ClStatePacket), true, false, &nc->addr);
				}
			}
		}
#endif
	}

We know that certain packets are meant to be processed right away, without checking for them to be processed in sequence. For example, acknowedgement packets are non-reliable and don't need to be processed in a specific order. Connect packets are to be executed as soon as they are received, because no other packet is supposed to be sent with them. Same for disconnect packets, “no connection” packets, LAN call, and LAN answer.

	//3. Check packet type if we need to check sequence number or if we process it right away
	//control packets
	//don't check sequence for these ones and process them straight away
	//but acknowledge CONNECT and DISCONNECT
	switch(header->type)
	{
	case PACKET_ACKNOWLEDGMENT:
	case PACKET_CONNECT:	//need to send back ack
	case PACKET_DISCONNECT:	//need to send back ack
	case PACKET_NOCONN:
	case PACKET_NACK:
	case PACKET_LANCALL:
	case PACKET_LANANSWER:
		checkprev = false;
		break;
	default:
		break;
	}

If it's not one of those packet types, checkprev=true, and we check the sequence number. These are reliable packets that must be processed in the order they were sent in. If we're missing a packet in the sequence, we will buffer the packets after it while we wait for the missing packet to arrive.

“next” will be the next expected sequence number (the one after lastrecvack in NetConn). “last” will be updated each time we execute a packet, to update lastrecvack with the last one.

	unsigned short next;	//next expected packet ack
	unsigned short last = PrevAck(header->ack);	//last packet ack to be executed

	//4. Check sequence number for one of three cases (behind, current, or future)

	//If checkprev was set (directly above), we need to check the sequence.
	//It must be a recognized NetConn; otherwise we don't have any sequence numbers.
	if(checkprev && nc != NULL)
	{
		// ÃÃÃâÃÃÃæ check sequence number (check snippet further down) ...
	}

Then we acknowledge the packet if it's meant to be reliable. Acknowledgement packets don't need acknowledgements themselves. A “no connection” packet tells us the other side doesn't even have sequence numbers for us, so there's no point acknowledging it. Usually, if checkprev=false, we don't check the packet sequence so we don't care about acknowledging it, but for connect and disconnect packets we must acknowledge because the other side expects a success signal back.

	//5. Acknowledge packet if needed

procpack:

	//We might disconnect further down in PacketSwitch()
	//So acknowledge packets while we still have the sequence numbers
	nc = Match(from);
	//Don't acknowledge NoConn packets as they are non-reliable,
	//and ack'ing them would cause a non-ending ack loop.
	if(header->type != PACKET_ACKNOWLEDGMENT &&
		header->type != PACKET_NOCONN &&
		sock && nc)
	{
		Acknowledge(header->ack, nc, from, sock, buffer, bytes);
	}
	//Always acknowledge ConnectPacket's
	else if( header->type == PACKET_CONNECT &&
		sock )
	{
		Acknowledge(header->ack, NULL, from, sock, buffer, bytes);
 	}
	//And acknowledge DisconnectPacket's
	else if(header->type == PACKET_DISCONNECT && sock)
	{
		Acknowledge(header->ack, NULL, from, sock, buffer, bytes);
	}

If we got disconnected from the other side and for some reason they retained the connection, we'll get packets that we have to tell the other side we can't process. They can then show an error to the user or try to reconnect.

	//6. If we don't recognize the connection and it's supposed to be reliable, tell the other side that we don't have a connection with them

	//We're getting an anonymous packet.
	//Maybe we've timed out and they still have a connection.
	//Tell them we don't have a connection.
	//We check if sock is set to make sure this isn't a local
	//command packet being executed.
	if(!nc &&
	header->type != PACKET_CONNECT &&
	header->type != PACKET_NOCONN &&
	header->type != PACKET_LANCALL &&
	header->type != PACKET_LANANSWER &&
	sock)
	{
		NoConnectionPacket ncp;
		ncp.header.type = PACKET_NOCONN;
		SendData((char*)&ncp, sizeof(NoConnectionPacket), from, false, true, NULL, &g_sock, 0, NULL);
		return;
	}

Then we execute packets. First, any packets before the current received one. Then the one we just received. And then any that we buffered that come after it.

The reason we execute packets that came BEFORE is because we may have a case like this:

packet 1 received
packet 2 received
packet 5 received

We'll be able to execute packets 1 and 2 even though the current is 5.

updinack:

	//7. Execute the packet
	//8. Execute any buffered packets after the current one (in order)

	// Translate in order
	if(checkprev && nc)
	{
		last = PrevAck(header->ack);
		last = ParseRecieved(next, last, nc);
	}

	// Translate in order
	if(NextAck(last) == header->ack ||
		!checkprev)
	{
		PacketSwitch(header->type, buffer, bytes, nc, from, sock);
		last = header->ack;
	}

	// Translate in order
	if(checkprev && nc)
	{
		while(true)
		{
			if(!Recieved(last+1, last+1, nc))
				break;

			last++;
			ParseRecieved(last, last, nc);
		}
	}

Finally, we update the received sequence number. We have to match up the connection pointer with the address again, because the instance it was pointing to might have been erased, or it might have appeared when it wasn't previously, as a connection is erased or created respectively.

For non-reliable packets we don't update the sequence number. For connect or disconnect packets, we only set the sequence number inside the PacketSwitch read function call when we create a connection.

	//9. And update the last received sequence number to the last packet executed

	//have to do this again because PacketSwitch might
	//read a ConnectPacket, which adds new connections.
	//also connection might have
	//been Disconnected(); and erased.
	nc = Match(from);

	//ack Connect packets after new NetConn added...
	//Don't acknowledge NoConn packets as they are non-reliable
	if(header->type != PACKET_ACKNOWLEDGMENT &&
		header->type != PACKET_NOCONN &&
		sock && nc && checkprev)
	{
		if(header->type != PACKET_CONNECT &&
			header->type != PACKET_DISCONNECT)
			nc->lastrecvack = last;
	}
}

The PacketSwitch() at the end is what executes the packet. It might better be called ExecPacket().

The Match() function at the top compares the “addr” port and IP address integers to every known connection and returns the match, or NULL on failure.

NetConn* Match(IPaddress* addr)
{
	if(!addr)
		return NULL;

	for(auto ci=g_conn.begin(); ci!=g_conn.end(); ci++)
		if(Same(&ci->addr, addr))
			return &*ci;

	return NULL;
}

bool Same(IPaddress* a, IPaddress* b)
{
	if(a->host != b->host)
		return false;

	if(a->port != b->port)
		return false;

	return true;
}

The packet is “old” if we've already buffered it (but it's ahead of the next expected ack/sequence number that we processed), or if its ack/sequence is behind our connection class's “lastrecvack”. We use an unsigned short for the sequence number, which holds a maximum value of 65535. Because we might exceed this value after 36 minutes if we send 30 packets a second, we wrap around and thus, there's a “sliding window” of values that are considered to be in the past (don't confuse this with the “sliding window” packet range that might be being reliably resent at any given moment). We can check if an ack is in the past (behind what is already executed) using PastAck():

bool PastAck(unsigned short test, unsigned short current)
{
	return ((current >= test) && (current - test <= USHRT_MAX/2))
	       || ((test > current) && (test - current > USHRT_MAX/2));
}

Where PastAck tests whether “test” is behind or at “current”.

Let's look in more detail at the part in the middle of TranslatePacket that checks the sequence number.

We define some variables. “next” will hold the current expected ack (lastrecvack+1) inside the following code block. “last” will hold the last packet to have been executed. For now, it's set to something, but it doesn't matter, as we update it at the end.

	unsigned short next;	//next expected packet ack
	unsigned short last = PrevAck(header->ack);	//last packet ack to be executed

We only check the sequence numbers if it's a packet that makes checkprev=true and if it's from a recognized connection.

	if(checkprev && nc != NULL)
	{

We set the “next” expected packet number.

		next = NextAck(nc->lastrecvack);	//next expected packet ack
		last = next;	//last packet ack to be executed

Next, we check how the received packet's sequence number compares to the next expected one.

		//CASE #1: ÃÃÃâoldÃÃÃâ packet
		if(PastAck(header->ack, nc->lastrecvack) || Recieved(header->ack, header->ack, nc))
		{
			Acknowledge(header->ack, nc, from, sock, buffer, bytes);
			return;
		}

		//CASE #2: current packet (the next expected packet)
		if(header->ack == next) 
		{
			// Translate packet
			last = next;
		} 

		//CASE #3: an unbuffered, future packet
		else  // More than +1 after lastrecvack?
		{
			/*
			last will be updated to the last executed packet at the end.
			for now it will hold the last buffered packet to be executed.
			*/
			unsigned short checklast = PrevAck(header->ack);

			if(Recieved(next, checklast, nc))
			{
				// Translate in order
				last = checklast;
				goto procpack;
			}
			else
			{
				AddRecieved(buffer, bytes, nc);

				if(Recieved(next, checklast, nc))
				{
					// Translate in order
					last = checklast;
					goto procpack;
				}
				else
				{
					//TODO
					//how to find which ack was missed, have to go through all buffered
					//this is something somebody smart can do in the future
					//NAckPacket nap;
					//nap.header.type = PACKET_NACK;
					//nap.header.ack =
				}
			}
		}
	}

As can be seen, there are three possible cases for the inbound packet's sequence number: it is either, 1.) behind or buffered, 2.) current expected, or 3.) future unbuffered.

Case 1: behind and buffered received packets


If we've already dealt with (executed) the packet, we simply acknowledge it again and return from TranslatePacket() with no further action.

		if(PastAck(header->ack, nc->lastrecvack) || Recieved(header->ack, header->ack, nc))
		{
			Acknowledge(header->ack, nc, from, sock, buffer, bytes);
			return;
		}

In the the second testcase of the if statement (packet is buffered received), we check if we've already buffered it, using Recieved():

//check when we've recieved a packet range [first,last] inclusive
bool Recieved(unsigned short first, unsigned short last, NetConn* nc)
{
	OldPacket* p;
	PacketHeader* header;
	unsigned short current = first;
	unsigned short afterlast = NextAck(last);
	bool missed;

	//go through all the received packets and check if we have the complete range [first,last]
	do
	{
		//for each number in the sequence...
		missed = true;

		//look through each packet from that address
		for(auto i=g_recv.begin(); i!=g_recv.end(); i++)
		{
			p = &*i;
			header = (PacketHeader*)&p->buffer;

			//is this the sequence number we're looking for?
			if(header->ack != current)
				continue;

			//is this the correct address?
			if(!Same(&p->addr, &nc->addr))
				continue;

			//go to next number in the sequence now that we know we have the previous one
			current = NextAck(current);
			missed = false;
			break;
		}

		//if we finished the inner loop and ÃÃÃâmissedÃÃÃâ is still false, we missed a number in the sequence, so return false
		if(missed)
			return false;

	//continue looping until we've arrived at the number after the ÃÃÃâlastÃÃÃâ number
	} while(current != afterlast);

	//if we got here, we got all the numbers
	return true;
}

“g_recv” is a linked list of OldPacket's. We go through each sequence number between “first” and “last” and check if we have each and every one. Because we use the received packet's ack number for both parameters in Case 1, we only check if we've buffered that one packet. Because g_recv holds inbound packets from every address we're connected to, we have to check to match the address when comparing ack numbers. You can store g_recv in the NetConn's and this might be more efficient.

Buffered Packets


The OldPacket class holds the byte array for the packet and the address and port of the sender (or the outbound port and address for outgoing buffered packets).


class OldPacket
{
public:
	char* buffer;
	int len;
	unsigned long long last;	//last time resent
	unsigned long long first;	//first time sent
	bool expires;
	bool acked;	//used for outgoing packets

	//sender/reciever
	IPaddress addr;
	void (*onackfunc)(OldPacket* op, NetConn* nc);

	void freemem()
	{
		if(len <= 0)
			return;

		if(buffer != NULL)
			delete [] buffer;
		buffer = NULL;
	}

	OldPacket()
	{
		len = 0;
		buffer = NULL;
		onackfunc = NULL;
		acked = false;
	}
	~OldPacket()
	{
		freemem();
	}

	OldPacket(const OldPacket& original)
	{
		len = 0;
		buffer = NULL;
		*this = original;
	}

	OldPacket& operator=(const OldPacket &original)
	{
		freemem();

		if(original.buffer && original.len > 0)
		{
			len = original.len;
			if(len > 0)
			{
				buffer = new char[len];
				memcpy((void*)buffer, (void*)original.buffer, len);
			}
			last = original.last;
			first = original.first;
			expires = original.expires;
			acked = original.acked;
			addr = original.addr;
			onackfunc = original.onackfunc;
		}
		else
		{
			buffer = NULL;
			len = 0;
			onackfunc = NULL;
		}

		return *this;
	}
};

It has some extra fields for outbound packets.

Case 2: current expected received packets


The second case is when the received packet is the next expected one, which means we received it in the correct order without repeats. The next expected (current) packet is the one after the “last received” one (lastrecvack). The variable “next” here will hold that ack. It is equal to nc->lastrecvack + 1, so you can use that instead of the function “NextAck”.

		next = NextAck(nc->lastrecvack);	//next expected packet ack
		last = next;	//last packet ack to be executed
	
		//CASE #2: current packet (the next expected packet)
		if(header->ack == next) 
		{
			// Translate packet
			last = next;
		} 

If it matches “next” we will process the packet and acknowledge it further down. We record the “last” packet executed, to update the sequence number.

Case #3: future, unbuffered received packets


If we reach “else” it means we have an unbuffered, future packet.

		//CASE #3: an unbuffered, future packet
		else  // More than +1 after lastrecvack?
		{
			/*
			last will be updated to the last executed packet at the end.
			for now it will hold the last buffered packet to be executed.
			*/
			unsigned short checklast = PrevAck(header->ack);

			if(Recieved(next, checklast, nc))
			{
				// Translate in order
				last = checklast;
				goto procpack;
			}
			else
			{
				AddRecieved(buffer, bytes, nc);

				if(Recieved(next, checklast, nc))
				{
					// Translate in order
					last = checklast;
					goto procpack;
				}
				else
				{
					//TODO
					//how to find which ack was missed, have to go through all buffered
					//this is something somebody smart can do in the future
					//NAckPacket nap;
					//nap.header.type = PACKET_NACK;
					//nap.header.ack =
				}
			}
		}

We check if we have a range of buffered packets up to this one. If we have a complete range, starting from the current (expected next) packet, we can execute them (because we only run them in the order they're sent in) and increase lastrecvack to equal “last”. We move up lastrecvack at the end of TranslatePacket. We might have more buffered packets after the received one. That is why we check for any extra packets and store the last executed one's ack number in “last”.

If we don't have a complete set of packets up to the received one, we call AddRecieved (buffer it).

void AddRecieved(char* buffer, int len, NetConn* nc)
{
	OldPacket p;
	p.addr = nc->addr;
	p.buffer = new char[ len ];
	p.len = len;
	memcpy((void*)p.buffer, (void*)buffer, len);
	memcpy((void*)&p.addr, (void*)&nc->addr, sizeof(IPaddress));

	g_recv.push_back(p);
}

If we have to buffer it, it means it's ahead of the last executed packet, and there's one missing before it.

If we wanted to only send selective repeats every second or so (if that was the delay on the channel and we didn't want to send some three copies of it before we received back an ack, and we're sure that loss of packets is minimal, and we'd rather leave the “sliding window” huge), we could use NAck's (negative ack's) to tell us when we've missed a packet. But selective repeat works pretty well. (Using nacks is a different kind of reliable UDP implementation.)

Acknowledgements


Further on we send ack's.

void Acknowledge(unsigned short ack, NetConn* nc, IPaddress* addr, UDPsocket* sock, char* buffer, int bytes)
{
	AckPacket p;
	p.header.type = PACKET_ACKNOWLEDGMENT;
	p.header.ack = ack;

	SendData((char*)&p, sizeof(AckPacket), addr, false, true, nc, sock, 0, NULL);
}

We use a SendData function for our RUDP implementation, shown and explained further down.

Whenever we send data, we have to fill out a packet struct for that type of packet. At minimum, we have to set header.type so that the received end can know what packet type it is from reading the first 2 bytes of the packet.

Executing Packet and Updating Sequence Number


If we get to this point in TranslatePacket, we'll execute the packets in order. If we checked sequence numbers, and we have a connection, we'll execute the buffered previous packets, then the current received packets, then check for any future buffered packets. If we don't check the sequence, or don't have a connection, we just execute the one packet we received.

updinack:
	
	// Translate in order
	if(checkprev && nc)
	{
		last = header->ack;
		last = ParseRecieved(next, last, nc);
	}
	
	// Translate in order
	if(NextAck(last) == header->ack ||
		!checkprev)
	{
		PacketSwitch(header->type, buffer, bytes, nc, from, sock);
		last = header->ack;
	}
	
	// Translate in order
	if(checkprev && nc)
	{
		last = header->ack;

		while(true)
		{
			if(!Recieved(last+1, last+1, nc))
				break;

			last++;
			ParseRecieved(last, last, nc);
		}
	}

	//have to do this again because PacketSwitch might
	//read a ConnectPacket, which adds new connections.
	//but also the connection might have
	//been Disconnected(); and erased.
	nc = Match(from);

	//ack Connect packets after new NetConn added...
	//Don't acknowledge NoConn packets as they are non-reliable
	if(header->type != PACKET_ACKNOWLEDGMENT &&
		header->type != PACKET_NOCONN &&
		sock && nc && checkprev)
	{
		if(header->type != PACKET_CONNECT &&
			header->type != PACKET_DISCONNECT)
			nc->lastrecvack = last;
	}

At the end we update the connection's “lastrecvack” to “last” one executed. If it's a ConnectPacket, we set the lastrecvack when reading the packet.

Executing a buffered packet range


We need to execute a packet range when we know we've got a complete sequence up to a certain ack. We return the last executed packet number here, in case it's behind “last”.

unsigned short ParseRecieved(unsigned short first, unsigned short last, NetConn* nc)
{
	OldPacket* p;
	PacketHeader* header;
	unsigned short current = first;
	unsigned short afterlast = NextAck(last);

	do
	{
		bool execd = false;

		for(auto i=g_recv.begin(); i!=g_recv.end(); i++)
		{
			p = &*i;
			header = (PacketHeader*)&p->buffer;

			if(header->ack != current)
				continue;

			if(!Same(&p->addr, &nc->addr))
				continue;

			PacketSwitch(header->type, p->buffer, p->len, nc, &p->addr, &g_sock);
			execd = true;
			current = NextAck(current);

			i = g_recv.erase(i);
			break;
		}

		if(execd)
			continue;

		break;
	} while(current != afterlast);

	return PrevAck(current);
}

SendData


We send data like so, passing the data bytes, size, address, whether it is meant to be reliable, whether we want it to expire after a certain time of resending (like a ConnectPacket that needs to fail sooner than the default timeout), the NetConn connection (which musn't be NULL if we're sending a reliable packet), the socket, the millisecond delay if we want to queue it to send a few moments from now, and a callback function to be called when it's acknowledged so we can take further action (like setting “handshook” to true for ConnectPacket's, or destroying the NetConn when a DisconnectPacket is acknowledged).

void SendData(char* data, int size, IPaddress * paddr, bool reliable, bool expires, NetConn* nc, UDPsocket* sock, int msdelay, void (*onackfunc)(OldPacket* p, NetConn* nc))
{
	//is this packet supposed to be reliable?
	if(reliable)
	{
		//if so, set the ack number
		((PacketHeader*)data)->ack = nc->nextsendack;

		//and add an OldPacket to the g_outgo list
		OldPacket p;
		p.buffer = new char[ size ];
		p.len = size;
		memcpy(p.buffer, data, size);
		memcpy((void*)&p.addr, (void*)paddr, sizeof(IPaddress));
		//in msdelay milliseconds, p.last will be RESEND_DELAY millisecs behind GetTicks()

		//set last sent time
		p.last = GetTicks() + msdelay - RESEND_DELAY;
		p.first = p.last;
		p.expires = expires;
		p.onackfunc = onackfunc;
		g_outgo.push_back(p);

		//update outbound ack for this connection
		nc->nextsendack = NextAck(nc->nextsendack);
	}

	if(reliable && msdelay > 0)
		return;

	PacketHeader* ph = (PacketHeader*)data;

	if(reliable && 
		(!nc || !nc->handshook) && 
		(ph->type != PACKET_CONNECT && ph->type != PACKET_DISCONNECT && ph->type != PACKET_ACKNOWLEDGMENT && ph->type != PACKET_NOCONN) )
	{
		Connect(paddr, false, false, false, false);
		return;
	}

	memcpy(out->data, data, size);
	out->len = size;
	out->data[size] = 0;

	SDLNet_UDP_Unbind(*sock, 0);
	if(SDLNet_UDP_Bind(*sock, 0, (const IPaddress*)paddr) == -1)
	{
		char msg[1280];
		sprintf(msg, "SDLNet_UDP_Bind: %s\n",SDLNet_GetError());
		ErrMess("Error", msg);
		//printf("SDLNet_UDP_Bind: %s\n",SDLNet_GetError());
		//exit(7);
	}

	//sendto(g_socket, data, size, 0, (struct addr *)paddr, sizeof(struct sockaddr_in));
	SDLNet_UDP_Send(*sock, 0, out);

	g_transmitted += size;

	SDLNet_FreePacket(out);
}

If it's reliable, we add an entry to the outbound OldPacket list. We set the “last” member variable of the OldPacket entry such that it is resent in a certain amount of time depending on when we delayed it to and the usual resend delay.

If it's reliable and the delay is greater than 0, we don't take any action in this function after buffering it in the outbound list because we will send it after ResendPacks() is called.

If it's reliable and we don't have a connection specified, we call Connect() to connect first, and return. It is also called if the connection hasn't finished the handshake (in which case Connect() will check to make sure that we have an outgoing ConnectPacket). The only case in which we don't need a handshook connection and send reliably is if we're sending a ConnectPacket or DisconnectPacket.

The SendData function is called itself with “reliable” set to false when resending a reliable packet from a buffered outbound OldPacket container.

The SendData function automatically sets the outbound ack for the reliable packets.

Keeping Connections Alive


As mentioned, there are three more functions in the UpdNet loop function:

KeepAlive();
CheckConns();
ResendPacks();

The KeepAlive() function sends KeepAlive packets to connections that are expiring. It prevents the other side from closing the connection, and also triggers an ack packet back, preventing from the connection being closed locally. The default is to keep connections alive until the user decides to Disconnect them.

//keep expiring connections alive (try to)
void KeepAlive()
{
	unsigned long long nowt = GetTicks();
	auto ci = g_conn.begin();

	//loop while we still have more connections to process...
	while(g_conn.size() > 0 && ci != g_conn.end())
	{
		//if we haven't received a handshake back, or if it's closed, we don't need to be keep it alive
		if(!ci->handshook || ci->closed)
		{
			ci++;
			continue;
		}

		//otherwise, if it's reached a certain percent of the timeout period, send a KeepAlivePacket...
		if(nowt - ci->lastrecv > NETCONN_TIMEOUT/4)
		{
			//check if we're already trying to send a packet to get a reply
			bool outgoing = false;

			//check all outgoing packets for a packet to this address
			for(auto pi=g_outgo.begin(); pi!=g_outgo.end(); pi++)
			{
				//if(memcmp(&pi->addr, &ci->addr, sizeof(IPaddress)) != 0)
				if(!Same(&pi->addr, &ci->addr))
				{
					continue;
				}

				outgoing = true;
				break;
			}

			//if we have an outgoing packet, we don't have to send a KeepAlivePacket
			if(outgoing)
			{
				ci++;
				continue;
			}

			//otherwise, send a KeepAlivePacket...
			KeepAlivePacket kap;
			kap.header.type = PACKET_KEEPALIVE;
			SendData((char*)&kap, sizeof(KeepAlivePacket), &ci->addr, true, false, &*ci, &g_sock, 0, NULL);
		}

		//check next connection next
		ci++;
	}
}

GetTicks() is our 64-bit timestamp function in milliseconds:

unsigned long long GetTicks()
{
#ifdef PLATFORM_WIN
	SYSTEMTIME st;
	GetSystemTime (&st);
	_FILETIME ft;
	SystemTimeToFileTime(&st, &ft);
	//convert from 100-nanosecond intervals to milliseconds
	return (*(unsigned long long*)&ft)/(10*1000);
#else
	struct timeval tv;

	gettimeofday(&tv, NULL);

	return
    (unsigned long long)(tv.tv_sec) * 1000 +
    (unsigned long long)(tv.tv_usec) / 1000;
#endif
}

Checking and Pruning Connections


Two more functions in UpdNet:

CheckConns();
ResendPacks();

In CheckConns we do several things:

1. Send out periodic pings for all the players in the room for all the clients using Cl(ient)StatePacket's
2. Handle and close any connections that are not yet closed but have timed out because the last received message has been longer than NETCONN_TIMEOUT milliseconds ago
3. For closed connections, flush any buffered inbound or outbound OldPacket's, and erase the NetConn from the list
4. For unresponsive clients, inform other players of the lagger


void CheckConns()
{
	unsigned long long now = GetTicks();

	// If we're not compiling for the matchmaker (the game app itself)
#ifndef MATCHMAKER

	static unsigned long long pingsend = GetTicks();

	//send out client pings
	if(g_netmode == NETM_HOST &&
		now - pingsend > (NETCONN_UNRESP/2)
		)
	{
		pingsend = now;

		for(int i=0; i<CLIENTS; i++)
		{
			Client* c = &g_client[i];

			if(!c->on)
				continue;

			if(i == g_localC)
				continue;	//clients will have their own ping for the host

			NetConn* nc = c->nc;

			if(!nc)
				continue;

			ClStatePacket csp;
			csp.header.type = PACKET_CLSTATE;
			csp.chtype = CLCH_PING;
			csp.ping = nc->ping;
			csp.client = i;
			SendAll((char*)&csp, sizeof(ClStatePacket), true, false, NULL);
		}
	}
#endif
	
	auto ci = g_conn.begin();

	while(g_conn.size() > 0 && ci != g_conn.end())
	{
		//get rid of timed out connections
		if(!ci->closed && now - ci->lastrecv > NETCONN_TIMEOUT)
		{
			//TO DO any special condition handling, inform user about sv timeout, etc.

#ifndef MATCHMAKER
			if(ci->ismatch)
			{
				g_sentsvinfo = false;
			}
			else if(ci->isourhost)
			{
				EndSess();
				RichText mess = RichText("ERROR: Connection to host timed out.");
				Mess(&mess);
			}
			else if(ci->ishostinfo)
				;	//ErrMess("Error", "Connection to prospective game host timed out.");
			else if(ci->isclient)
			{
				//ErrMess("Error", "Connection to client timed out.");

				/*
				TODO
				combine ClDisconnectedPacket and ClientLeftPacket.
				use params to specify conditions of leaving:
				- of own accord
				- timed out
				- kicked by host
				*/

				//TODO inform other clients?
				ClDisconnectedPacket cdp;
				cdp.header.type = PACKET_CLDISCONNECTED;
				cdp.client = ci->client;
				cdp.timeout = true;
				SendAll((char*)&cdp, sizeof(ClDisconnectedPacket), true, false, &ci->addr);
				
				Client* c = &g_client[ci->client];
				RichText msg = c->name + RichText(" timed out.");
				AddChat(&msg);
			}
#else
			g_log<<DateTime()<<" timed out"<<std::endl;
			g_log.flush();
#endif

			ci->closed = true;	//Close it using code below
		}

		//get rid of closed connections
		if(ci->closed)
		{
			if(&*ci == g_mmconn)
			{
				g_sentsvinfo = false;
				g_mmconn = NULL;
			}
			if(&*ci == g_svconn)
				g_svconn = NULL;
#ifndef MATCHMAKER
			for(int cli=0; cli<CLIENTS; cli++)
			{
				Client* c = &g_client[cli];

				if(!c->on)
					continue;

				if(c->nc == &*ci)
				{
					if(g_netmode == NETM_HOST)
					{
					}

					if(c->player >= 0)
					{
						Player* py = &g_player[c->player];
						py->on = false;
						py->client = -1;
					}

					c->player = -1;
					c->on = false;
				}
			}
#endif

			//necessary to flush? already done in ReadDisconnectPacket();
			//might be needed if connection can become ->closed another way.
			FlushPrev(&ci->addr);
			ci = g_conn.erase(ci);
			continue;
		}

		//inform other clients of unresponsive clients
		//or inform local player or unresponsive host
		if(now - ci->lastrecv > NETCONN_UNRESP &&
			ci->isclient)	//make sure this is not us or a matchmaker
		{
#ifndef MATCHMAKER
			NetConn* nc = &*ci;

			Client* c = NULL;

			if(nc->client >= 0)
				c = &g_client[nc->client];

			if(g_netmode == NETM_CLIENT &&
				nc->isourhost)
			{
				//inform local player TODO
				c->unresp = true;
			}
			else if(g_netmode == NETM_HOST &&
				nc->isclient &&
				c)
			{
				//inform others
				if(c->unresp)
				{
					ci++;	
					continue; //already informed
				}

				c->unresp = true;

				ClStatePacket csp;
				csp.header.type = PACKET_CLSTATE;
				csp.chtype = CLCH_UNRESP;
				csp.client = c - g_client;
				SendAll((char*)&csp, sizeof(ClStatePacket), true, false, &nc->addr);
			}
#endif
		}

		ci++;
	}
}

Resending Packets


Finally, ResendPacks():

void ResendPacks()
{
	OldPacket* p;
	unsigned long long now = GetTicks();

	//remove expired ack'd packets
	auto i=g_outgo.begin();
	while(i!=g_outgo.end())
	{
		p = &*i;

		if(!p->acked)
		{
			i++;
			continue;
		}

        //p->last and first might be in the future due to delayed sends,
        //which would cause an overflow for unsigned long long.
        unsigned long long safelast = enmin(p->last, now);
        unsigned long long passed = now - safelast;
        unsigned long long safefirst = enmin(p->first, now);

		if(passed < RESEND_EXPIRE)
		{
			i++;
			continue;
		}

		i = g_outgo.erase(i);
	}

	//resend due packets within sliding window
	i=g_outgo.begin();
	while(i!=g_outgo.end())
	{
		p = &*i;

		//kept just in case it needs to be recalled by other side
		if(p->acked)
		{
			i++;
			continue;
		}
        
        unsigned long long safelast = enmin(p->last, now);
        unsigned long long passed = now - safelast;
        unsigned long long safefirst = enmin(p->first, now);

		NetConn* nc = Match(&p->addr);

		//increasing resend delay for the same outgoing packet

		unsigned int nextdelay = RESEND_DELAY;
        unsigned long long firstpassed = now - safefirst;

		if(nc && firstpassed >= RESEND_DELAY)
		{
			unsigned long long sincelast = safelast - safefirst;
			//30, 60, 90, 120, 150, 180, 210, 240, 270
			nextdelay = ((sincelast / RESEND_DELAY) + 1) * RESEND_DELAY;
		}

		if(passed < nextdelay)
		{
			i++;
			continue;
		}

		PacketHeader* ph = (PacketHeader*)p->buffer;

		/*
		If we don't have a connection to them
		and it's not a control packet, we
		need to connect to them to send reliably.
		Send it when we get a handshake back.
		*/
		if((!nc || !nc->handshook) &&
			ph->type != PACKET_CONNECT &&
			ph->type != PACKET_DISCONNECT &&
			ph->type != PACKET_ACKNOWLEDGMENT &&
			ph->type != PACKET_NOCONN)
		{
			Connect(&p->addr, false, false, false, false);
			i++;
			continue;
		}

//do we want a sliding window?
#if 1
		if(nc)
		{
			unsigned short lastack = nc->nextsendack + SLIDING_WIN - 1;

			if(PastAck(lastack, ph->ack) && ph->ack != lastack)
			{
				i++;
				continue;
				//don't resend more than SLIDING_WIN packets ahead
			}
		}
#endif

		if(p->expires && now - safefirst > RESEND_EXPIRE)
		{
			i = g_outgo.erase(i);
			continue;
		}

		SendData(p->buffer, p->len, &p->addr, false, p->expires, nc, &g_sock, 0, NULL);

		p->last = now;

		i++;
	}
}

We

1.) erase OldPacket's that have been acknowledged (acked = true),
2.) check if the OldPacket in question is within the sliding window, and if it is,
2.) resend those OldPacket's that have reached a certain delay,
3.) and erase OldPacket's that are set to expire.

“enmin” and “enmax” are just the min max macros:

#define enmax(a,b) (((a)>(b))?(a):(b))
#define enmin(a,b) (((a)<(b))?(a):(b))

We don't want the “firstpassed” value (the amount of time that has passed since the OldPacket was first sent) to be negative (which would be a giant positive number for an unsigned 64-bit long long), so we set “safefirst” used in its calculation to be no more than the time “now”, from which it is subtracted. If we didn't do this, we would get undefined behaviour, with some packets getting resent and some getting erased.

        unsigned long long safelast = enmin(p->last, now);
        unsigned long long passed = now - safelast;
        unsigned long long safefirst = enmin(p->first, now);

		NetConn* nc = Match(&p->addr);

		//increasing resend delay for the same outgoing packet

		unsigned int nextdelay = RESEND_DELAY;
        unsigned long long firstpassed = now - safefirst;

Reading Acknowledgements


Whenever we receive an AckPacket, we call ReadAckPacket on it in PacketSwitch:

void ReadAckPacket(AckPacket* ap, NetConn* nc, IPaddress* from, UDPsocket* sock)
{
	OldPacket* p;
	PacketHeader* header;

	for(auto i=g_outgo.begin(); i!=g_outgo.end(); i++)
	{
		p = &*i;
		header = (PacketHeader*)p->buffer;
		if(header->ack == ap->header.ack &&
				Same(&p->addr, from))
		{
			if(!nc)
				nc = Match(from);

			if(nc)
			{
				nc->ping = (float)(GetTicks() - i->first);
			}

			if(p->onackfunc)
				p->onackfunc(p, nc);

			i = g_outgo.erase(i);

			return;
		}
	}
}

In it, we will check for the matching buffered inbound OldPacket, and erase it from the list if found. But before that, we call a registered callback method that was set up when the packet was sent.

Using the “first” time the packet was sent, subtracting it from the current time, gives the round-trip latency for that connection, which we can record in the NetConn class.

Callbacks on Acknowledgement


Whenever we send a DisconnectPacket, we set the callback function to:

void OnAck_Disconnect(OldPacket* p, NetConn* nc)
{
	if(!nc)
		return;

	nc->closed = true;	//to be cleaned up this or next frame
}

Which will clean up the connection and stop resending the DisconnectPacket once it's acknowledged. It's best to encapsulate the needed functionality so we can safely Disconnect.

void Disconnect(NetConn* nc)
{
	nc->disconnecting = true;

	//check if we already called Disconnect on this connection
	//and have an outgoing DisconnectPacket
	bool out = false;

	for(auto pit=g_outgo.begin(); pit!=g_outgo.end(); pit++)
	{
		if(!Same(&pit->addr, &nc->addr))
			continue;

		PacketHeader* ph = (PacketHeader*)pit->buffer;

		if(ph->type != PACKET_DISCONNECT)
			continue;

		out = true;
		break;
	}

	if(!out)
	{
		DisconnectPacket dp;
		dp.header.type = PACKET_DISCONNECT;
		SendData((char*)&dp, sizeof(DisconnectPacket), &nc->addr, true, false, nc, &g_sock, 0, OnAck_Disconnect);
	}
}

When we receive an acknowledgement of a ConnectPacket that we sent out, we also need to set “handshook” to true. You can set user callbacks for certain special connections, like matchmakers or game hosts, to carry out certain functions, like immediately polling for servers, or getting server info, or joining the game room.


//on connect packed ack'd
void OnAck_Connect(OldPacket* p, NetConn* nc)
{
	if(!nc)
		nc = Match(&p->addr);

	if(!nc)
		return;

	nc->handshook = true;

	ConnectPacket* scp = (ConnectPacket*)p->buffer;

	//if(!scp->reconnect)
	{
#ifndef MATCHMAKER
		GUI* gui = &g_gui;

		if(nc->isourhost)
		{
			g_svconn = nc;

			//TO DO request data, get ping, whatever, server info

			JoinPacket jp;
			jp.header.type = PACKET_JOIN;
			std::string name = g_name.rawstr();
			if(name.length() >= PYNAME_LEN)
				name[PYNAME_LEN] = 0;
			strcpy(jp.name, name.c_str());
			jp.version = VERSION;
			SendData((char*)&jp, sizeof(JoinPacket), &nc->addr, true, false, nc, &g_sock, 0, NULL);
		}
#endif

		if(nc->ishostinfo)
		{
			//TO DO request data, get ping, whatever, server info
			GetSvInfoPacket gsip;
			gsip.header.type = PACKET_GETSVINFO;
			SendData((char*)&gsip, sizeof(GetSvInfoPacket), &nc->addr, true, false, nc, &g_sock, 0, NULL);
		}

#ifndef MATCHMAKER
		if(nc->ismatch)
		{
			g_mmconn = nc;
			g_sentsvinfo = false;

			if(g_reqsvlist && !g_reqdnexthost)
			{
				g_reqdnexthost = true;

				GetSvListPacket gslp;
				gslp.header.type = PACKET_GETSVLIST;
				SendData((char*)&gslp, sizeof(GetSvListPacket), &nc->addr, true, false, nc, &g_sock, 0, NULL);
			}
		}
#endif
	}
}

You can see there's a commented out function pointer called “chcallback” in the NetConn class, which might be given a function to call when the connection is handshook, instead of hard-coding several cases for the connection type (“ismatch”, “isourhost”, etc.)

Connecting


Before we host a server or connect to the matchmaker, we must open a socket.

void OpenSock()
{
	unsigned short startport = PORT;

	if(g_sock)
	{
		IPaddress* ip = SDLNet_UDP_GetPeerAddress(g_sock, -1);

		if(!ip)
			g_log<<"SDLNet_UDP_GetPeerAddress: "<<SDLNet_GetError()<<std::endl;
		else
			startport = SDL_SwapBE16(ip->port);

		SDLNet_UDP_Close(g_sock);
		g_sock = NULL;
	}

	if(g_sock = SDLNet_UDP_Open(startport))
		return;

	//try 10 ports
#ifndef MATCHMAKER
	for(int i=0; i<10; i++)
	{
		if(!(g_sock = SDLNet_UDP_Open(PORT+i)))
			continue;

		return;
	}
#endif

	char msg[1280];
	sprintf(msg, "SDLNet_UDP_Open: %s\n", SDLNet_GetError());
	g_log<<msg<<std::endl;
	ErrMess("Error", msg);
}

This OpenSock method will try 10 different port numbers if the first one fails. If it still doesn't work, it will log a message from SDLNet. After we open a port, we can send packets. The OpenSock method is encapsulated in the Connect() function. We can call the first Connect method, which takes an IP string or domain address, or the second, which accepts an IPaddress struct. They also accept some parameters to describe their use, like whether the connection is the matchmaker, the host being joined, a client of our room, or a random server we're getting info on.

NetConn* Connect(const char* addrstr, unsigned short port, bool ismatch, bool isourhost, bool isclient, bool ishostinfo)
{
	IPaddress ip;

	//translate the web address string to an IP and port number
	if(SDLNet_ResolveHost(&ip, addrstr, port) == -1)
	{
		return NULL;
	}

	//call the following function...
	return Connect(&ip, ismatch, isourhost, isclient, ishostinfo);
}

//Safe to call more than once, if connection already established, this will just
//update NetConn booleans.
NetConn* Connect(IPaddress* ip, bool ismatch, bool isourhost, bool isclient, bool ishostinfo)
{
	if(!g_sock)
		OpenSock();


	NetConn* nc = Match(ip);

	NetConn newnc;
	bool isnew = false;

	//if we don't recognize this address as having a connection to, make a new NetConn instance for the list
	if(!nc)
	{
		isnew = true;
		newnc.addr = *ip;
		newnc.handshook = false;
		newnc.lastrecv = GetTicks();
		newnc.lastsent = newnc.lastrecv;
		//important - reply ConnectPacket with ack=0 will be
		//ignored as copy (even though it is original) if new NetConn's lastrecvack=0.
		newnc.lastrecvack = USHRT_MAX;
		newnc.nextsendack = 0;
		newnc.closed = false;
		g_conn.push_back(newnc);

		nc = &*g_conn.rbegin();
	}
	else
	{
		//force reconnect (sending ConnectPacket).
		//also important for Click_SL_Join to know that we
		//can't send a JoinPacket immediately after this function,
		//but must wait for a reply ConnectPacket.
		if(nc->closed)
			nc->handshook = false;
	}

	bool disconnecting = false;

	//if we have an outgoing DisconnectPacket, set disconnecting=true
	for(auto pit=g_outgo.begin(); pit!=g_outgo.end(); pit++)
	{
		OldPacket* op = &*pit;

		if(!Same(&op->addr, &nc->addr))
			continue;

		PacketHeader* ph = (PacketHeader*)op->buffer;

		if(ph->type != PACKET_DISCONNECT)
			continue;

		disconnecting = true;
		break;
	}

	//if we're closing this connection, don't send any other reliable packets on it except DisconnectPacket and clear any outbound or inbound OldPacket's
	if(disconnecting)
	{
		nc->handshook = false;
		FlushPrev(&nc->addr);
	}

	//different connection purposes
	//only "true" it, or retain current state of nc->...
	nc->isclient = isclient ? true : nc->isclient;
	nc->isourhost = isourhost ? true : nc->isourhost;
	nc->ismatch = ismatch ? true : nc->ismatch;
	nc->ishostinfo = ishostinfo ? true : nc->ishostinfo;

	if(isourhost)
		g_svconn = nc;
	if(ismatch)
		g_mmconn = nc;

	//see if we need to connect for realsies (send a ConnectPacket).
	//i.e., send a connect packet and clean previous packets (OldPacket's list).
	if(!nc->handshook)
	{
		bool sending = false;	//sending ConnectPacket?
		unsigned short yourlastrecvack = PrevAck(nc->nextsendack);

		//check if we have an outgoing ConnectPacket
		for(auto pi=g_outgo.begin(); pi!=g_outgo.end(); pi++)
		{
			if(!Same(&pi->addr, &nc->addr))
				continue;

			PacketHeader* ph = (PacketHeader*)pi->buffer;

			if(PastAck(PrevAck(ph->ack), yourlastrecvack))
				yourlastrecvack = PrevAck(ph->ack);

			if(ph->type != PACKET_CONNECT)
				continue;

			sending = true;
			break;
		}

		if(!sending)
		{
			ConnectPacket cp;
			cp.header.type = PACKET_CONNECT;
			cp.reconnect = false;
			cp.yourlastrecvack = yourlastrecvack;
			cp.yournextrecvack = nc->nextsendack;
			cp.yourlastsendack = nc->lastrecvack;
			SendData((char*)&cp, sizeof(ConnectPacket), ip, isnew, false, nc, &g_sock, 0, OnAck_Connect);
		}
	}

	nc->closed = false;

	return nc;
}

When closing a connection, or connecting again after a connection had been disconnected, we flush any buffered in- or out-bound OldPacket's.

//flush all previous incoming and outgoing packets from this addr
void FlushPrev(IPaddress* from)
{
	auto it = g_outgo.begin();

	while(it!=g_outgo.end())
	{
		if(!Same(&it->addr, from))
		{
			it++;
			continue;
		}

		it = g_outgo.erase(it);
	}

	it = g_recv.begin();

	while(it!=g_recv.end())
	{
		if(!Same(&it->addr, from))
		{
			it++;
			continue;
		}

		it = g_recv.erase(it);
	}
}

Conclusion


That is all for this article. If you want to see the rest of the article covering parity bit checking, lockstep, and LAN networking, purchase the full article here: http://www.gamedev.net/files/file/223-reliable-udp-implementation-lockstep-lan-and-parity-bit-checking/


Article Update Log


6 Oct 2015: Initial release

2D Transforms 101

$
0
0
A presentation/tutorial on 2D transforms for programmers and practitioners favouring intuition over mathematical rigour; animations are used to illustrate the effect of every transform explained.

Click Here to view presentation.

Firefox, Chrome or Opera recommended as they support animations; see Requirements below for details. Press ? while in the presentation for controls and Esc for an overview and quick navigation. Comments and suggestions are welcome.

Overview


Transformations are a general mathematical concept that is applicable to anyone working in:

  • Computer Graphics
    • Animation
    • Game Programming (2D and 3D)
    • Image Processing
    • Motion Capture
    • UI Design
  • Computer Vision
  • Robotics
  • Aeronautics
  • Parallel Computing

Concepts discussed are dimension-indepedant; it's just easier to explain and visualize things in 2D but they're applicable to higher dimensions without loss of generality.


Instead of dealing with only elementary transforms (rotate, scale, translate) on points, which most resources do, it also covers:

  • Basic math behind transforms (without matrices)
    • Matrices, introduced past the basics since they're just tools
  • Composite transforms — concatenation of multiple transforms
    • Anti-commutativity
    • Transforms about an arbitrary origin
  • Active and passive viewpoints of transforms
  • Transformation of coordinate systems
  • Mapping between multiple coordinate systems
  • Hierarchical Transforms

Requirements


The presentation was hand-crafted using HTML5, CSS3, JavaScript and SVG; so nothing more than a browser is required to view the presentation. Firefox, Chrome or Opera, even if you've an older version, is highly recommended since support for SVG animations isn't that great in other browsers; with browsers like Safari, Edge or IE you will not be able to see these animations — caveat lector.


You can also view the presentation on a mobile or a tablet; the content, without any loss of fidelity, should get resized and fit to given form factor, thanks to vector graphics and CSS3. Touch (tap and swipe left/right) is supported both for navigation and animation control.


Animations


Transformations are better understood visually than with just dry theory. Hence every transformation workout is accompanied, along with the math, by an animation. Images with a graph sheet background contain animations. Simply click on such an image to cycle through the animation. Every click changes the image's state, animating it into a new figure. When you see the original figure you started with, it denotes the end of all the animation the image contains.


If you're using a keyboard to navigate the presentation, clicking the image steals focus from the presentation and sets in on to the image; simply click anywhere outside the image to give the focus back to the presentation. Now press space / ? to continue with the presentation.


Solution


The solution to problem of mapping the boy space to street space that is posed at the end of the presentation is in map_boy_to_street.md.


SVG


The demonstrations/interactive animations embedded within the presentation was done in SVG, the XML-based, open standard file format for vector graphics with support for animation. In English, all it has are just instructions like move to, line to, rect, circle, ellipse, etc. in a very readable, XML format and no unintelligible binary data. So a reader (yes, a human one too) can easily read and understand it; a renderer can render it at any resolution without any loss in fidelity. The presentation's first slide has a 3D-transformed background which too is an SVG — it should show up as something similar to this; a simple check to see how well your browser supports SVGs and CSS3 transforms.


It's highly recommended that you fiddle with the SVGs under images directory. SVG format is very similar to PostScript (which also has commands like move to, line to, etc.) and is an excellent Hello World test bed (Short, Self Contained, Correct, Example) for learning transformations or 2D graphics in general. Oh they also have a tag for groupings <g> which may be used to learn hierarchical transformations. An SVG is only more readable than a PS, PDF or XAML. Just open it in a (modern) browser to view it (no, not Edge, it doesn't do 3D CSS3 transforms in SVGs yet :), open it in your favourite text editor, muck around, save and refresh your browser to see the changes immediately; rinse and repeat.


Credits

Jump Point Search: Fast A* Pathfinding for Uniform Cost Grids

$
0
0
In 2011, at the 25th National Conference on Artificial Intelligence. AAAI, Daniel Harabor and Alban Grastien presented their paper "Online Graph Pruning for Pathfinding on Grid Maps".

This article explains the Jump Point Search algorithm they presented, a pathfinding algorithm that is faster than A* for uniform cost grids that occur often in games.

What to know before reading


This article assumes you know what pathfinding is. As the article builds on A* knowledge, you should also know the A* algorithm, including its details around traveled and estimated distances, and open and closed lists. The References section lists a few resources you could study.

The A* algorithm


The A* algorithm aims to find a path from a single start to a single destination node. The algorithm cleverly exploits the single destination by computing an estimate how far you still have to go. By adding the already traveled and the estimated distances together, it expands the most promising paths first. If your estimate is never smaller than the real length of the remaining path, the algorithm guarantees that the returned path is optimal.


Attached Image: a_star.png
The figure shows a path computed with A* with its typical area of explored squares around the optimal path.


This grid is an example of a uniform cost grid. Traveling a rectangle horizontally or vertically has a distance of 1, traveling diagonally to a neighbour has length sqrt(2). (The code uses 10/2 and 14/2 as relative approximation.) The distance between two neighbouring nodes in the same direction is the same everywhere.

A* performs quite badly with uniform cost grids. Every node has eight neighbours. All those neighbours are tested against the open and closed lists. The algorithm behaves as if each node is in a completely separate world, expanding in all directions, and storing every node in the open or closed list. In other words, every explored rectangle in the picture above has been added to the closed list. Many of them also have been added to the open list at some point in time.

While A* 'walks' towards the end node, the traveled path gets longer and the estimated path gets shorter. There are however in general a lot of feasible parallel paths, and every combination is examined and stored.


Attached Image: grid_path.png


In the figure, the shortest path between the left starting point and the right destination point is any sequence of right-up diagonal or right steps, within the area of the two yellow lines, for example the green path.

As a result, A* spends most of its time in handling updates to the open and closed lists, and is very slow on big open fields where all paths are equal.

Jump point search algorithm


The JPS algorithm improves on the A* algorithm by exploiting the regularity of the grid. You don't need to search every possible path, since all paths are known to have equal costs. Similarly, most nodes in the grid are not interesting enough to store in an open or closed list. As a result, the algorithm spends much less time on updating the open and closed lists. It potentially searches larger areas, but the authors claim the overall gain is still much better better due to spending less time updating the open and closed lists.


Attached Image: jps.png


This is the same search as before with the A* algorithm. As you can see you get horizontal and vertical searched areas, which extend to the next obstacle. The light-blue points are a bit misleading though, as JPS often stacks several of them at the same location.

The algorithm


The JPS algorithm builds on the A* algorithm, which means you still have an estimate function, and open and closed lists. You also get the same optimality properties of the result under the same conditions. It differs in the data in the open and closed lists, and how a node gets expanded.

The paper discussed here finds paths in 2D grids with grid cells that are either passable or non-passable. Since this is a common and easy to explain setup, this article limits itself to that as well. The authors have published other work since 2011 with extensions which may be interesting to study if your problem is different from the setup used here.

Having a regular grid means you don't need to track precise costs every step of the way. It is easy enough to compute it when needed afterwards. Also, by exploiting the regularity, there is no need to expand in every direction from every cell, and have expensive lookups and updates in the open and closed lists with every cell like A* does. It is sufficient to only scan the cells to check if there is anything 'interesting' nearby (a so-called jump point).

Below, a more detailed explanation is given of the scanning process, starting with the horizontal and vertical scan. The diagonal scan is built on top of the former scans.

Horizontal and vertical scan


Horizontal (and vertical) scanning is the simplest to explain. The discussion below only covers horizontal scanning from left to right, but the other three directions are easy to derive by changing scanning direction, and/or substituting left/right for up/down.


Attached Image: horizontal.png


The (A) picture shows the global idea. The algorithms scans a single row from left to right. Each horizontal scan handles a different row. In the section about diagonal scan below, it will be explained how all rows are searched. At this time, assume the goal is to only scan the b row, rows a and c are done at some other time.

The scan starts from a position that has already been done, in this case b1. Such a position is called a parent. The scan goes to the right, as indicated by the green arrow leaving from the b1 position. The (position, direction) pair is also the element stored in open and closed lists. It is possible to have several pairs at the same position but with a different direction in a list.

The goal of each step in the scan is to decide whether the next point (b2 in the picture) is interesting enough to create a new entry in the open list. If it is not, you continue scanning (from b2 to b3, and further). If a position is interesting enough, new entries (new jump points) are made in the list, and the current scan ends.

Positions above and below the parent (a1 and c1) are covered already due to having a parent at the b1 position, these can be ignored.

In the [A] picture, position b2 is in open space, the a and c rows are handled by other scans, nothing to see here, we can move on [to b3 and further]. The [B] picture is the same. The a row is non-passable, the scan at the a row has stopped before, but that is not relevant while scanning the b row.

The [C] picture shows an 'interesting' situation. The scan at the a row has stopped already due to the presence of the non-passable cell at a2 [or earlier]. If we just continue moving to the right without doing anything, position a3 would not be searched. Therefore, the right action here is to stop at position b2, and add two new pairs to the open list, namely (b2, right) and (b2, right-down) as shown in picture [D]. The former makes sure the horizontal scan is continued if useful, the latter starts a search at the a3 position (diagonally down). After adding both new points, this scan is over and a new point and direction is selected from the open list.

The row below is not the only row to check. The row above is treated similarly, except 'down' becomes 'up'. Two new points are created when c2 is non-passable and c3 is passable. (This may happen at the same time as a2 being non-passable and a3 being passable. In that case, three jump points will be created at b2, for directions right-up, right, and right-down.) Last but not least, the horizontal scan is terminated when the scan runs into a non-passable cell, or reaches the end of the map. In both cases, nothing special is done, besides terminating the horizontal scan at the row.

Code of the horizontal scan

def search_hor(self, pos, hor_dir, dist):
    """
    Search in horizontal direction, return the newly added open nodes

    @param pos: Start position of the horizontal scan.
    @param hor_dir: Horizontal direction (+1 or -1).
    @param dist: Distance traveled so far.
    @return: New jump point nodes (which need a parent).
    """
    x0, y0 = pos
    while True:
        x1 = x0 + hor_dir
        if not self.on_map(x1, y0):
            return [] # Off-map, done.

        g = grid[x1][y0]
        if g == OBSTACLE:
            return [] # Done.

        if (x1, y0) == self.dest:
            return [self.add_node(x1, y0, None, dist + HORVERT_COST)]

        # Open space at (x1, y0).
        dist = dist + HORVERT_COST
        x2 = x1 + hor_dir

        nodes = []
        if self.obstacle(x1, y0 - 1) and not self.obstacle(x2, y0 - 1):
            nodes.append(self.add_node(x1, y0, (hor_dir, -1), dist))

        if self.obstacle(x1, y0 + 1) and not self.obstacle(x2, y0 + 1):
            nodes.append(self.add_node(x1, y0, (hor_dir, 1), dist))

        if len(nodes) > 0:
            nodes.append(self.add_node(x1, y0, (hor_dir, 0), dist))
            return nodes

        # Process next tile.
        x0 = x1

Coordinate (x0, y0) is at the parent position, x1 is next to the parent, and x2 is two tiles from the parent in the scan direction.

The code is quite straightforward. After checking for the off-map and obstacle cases at x1, the non-passable and passable checks are done, first above the y0 row, then below it. If either case adds a node to the nodes result, the continuing horizontal scan is also added, all nodes are returned.

The code of the vertical scan works similarly.

Diagonal scan


The diagonal scan uses the horizontal and vertical scan as building blocks, otherwise, the basic idea is the same. Scan the area in the given direction from an already covered starting point, until the entire area is done or until new jump points are found.


Attached Image: diagonal.png


The scan direction explained here is diagonally to the right and up. Other scan directions are easily derived by changing 'right' with 'left', and/or 'up' with 'down'.

Picture [E] shows the general idea. Starting from position a1, the goal is to decide if position b2 is a jump point. There are two ways how that can happen. The first way is if a2 (or b1) itself is an 'interesting' position. The second way is if up or to the right new jump points are found.

The first way is shown in picture [F]. When position b1 is non-passable, and c1 is passable, a new diagonal search from position b2 up and to the left must be started. In addition, all scans that would be otherwise performed in the diagonal scan from position a1 must be added. This leads to four new jump points, as shown in picture [G]. Note that due to symmetry, similar reasoning causes new jump points for searching to the right and down, if a2 is non-passable and a3 is passable. (As with the horizontal scan, both c1 and a3 can be new directions to search at the same time as well.)

The second way of getting a jump point at position b2 is if there are interesting points further up or to the right. To find these, a horizontal scan to the right is performed starting from b2, followed by a vertical scan up from the same position.

If both scans do not result in new jump points, position b2 is considered done, and the diagonal scan moves to examining the next cell at c3 and so on, until a non-passable cell or the end of the map.

Code of the diagonal scan

def search_diagonal(self, pos, hor_dir, vert_dir, dist):
    """
    Search diagonally, spawning horizontal and vertical searches.
    Returns newly added open nodes.

    @param pos: Start position.
    @param hor_dir: Horizontal search direction (+1 or -1).
    @param vert_dir: Vertical search direction (+1 or -1).
    @param dist: Distance traveled so far.
    @return: Jump points created during this scan (which need to get a parent jump point).
    """
    x0, y0 = pos
    while True:
        x1, y1 = x0 + hor_dir, y0 + vert_dir
        if not self.on_map(x1, y1):
            return [] # Off-map, done.

        g = grid[x1][y1]
        if g == OBSTACLE:
            return []

        if (x1, y1) == self.dest:
            return [self.add_node(x1, y1, None, dist + DIAGONAL_COST)]

        # Open space at (x1, y1)
        dist = dist + DIAGONAL_COST
        x2, y2 = x1 + hor_dir, y1 + vert_dir

        nodes = []
        if self.obstacle(x0, y1) and not self.obstacle(x0, y2):
            nodes.append(self.add_node(x1, y1, (-hor_dir, vert_dir), dist))

        if self.obstacle(x1, y0) and not self.obstacle(x2, y0):
            nodes.append(self.add_node(x1, y1, (hor_dir, -vert_dir), dist))

        hor_done, vert_done = False, False
        if len(nodes) == 0:
            sub_nodes = self.search_hor((x1, y1), hor_dir, dist)
            hor_done = True

            if len(sub_nodes) > 0:
                # Horizontal search ended with a jump point.
                pd = self.get_closed_node(x1, y1, (hor_dir, 0), dist)
                for sub in sub_nodes:
                    sub.set_parent(pd)

                nodes.append(pd)

        if len(nodes) == 0:
            sub_nodes = self.search_vert((x1, y1), vert_dir, dist)
            vert_done = True

            if len(sub_nodes) > 0:
                # Vertical search ended with a jump point.
                pd = self.get_closed_node(x1, y1, (0, vert_dir), dist)
                for sub in sub_nodes:
                    sub.set_parent(pd)

                nodes.append(pd)

        if len(nodes) > 0:
            if not hor_done:
                nodes.append(self.add_node(x1, y1, (hor_dir, 0), dist))

            if not vert_done:
                nodes.append(self.add_node(x1, y1, (0, vert_dir), dist))

            nodes.append(self.add_node(x1, y1, (hor_dir, vert_dir), dist))
            return nodes

        # Tile done, move to next tile.
        x0, y0 = x1, y1

The same coordinate system as with the horizontal scan is used here as well. (x0, y0) is the parent position, (x1, y1) is one diagonal step further, and (x2, y2) is two diagonal steps.

After map boundaries, obstacle, and destination-reached checking, first checks are done if (x1, y1) itself should be a jump point due to obstacles. Then it performs a horizontal scan, followed by a vertical scan.

Most of the code is detection that a new point was created, skipping the remaining actions, and then creating new jump points for the skipped actions. Also, if jump points got added in the horizontal or vertical search, their parent reference is set to the intermediate point. This is discussed further in the next section.

Creating jump points


Creating jump points at an intermediate position, such as at b2 when the horizontal or vertical scan results in new points has a second use. It's a record of how you get back to the starting point. Consider the following situation


Attached Image: path_storage.png


Here, a diagonal scan started at a1. At b2 nothing was found. At c3, the horizontal scan resulted in new jump points at position c5. By adding a jump point at position c3 as well, it is easy to store the path back from position c5, as you can see with the yellow line. The simplest way is to store a pointer to the previous (parent) jump point.

In the code, I use special jump points for this, which are only stored in the closed list (if no suitable node could be found instead) by means of the get_closed_node method.

Starting point


Finally, a small note about the starting point. In all the discussion before, the parent was at a position which was already done. In addition, scan directions make assumptions about other scans covering the other parts. To handle all these requirements, you first need to check the starting point is not the destination. Secondly, make eight new jump points, all starting from the starting position but in a different direction.

Finally pick the first point from the open list to kick off the search.

Performance


I haven't done real performance tests. There is however an elaborate discussion about it in the original paper. However, the test program prints some statistics about the lists

Dijkstra: open queue = 147
Dijkstra: all_length = 449

A*: open queue = 91
A*: all_length = 129

JPS: open queue = 18
JPS: all_length = 55

The open/closed list implementation is a little different. Rather than moving an entry from the open to the closed list when picking it from the open list, it gets added to an overall list immediately. This list also knows the best found distance for each point, which is used in the decision whether a new point should also be added to the open list as well.

The all_length list is thus open + closed together. To get the length of the closed list, subtract the length of the open list.

For the JPS search, a path back to the originating node is stored in the all_length list as well (by means of the get_closed_node). This costs 7 nodes.

As you can see, the Dijkstra algorithm uses a lot of nodes in the lists. Keep in mind however that it determines the distance from the starting point to each node it vists. It thus generates a lot more information than either A* or JPS.

Comparing A* and JPS, even in the twisty small area of the example search, JPS uses less than half as many nodes in total. This difference increases if the open space gets bigger, as A* adds a node for each explored point while JPS only add new nodes if it finds new areas behind a corner.

References


The Python3 code is attached to the article. Its aim is to show all the missing pieces of support code from the examples I gave here. It does not produce nifty looking pictures.

Dijkstra algorithm

Not discussed but a worthy read.
A* algorithm
JPS algorithm

Versions

  • 20151024 First release

Leading the Target

$
0
0
Where should we aim if we want to hit a moving target with a finite-speed projectile? This is one of the recurrent questions from beginner game developers. If we naively aim at the target's current position, by the time our projectile gets there the target will have moved, so we need to aim ahead of the target's current position. The technical name for the technique is "deflection", but most people use "leading the target". Wikipedia page here.

There are several variations of the problem, where perhaps the projectile is a missile that needs to accelerate, or where the shooter is a turret that is currently aiming in some direction and needs time to aim somewhere else... We'll cover the simple case first, and then we'll present a general template for solving variations of the problem.

Plain-vanilla deflection


Let's assume the shooter can aim and shoot anywhere instantly, the target is moving at a constant velocity and the projectile will travel at a constant velocity too. We are given as inputs the target's current position, its velocity and the speed of our projectile. We'll use coordinates where the shooter is at the origin and has zero velocity.

First-order correction


As mentioned before, if we naively aim at the target's current position, by the time the projectile gets there, the target will have moved. We can compute how long it will take for the projectile to get to the target's current position, compute where the target will be then and aim there instead.

Position compute_first_order_correction(Position target_position, Vector target_velocity, float projectile_speed) {
    float t = distance(Origin, target_position) / projectile_speed;
    return target_position + t * target_velocity;
}

This simple piece of code is probably good enough in many cases (if the target is moving slowly compared to the projectile speed, if the target is moving perpendicularly to the shooter-to-target vector, or if we want to sometimes miss because a more precise solution would be detrimental to the fun of the game).

Iterative approximation


For a more precise solution, you could iterate this first-order correction until it converges.

Position iterative_approximation(Position target_position, Vector target_velocity, float projectile_speed) {
    float t = 0.0f;
    for (int iteration = 0; iteration < MAX_ITERATIONS; ++iteration) {
		float old_t = t;
        t = distance(Origin, target_position + t * target_velocity) / projectile_speed;
        if (t - old_t < EPSILON)
            break;
    }
	
    return target_position + t * target_velocity;
}

Computing the answer directly


In the iterative approximation, we would stop if we found a place where old_t and t match. This gives us an equation to solve:

t = distance(Origin, target_position + t * target_velocity) / projectile_speed

Let's do some computations to try to solve it.

t = sqrt(dot_product(target_position + t * target_velocity, target_position + t * target_velocity)) / projectile_speed

t^2 * projectile_speed^2 = dot_product(target_position + t * target_velocity, target_position + t * target_velocity)

t^2 * projectile_speed^2 = dot_product(target_position, target_position) + 2 * t * dot_product(target_position, target_velocity) + t^2 * dot_product(target_velocity, target_velocity)


This is a second-degree equation in t^2 which we can easily solve, leading to the following code:

// a*x^2 + b*x + c = 0
float first_positive_solution_of_quadratic_equation(float a, float b, float c) {
  float discriminant = b*b - 4.0f*a*c;
  if (discriminant < 0.0f)
    return -1.0f; // Indicate there is no solution                                                                      
  float s = std::sqrt(discriminant);
  float x1 = (-b-s) / (2.0f*a);
  if (x1 > 0.0f)
    return x1;
  float x2 = (-b+s) / (2.0f*a);
  if (x2 > 0.0f)
    return x2;
  return -1.0f; // Indicate there is no positive solution                                                               
}

Position direct_solution(Position target_position, Vector target_velocity, float projectile_speed) {
    float a = dot_product(target_velocity, target_velocity) - projectile_speed * projectile_speed;
    float b = 2.0f * dot_product(target_position, target_velocity);
    float c = dot_product(target_position, target_position);
    
    float t = first_positive_solution_to_quadratic_equation(a, b, c);
    if (t <= 0.0f)
        return Origin; // Indicate we failed to find a solution
	
    return target_position + t * target_velocity;
}

The general case


There are many variations of the problem we could consider: Accelerating targets, accelerating projectiles, situations where it takes time to aim at a new direction... All of them can be solved following the same template.

The things that could change can be encoded in two functions:
  • position_of_target_at(time)
  • time_to_hit(position)
All we are really doing is finding a time t at which the following equation holds:

t = time_to_hit(position_of_target_at(t))

We then compute where the target will be at time t and aim there.

Just as before, we could do a first-order correction, use iterative approximation or solve the problem directly. It might be the case that an analytical solution can be found, like we did in the previous section, but things can get messy quickly and you may have to resort to a numerical solution.

Conclusion


This article covered three methods to implement deflection in your games: First-order correction, iterative approximation and directly finding the solution. You'll need to use some judgement to decide which one to use. Hopefully this article gives you enough to make an informed decision.

Article Update Log


30 Oct 2015: Initial release

Code for Game Developers: Optimization

$
0
0
Code for Game Developers is another take on Math for Game Developers - a weekly instructional YouTube series starting from the basics of a concept and working up towards more complex topics. In the case of this video series, after laying out the foundation of optimization you will learn about:
  • Amdahl's Law
  • Big O notation
  • Cache Levels
  • Binary Search
  • Hash Tables
  • CPU optimizations
If you have questions about the topics covered or requests for future topics, I would love to hear them! Leave a comment, or ask me on my Twitter, @VinoBS

Note:  
The video below contains the playlist for all the videos in this series, which can be accessed via the playlist icon at the top of the embedded video frame. The first video in the series is loaded automatically


Combining Material Friction and Restitution Values

$
0
0


Physics simulations commonly use the Coulomb friction model, which requires a coefficent of friction between the materials of two interacting objects to calculate the friction force. Similarly, a coefficient of restitution is required to calculate the collision response force. But how do you determine these coefficients for each pair of materials?


A common approach is to define values of friction and restitution for each individual material and then combine them to get the material-material values. Given individual material friction values \(x\) and \(y\), we need to define a combination function \(f(x,y)\). Similarly, \(r(x,y)\) for restitution (using \(x\) and \(y\) to mean the material restitution values this time).


Function requirements


The value of \(f(x,y)\) and \(r(x,y)\) should lie between \(x\) and \(y\). So \(f(x,x) = x\) and \(r(x,x) = x\).


For any constant \(c\), \(f(x,c)\) and \(r(x,c)\) should be monotonically increasing (it shouldn't ever decrease as \(x\) increases). It should also avoid long flat sections, so as to be able to discriminate bewteen materials. For instance, putting boxes of ice and rubber on an plane and increasing the slope, the ice should slip first, whether the plane is made of ice or rubber.


\(f(x,y)\) should favour slippy over grippy, i.e. \(f(0,1) \lt 0.5\). This corresponds to the intuitive notion that ice should have a greater effect on the combined restitution value than rubber, e.g. vehicle tyres on ice.


I decided that I wanted \(r(x,y)\) to favour the extremes, in a similar way that \(f(x,y)\) should favour values towards \(0\). So very bouncy or very energy-absorbing materials predominate over average ones. In a game world, you then have the option of making the world less or more bouncy for all objects within it by changing the world material, while maintaining a reasonably wide range of restitution values when the world is set to an averagely bouncy material.


Friction


Candidates for \(f\) that are often used are the minimum, the arithmetic average, and the geometric average.


Minimum


\(f_{min}(x,y) = min(x,y)\)

Attached Image: min.gif


This has too many flat sections and doesn't adequately discrimiate between materials, e.g. \(f(0.1,0.1) = f(0.1,1)\).


Arithmetic average


\(f_{aa}(x,y) = \frac{x + y}{2}\)

Attached Image: x+y_2.gif


This doesn't favour slippy over grippy enough.


Geometric average


\(f_{ga}(x,y) = \sqrt{{x}{y}}\)

Attached Image: sqrt(xy).gif


This is good, but the values aren't equally spaced. For this reason, I have found an alternative function - a weighted sum of \(x\) and \(y\).


Weighted sum


\(f_{ws}(x,y) = \frac{{x}{w_{x}} + {y}{w_{y}}}{w_{x} + w_{y}}\) where \(w_{x} = \sqrt{2}(1 - x) + 1\)

Attached Image: f_wc_c=sqrt(2).gif


\(f_{ws}\) has a more regular spacing between values than \(f_{ga}\). The trade-off is that it doesn't cover the full range of values for \(f(x,1)\) (\(f(0,1) \approx 0.3\)). However, they are approximately equal for \(0.2 \le x \le 1\).


Restitution


As with friction, the minimum, the arithmetic average, and the geometric average are often used.


Minimum

Attached Image: min.gif


\(r_{min}\) has the same objections as \(f_{min}\).


Geometric average

Attached Image: sqrt(xy).gif


\(r_{ga}\) is not suitable because it would require the world material to have a restiution near \(1\) to provide a wide range of combined values.


Arithmetic average

Attached Image: x+y_2.gif


\(r_{aa}\) is better, but it doesn't give a very wide range of values for \(r(x,0.5)\). We can improve on this range by allowing some flatness and defining \(r\) as a piecewise min/max/sum function.


Piecewise min/max/sum


\(r_{pmms} = \begin{cases}min(x,y) & \text{if }x \lt 0.5 \land y \lt 0.5\\max(x,y) & \text{if }x \gt 0.5 \land y \gt 0.5\\x + y - 0.5 & \text{otherwise}\end{cases}\)

Attached Image: r_pmms.gif


This has the same shortcomings as \(r_{min}\) at the corners where the min and max functions are used. But you can't avoid that if you want to have the full range of values for \(r(x,0.5)\) and still satisfy \(r(x,x) = x\). Similar to the friction, I have created a weighted sum function that I think is better.


Weighted sum


\(r_{ws}(x,y) = \frac{{x}{w_{x}} + {y}{w_{y}}}{w_{x} + w_{y}}\) where \(w_{x} = \sqrt{2}\left\vert{2x - 1}\right\vert + 1\)

Attached Image: r_wc_c=sqrt(2).gif


As with \(f_{ws}\), \(r_{ws}\) sacrifices some of the range for \(r(x,0.5)\) to provide better continuity in the corners.


Why \(\sqrt{2}\)?


It's the choice that maximizes the function range, while maintaining monotonicity. These graphs show what \(f_{ws}\) looks like with \(w_{x} = c(1 - x) + 1\), for \(c = 0.5\), \(c = 1\), \(c = \sqrt{2}\), \(c = 2\), and \(c = 4\). For \(c \lt \sqrt{2}\), \(f_{ws}(x,1)\) has less range. For \(c \gt \sqrt{2}\), \(f_{ws}\) is no longer monotonic - near \(f_{ws}(0.1,0.9)\) it starts to curve back, making a more grippy material have a lower combined friction! You can see this more clearly for higher values of \(c\).


\(c = 0.5\)

Attached Image: f_wc_c=0.5.gif

\(c = 1\)

Attached Image: f_wc_c=1.gif

\(c = \sqrt{2}\)

Attached Image: f_wc_c=sqrt(2).gif

\(c = 2\)

Attached Image: f_wc_c=2.gif

\(c = 4\)

Attached Image: f_wc_c=4.gif

Conclusion


The method to combine material friction and restitution values may seem like a minor detail, but sometimes the devil's in the details.


Since the whole concept of defining values for friction and restitution for a single material and then combining them isn't physically accurate, this is obviously just a case of finding a suitable function rather than attempting to model reality. You may have different requirements for your functions, but I hope this discussion of the alternatives is useful.


Links


I made the graphs at the WolframAlpha web site. I find it's a pretty useful tool. Here's an example plot.


Article Update Log


12 Nov 2015: Initial release

Making Your C++ Namespace Solid and Future-Proof

$
0
0
This article provides a possible solution to a real problem, nothing more, nothing less. It is up to developers evaluating pros and cons to decide if this approach is worthwhile for their framework/library.

The problem


In C++ you do not import stuff, you include files which means "text replacement" and some preprocessor magic. When you include a file you are indirectly including many other files, relying on this behaviour is bad and can cause harm in the long run:
  • What you expect "by design" is that you have at your disposal only what you "imported/included"
  • Side-included headers are actually only a implementation detail: it may change!

Two real examples of breaking code


Example #1

This GCC distribution at least have a STL library that indirectly include

<functional>

from other headers, when you accidentally use stuff from such a header then the code will just compile fine, but when you try to compile the code from elsewhere the compilers will complain that there is no such thing called "std::function" and (maybe) you are missing some include (and you are truly missing an include).

Example #2

Your class is using another class as a private member:

#include "Foo.h" // a implementation detail
    
class MyClass{
    Foo _foo;
public:
    //...
};

Later you decide to refactor the code and use internally another class:

#include "Bar.h" //ops.. any client used "foo" but not included it? => dang compile error for him
    
class MyClass{
    Bar _bar;
public:
    //...
};

The Solution


The solution to the problem is actually very simple: Put everything in another namespace, and "import" it only if client is actually including it from the right header.

Your library BEFORE


Directory structure:
mylib/
    +MyClass.h
    +Foo.h
    +MyClass.cpp
    +Foo.cpp

MyClass.h: including this file actually cause the inclusion of "Foo.h".
    #pragma once
    #include "Foo.h" // a implementation detail
    
    namespace mylib{
        class MyClass{
            Foo _foo;
        public:
            //...
        };
    }

MyClass.cpp
    #include "MyClass.h" // a implementation detail
    
    namespace mylib{
        //...
    }

Foo.h
    #pragma once
    
    namespace mylib{
        class Foo{
            //...
        };
    }

Your library AFTER


Directory structure:
mylib/
    
    +MyClass.h
    +Foo.h
    
    priv/
        +MyClass.h
        +Foo.h
        +MyClass.cpp
        +Foo.cpp

You move all old files to a private folder, then you just import stuff into your namespace from public headers

Forwarding headers

mylib/MyClass.h
#include "priv/MyClass.h"

namespace PUBLIC_NAMESPACE{
    using MyClass = PRIVATE_NAMESPACE::MyClass; //requires C++11
}

mylib/Foo.h
#include "priv/Foo.h"

namespace PUBLIC_NAMESPACE{
    using Foo = PRIVATE_NAMESPACE::Foo; //requires C++11
}

Internally you keep everything in a private namespace, so the user is forced to include correct headers immediatly:

Now entering the "priv" folder

mylib/ priv/ MyClass.h
    #pragma once
    #include "Foo.h"
    
    namespace PRIVATE_NAMESPACE{
        class MyClass{
            Foo _foo;
        public:
            //...
        };
    }

Note how important is the usage of "relative path" inclusion

mylib/ priv/ MyClass.cpp
    #include "MyClass.h" // a implementation detail
    
    namespace PRIVATE_NAMESPACE{
        //...
    }

mylib/ priv/ Foo.h
    #pragma once
    
    namespace PRIVATE_NAMESPACE{
        class Foo{
            //...
        };
    }

Apart from renaming namespaces, there are no major changes in the pre-existing code nor pre-processor magic, the whole task could be automated so that you get C#-style headers almost for free. Basically you can continue to develop as always because it is always possible to re-import stuff in a different namespace (even third party libraries).

Effects on client code:


Without forwarding:
#include <MyClass.h>
using namespace PUBLIC_NAMESPACE;
    
int main(){
    MyClass a;
    Foo b;     //allowed (public namespace polluted)
}

With forwarding:
#include <MyClass.h>
using namespace PUBLIC_NAMESPACE;
    
int main(){
    MyClass a;
    Foo b;     //NOT ALLOWED Compile error (need to include Foo)
}

Pros
  • Less pollution in public namespace
  • Users are forced to not rely on implementation details
  • Less chance to break code after library refactoring
Cons
  • Increased compile time
  • More maintenance cost for library developers

Article updates


14/11/2015 17:10 added usage example

Maintenance-free Enum to String in Pure C++ with "Better Enums"

$
0
0

Background


Enums are used in game programming to represent many different things – for example the states of a character, or the possible directions of motion:

enum State {Idle, Fidget, Walk, Scan, Attack};
enum Direction {North, South, East, West};

During debugging, it would be useful to see "State: Fidget" printed in the debug console instead of a number, as in "State: 1". You might also need to serialize enums to JSON, YAML, or another format, and might prefer strings to numbers. Besides making the output more readable to humans, using strings in the serialization format makes it resistant to changes in the numeric values of the enum constants. Ideally, "Fidget" should still map to Fidget, even if new constants are declared and Fidget ends up having a different value than 1.

Unfortunately, C++ enums don't provide an easy way of converting their values to (and from) string. So, developers have had to resort to solutions that are either difficult to maintain, such as hard-coded conversions, or that have restrictive and unappealing syntax, such as X macros. Sometimes, developers have also chosen to use additional build tools to generate the necessary conversions automatically. Of course, this complicates the build process. Enums meant for input to these build tools usually have their own syntax and live in their own input files. The build tools require special handling in the Makefile or project files.

Pure C++ solution


It turns out to be possible to avoid all the above complications and generate fully reflective enums in pure C++. The declarations look like this:

BETTER_ENUM(State, int, Idle, Fidget, Walk, Scan, Attack)
BETTER_ENUM(Direction, int, North, South, East, West)

And can be used as:

State   state = State::Fidget;

state._to_string();                     // "Fidget"
std::cout << "state: " << state;        // Writes "state: Fidget"

state = State::_from_string("Scan");    // State::Scan (3)

// Usable in switch like a normal enum.
switch (state) {
    case State::Idle:
        // ...
        break;

    // ...
}

This is done using a few preprocessor and template tricks, which will be sketched out in the last part of the article.

Besides string conversions and stream I/O, it is also possible to iterate over the generated enums:

for (Direction direction : Direction._values())
    character.try_moving_in_direction(direction);

You can generate enums with sparse ranges and then easily count them:

BETTER_ENUM(Flags, char, Allocated = 1, InUse = 2, Visited = 4, Unreachable = 8)

Flags::_size();     // 4

If you are using C++11, you can even generate code based on the enums, because all the conversions and loops can be run at compile time using constexpr functions. It is easy, for example, to write a constexpr function that will compute the maximum value of an enum and make it available at compile time – even if the constants have arbitrary values and are not declared in increasing order.

I have packed the implementation of the macro into a library called Better Enums, which is available on GitHub. It is distributed under the BSD license, so you can do pretty much anything you want with it for free. The implementation consists of a single header file, so using it is as simple as adding enum.h to your project directory. Try it out and see if it solves your enum needs.

How it works


To convert between enum values and strings, it is necessary to generate a mapping between them. Better Enums does this by generating two arrays at compile time. For example, if you have this declaration:

BETTER_ENUM(Direction, int, North = 1, South = 2, East = 4, West = 8)

The macro will expand to something like this:

struct Direction {
    enum _Enum {North = 1, South = 2, East = 4, West = 8};

    static const int _values[] = {1, 2, 4, 8};
    static const char * const _names[] = {"North", "South", "East", "West"};

    // ...functions using the above declarations...
};

Then, it's straightforward to do the conversions: look up the index of the value or string in _values or _names, and return the corresponding value or string in the other array. So, the question is how to generate the arrays.

The values array


The _values array is generated by referring to the constants of the internal enum _Enum. That part of the macro looks like this:

    static const int _values[] = {__VA_ARGS__};

which expands to

    static const int _values[] = {North = 1, South = 2, East = 4, West = 8};

This is almost a valid array declaration. The problem is the extra initializers such as "= 1". To deal with these, Better Enums defines a helper type whose purpose is to have an assignment operator, but ignore the value being assigned:

template <typename T>
struct _eat {
    T   _value;

    template <typename Any>
    _eat& operator =(Any value) { return *this; }   // Ignores its argument.

    explicit _eat(T value) : _value(value) { }      // Convert from T.
    operator T() const { return _value; }           // Convert to T.
}

It is then possible to turn the initializers "= 1" into assignment expressions that have no effect:

    static const int _values[] =
        {(_eat<_Enum>)North = 1,
         (_eat<_Enum>)South = 2,
         (_eat<_Enum>)East = 4,
         (_eat<_Enum>)West = 8};

The strings array


For the strings array, Better Enums uses the preprocessor stringization operator (#), which expands __VA_ARGS__ to something like this:

    static const char * const _names[] =
        {"North = 1", "South = 2", "East = 4", "West = 8"};

We almost have the constant names as strings – we just need to trim off the initializers. Better Enums doesn't actually do that, however. It simply treats the whitespace characters and the equals sign as additional string terminators when doing comparisons against strings in the _names array. So, when looking at "North = 1", Better Enums sees only "North".

Is it possible to do without a macro?


I don't believe so, for the reason that stringization (#) is the only way to convert a source code token to a string in pure C++. One top-level macro is therefore the minimum amount of macro overhead for any reflective enum library that generates conversions automatically.

Other considerations


The full macro implementation is, of course, somewhat more tedious and complicated than what is sketched out in this article. The complications arise mostly from supporting constexpr usage, dealing with static arrays, accounting for the quirks of various compilers, and factoring as much of the macro as possible out into a template for better compilation speed (templates don't need to be re-parsed when instantiated, but macro expansions do).

Billboarded Foliage in Unreal Engine 4

$
0
0
This article will guide you through how to create billboarded folage in Unreal Engine 4. That is, foliage which is a simple quad repeated many times, all of which always face the camera. I will also discuss why this is a good idea (along with some of the potential downsides, too) and the performance implications.

Foliage in Unreal Engine 4


By default, Unreal Engine 4 supports foliage via its foliage editing tool. This tool allows placement if instanced static meshes (static meshes meaning non-skeletal models, in more generic terms). Each of these foliage assets can be drawn many thousands of times onto the map, each with instance-specific parameters, e.g. rotation, location, etc.

For relatively small (e.g. under 10,000) assets, which are simple (e.g. less than 100 polygons) this generally performs OK with shadows and good quality lighting on the foliage, so long as you set a reasonable culling distance so that the graphics hardware doesn't try to draw all 10,000 instances at once.

For relatively large amounts of foliage (e.g. entire forests) this can pose problems.

Let's discuss a scenario which happened in my game to clarify. To the north of the map is a large forest, and the player may enter the southern edge of that forest. Everything beyond the southern edge of that forest is outside the playable area, but still needs to be rendered and needs to give the impression of a huge, impassible forested area.

If we were to render the entire forest using even low-poly versions of the trees, this can and does cause a performance issue for players with lower end hardware.

The solution is to create a billboard.

A billboard? Isn't that something to do with advertising?


Out of the box, Unreal Engine 4 supports a component known as a Billboard Material Component. These are great for one-off or small numbers of static meshes placed into the level, as shown in the example above. Unfortunately they cannot be used for the foliage tool, as the foliage tool only accepts placement of static meshes and to make use of the Billboard Component, it must be contained within an Actor which is not a supported type for this tool.

So, we must make our own Billboard Material. The base instructions on this to get you started can be found on Epic's documentation in a section that discussed stylized rendering (this is obscure enough that many may not find it).

I will not reproduce Epic's content here, however I will provide a screenshot of my own material, based upon theirs, and discuss its creation and how to use it in your game.

Start out by importing some simple 2D textures which represent your billboarded sprite. For this, I took screenshots of my actual tree model, and made the backgrounds transparent. This makes them look identical to the actual high poly models, at any reasonable distance.

It is important to have some variety here, for my game I chose four different views of the same tree, so that they look different when displayed:


billboard tree 1
billboard tree 2
billboard tree 3
billboard tree 4


Preparing the material


The next step in creation of the billboards is to create a material which will ensure that the verticies of your static mesh face the camera. This works because the static mesh we will use will be a simple quad built from two triangles (more on this later).

Go into Unreal Engine's Content Browser, right click and choose to create a new Material.

You should create a material which has a blend mode of Masked, Shading model of Unlit and is Two Sided:

material properties for billboaded materials

You may then place your nodes in the material's graph pane. These are similar to the one on Epic's documentation, however the parts missing from their documentation are shown here in my implementation (click the image to enlarge):

billboardmaterial

There are some important things to note about this material. As discussed already the material adjusts the position of its verticies to face the camera. It does this via the nodes connected to the World Position Offset.

The 'Custom' node, within the billboard effect section, contains some custom HLSL code which is used to calculate the correct rotation of the quad. The content should read as follows, with the 'Inputs' set to one value named 'In' and the output type as "CMOT Float 2" (note, this differs slightly from Epic's version, which had broken parameter names):

float2 output; 
output = atan2 (In.y,In.x); 
return (output);

The nodes attached to the PivotPosition ensure that the quad rotates around its origin, and is translated to world space so that the coordinates make some sense.

Note that this material is not intended to be used directly. The Texture has been promoted to a Material Parameter, which can then be used by material instances.

You should right click on this material in the content browser once you have saved it, and make multiple instances of it, each of which uses the correct texture that you want to use as a billboard. This will prevent code duplication and is slightly more efficient on resources.

instances

Now we have defined the material, we can move on to loading a simple quad into Unreal Engine 4, which can be used as the static mesh for the foliage tool.

Creating and loading the mesh


All we need in terms of a model for the billboard is a simple quad, built from two triangles. You can create such an asset in Blender, or alternatively I have attached mine to this article, it may be downloaded below and used freely in any project.

Attached File  squareplane.zip   6.06KB   45 downloads

When you import the quad, be aware you may need to adjust the rotation and translation of the quad so that it sits squarely initially facing the camera, and on the surface of your terrain. If you do not do this, then your material will face sideways, or upside down (or both!) and the material will translate its position to always face in the wrong direction!

For example, to import my quad, you could use:
  • Roll: 270 degrees
  • Pitch: 180 degrees
  • Yaw: 0 degrees
  • Import Uniform Scale: Adjust this to suit your map, the quad is quite large.
  • Import translation, Z axis: Adjust this to suit your terrain. I used 190 units.
Once you have imported the quad, name it something sensible (I named mine TreeBillboard_Quad_1) and assign it your billboard material.

You could now place this into your map, and observe how as you move the camera, the quad will always face your viewpoint. Alternately, and more sensibly, you can now drag this static mesh into the foliage tool, and start placing it:

foliage edit

When you add the mesh to the foliage tool you should be sure to disable the Align to Normal and Random Yaw options, as both of these rotate your mesh and will break the effect put in place by the material.

Be aware that you should always place this mesh outside the playable area, where the player cannot reach it and attempt to walk behind or at the side of it. If they do so, the illusion will be broken and it won't look good at all.

Once you have placed many thousands of these trees they will start to look like a forest. The quality of your result is directly related to the quality of the initial textures you used:

trees


Performance


As we are only drawing two triangles for each tree, the performance of this solution is more than acceptable on modern hardware. I was able to place enough trees to fill my map without noticable slowdown on my mid-range graphics card (AMD R9 270X). Although I used this for trees, the same approach could be used for grass, reeds, or any other smaller plants that the player might be close to, but wouldn't notice the flatness.

It is also difficult to properly light and display shadows for billboards. In my game, I have turned off shadows for the billboard meshes. As they are usually placed very far from the camera, the player should not notice this. If they get too close, all bets are off.

It is worth noting however that the performance of this solution is not perfect. By using the 'Custom' node in our material we prevent Unreal Engine 4 from making various optimisations to our shader. This has not been noticable for me, but your mileage may vary. If you are unsure, always profile your game.

Conclusion


I hope this has been a useful article on how to render many pieces of foliage without breaking the bank in terms of your GPU budget. There are many ways of rendering foliage of which this is just one. If you have any questions, improvements or other feedback as always please feel free to comment below.

Article Update Log


26 Nov 2015: Initial release

My Year as a Mobile Gamedev

$
0
0

Over a year ago I released my first Android game after a few months of working and posting my progress on wykop.pl with #odzeradogierdevelopera hashtag. with literally no prior knowledge in gamemaking, I've managed to create a simple game which has been positively acclaimed.

Now, having gained a lot of experience and with a slightly new vision and approach to mobile gamedev, I’m publishing my fourth game – MiniCab: Animal Express. I’d like to briefly outline the differences I notice regarding my actions and choices.


OU01Ohy.png
reVoid


When I was releasing my first game, I had no marketing knowledge whatsoever. I was driven by the presumption that a good game will sell itself. But nothing could be further from the truth. The truth is, even the best, the most innovative game with poor advertising won’t be a success or, what’s worse, a well marketed crappy game may be a hit! That’s the problem with the mobile games market. Flooding the market with garbage which cunningly imitates popular games or films by using strikingly similar graphics, using keywords (so-called ASO) and so on. A large part of such games are completely unplayable. What’s more – they shouldn’t even be called games at all, although they hold higher ranking positions than true games simply by misleading those less-aware gamers who are oblivious to such trickeries. Of course, everything is done in accordance with law, because there is no direct copyright infringement.

Back to reVoid marketing, which was pretty much non-existent, the only publicity and marketing was achieved through my reports in a form of posts tagged #odzeradogierdevelopera on wykop.pl. The summary post has been upvoted by over 1000 users. That contributed to a high ranking position on the first day after publication in the Play Store and a high download rate, although it has dropped and now the game is downloaded by a few users a week.

In total, the game has been downloaded 34,878 times, 20% on the first week, and 60% of the downloads were from Poland.


8OY2kgs.png
reVoid – total downloads

THGC8nV.png
Fly! Fly!


A few months after reVoid release I started thinking about a new game. I thought that it’d be cool to make something quickly, try to meet a certain short deadline. I settled on 14 days and after those two weeks under low workload I released a simple game without any marketing coverage. I’ve only made one post on wykop.pl/mikroblog about the release. How many downloads? A little over 900. The game didn’t really catch on. Yes, maybe it wasn’t the most remarkable game, but first of all it was pretty much unheard of :) It’s important to note that every day app stores are flooded with hundreds of new products; over 500 new apps are added to Play Store each day! That’s why it’s impossible for a potential gamer to find a desirable game on their own – they need help and that’s why marketing is so important.


fPaxB16.png
Fly! Fly – total downloads

OMao38K.png
Hools Run


After Fly! Fly! it took me quite a long time to bring myself to start another project. I made a few prototypes but none of them were suitable to become a legitimate game. Then wykop.pl user @Oskarek89 suggested that we cooperate on production of a football-themed game. The cooperation was based on the premise that I manage the development and he makes sure that the game sells out, using his fanpage and connections. It was a good decision, because I was able to focus on game making without bothering with the marketing.

On the first week, the game has been downloaded 14,000 times and after that it skyrocketed to a high position in the ranking. Though it was downloaded mostly in Poland (86%), it was virtually non-existent in other countries. And that’s the next issue: when a game gains popularity on the biggest market – USA – its popularity rapidly spreads throughout other countries through the media. In the case of Poland, everything stays here and, for all intents and purposes, restricting the marketing only to Polish market makes our game unavailable to other markets.

In total, Hools Run has been downloaded 25,337 times, 51% of the downloads happened on the first week.


rRmJwdY.png
Hools Run – total downloads

6ouKDD3.png
Minicab Animal Express


At the beginning it was supposed to be a project similar to Fly! Fly! – a simple pixel-art game about driving a taxi created in no more than 3 weeks. I ended up making it for nearly three months :) It was all because in the course of its production I found that it’s not a good idea to release the next game as soon as possible, since no one is chasing me. I realized it’ll be better to apply myself, work a little longer and release a game which is much better than every next pixel-art shitty game. I also implemented some changes in terms of marketing. I started to show the game in its various stages of production, not just on wykop.pl, but also on foreign sites, i.e. on reddit or Twitter. The game hasn’t gained much popularity on those sites, but with each new post it piqued the interest of several people who praised some of its aspects, asked about the release date and so on.

I prepared a presskit with the most important information, screenshots and gameplay, and I sent it to Polish and foreign gaming and Android websites, hoping that they will publish some information about my game in the form of news/reviews. This kind of marketing costs nothing, and can really give a lot. Most of these sites warmly welcome any information about the games directly from their developers – this way presskit news are almost ready, and the journalists who are reportedly always very busy, are very eager to indulge in the opportunity to use any free stuff. Of course, provided that the game is good enough and worthy of publication :)

With that in mind, it’s important not to be overeager, no one likes spam in their mailbox. The message must be sent once, to a proper address. Some newsrooms have a separate box/forms to contact the developers or specific individuals on tech websites who specialize in gaming.

Summary


Mobile gamedev it is not, as I discovered, a simple matter, especially for someone who works alone, dealing with all the aspects of production: starting with graphics, through gameplay, to the marketing. During this year of game dev, I’ve learned many new things, but still I barely even touched on the subject. It is essential for every developer who works alone (and who has no intention of going to any publisher and would rather release their own game by themselves) to start showing it to the world as soon as possible, gather opinions, comments and ideas. Reddit, twitter, gamedev forums, groups on Facebook, itch.io. It’s also a very good idea to start a devlog e.g. on Tumblr (example: http://jettoast.tumblr.com/). If someone starts to show their game two weeks before the release, they can be sure that it won’t succeed. Building up the position on the market starts long before the release of the game, especially if you don’t have millions for big advertising campaigns.

The second issue is building a community. This is important, because faithful and devoted community surrounding a particular game can, in addition to support during various stages of production, yield a nice profit and provide free advertising. The third issue is the search for new opportunities. Instead of doing everything by yourself, you can hire a person or company that specializes in independent game marketing ($$$ needed) or you can contact a publisher. Nowadays, more and more publishers are running special programs for independent developers where they offer technical, financial and marketing support for the game in exchange for share in profits (examples: http://www.11bitstudios.com/pl/launchpad/ or http://www.publishing.vividgames.com/). Then there is the question: will I earn more by publishing the game on my own or with the help of a publisher who will want a large portion of the profits in return? Everyone has to answer that by themselves. I am guided by a simple principle: it is better to get 10% of something than 100% of nothing :)

What about my finances? How much money have I managed to earn in this multi-billion-dollar mobile gaming market so far? A little less than 250$. All of my games are 100% free and the only way of monetizing is through the ads. My games are, what’s very important, released only on one platform – Android, which is mainly due to the lack of funds for investment in iOS platform on which the entry threshold is much higher than in the Play Store. I’d rather not talk about Windows Phone platform.

And this way I’ve described my first year of amateur gamedev. In this short text I failed to cover all the aspects and details, so if you feel unsatisfied or have any questions, feel free to discuss, at the same time I encourage you to download my youngest child: MiniCab Animal Express :)

Regards.

https://twitter.com/ZarzyckiAdrian

Creating your first game with Game Maker: Studio

$
0
0

Introduction


So you want to start creating your own games? Then you've come at the right place. This article will get you started on creating simple 2D games.

Game Maker: Studio


What is that?


Game Maker: Studio is a popular game development software used by many Indie Game Developers all over the world. It's easy; yet powerful.

It has a free version which is capable of making good games for Windows. Further, the professional version can be bought for more features and can be extended by buying packages to be able to make games for different platforms such as Android, Mac, iOS, etc.

There are mainly two ways of creating your game: Using the Drag&Drop actions, or by coding. In this article, we'll make our game using the coding language of Game Maker: Studio, which is called Game Maker Language and often abbreviated as GML. Don't worry, it's very easy. Let's proceed.

Understanding the basics


Before starting, understanding the basics is a must. Let's see how a game is created in GM:S.

Sprites


Sprites are the images created/imported in the software to be used for different things such as the character, a block, the wall, or the boss. A sprite can be a single image or a series of images (or sub-images) which results in an animated sprite.

Sprites can be created using the sprite-editor in GM:S or can be imported from any file.

Objects


Objects signify different elements of a game, such as a character, a block, a power-up, an enemy, or anything. So every different element, or simply object of a game needs a different object.

Sprites can be assigned to objects. Further, you can add events, actions and code in the object which define its actions, and then can be placed in a room, which will be shown when you play your game.

Note: If you understand this completely, then, good for you. If not, or if you're confused, don't worry - just keep reading. You'll get it eventually.

Rooms


Rooms can be defined as levels in your game. A room is a rectangular space - its size is defined by its width and height in number of pixels. (Example: A width of 1024 and a height of 768 pixels will result in a room of size 1024x768)

After a room is created, objects can be put in the space of the room, and a level can be designed in this way. This way, many rooms, or levels, can be created. When you start your game, the first room is shown first.

Our first game!


So now that we're done with the basics, we'll start by creating a simple game. We'll be making a simple character who needs to collect coins to win, avoiding the enemies.

Start Game Maker: Studio. You'll see a small window with many tabs. Open the New Tab, enter your project name and click on Create. You'll see an empty window with many folders in the left pane. That's where all of the Sprites, Objects, Rooms, Sounds and everything is sorted. Quite neat, isn't it? ;)

Sprites


In that left pane, the first folder will be Sprites. Right-click on it and select Create Sprite. You'll see sprite0 under the folder Sprites - that's your first sprite! A small window will open - that's the sprite manager. It shows your sprite with many options. It's empty for now, because you haven't created or imported any sprite.

Name it spr_player, because it will be our player's sprite.

Click on Load Sprite to load any image file for the player, or click on Edit Sprite to create your own.

Creating your sprite


Now that you've clicked on Edit Sprite, another window will open: This is where all of the subimages of your sprite are created. From the menus on the top, open the File menu and select New.... Enter the dimensions of the sprite in the window that opens. In our case, we'll use width: 32, height: 32. Hit enter, and in that window, a small sprite will be created, with the name image 0.

Wow. You just created the first subimage of your sprite! Double-click on the sub-image you just created. Another window will open, and this one is the sprite editor. You'll see it's mostly like Paint. Now - use your creativity! Create your player, as you like. Remember: We're creating a Top-Down game, which means the player must be created as seen from the top. And, it must face right: or else it'll cause problems. Now, create! :D

...

Done with the sprite? Click on the Green Tick on the top-left in the window. It'll close, and in the sub-image editor you'll see your player image. Again, click on the Green Tick. There's your sprite! Now click OK to save the sprite.

Now, in the same way, create these sprites: a wall block, a coin, and an enemy - and remember, they too must be from the top and the enemy also should be facing right. Don't forget to name them after "spr_"(Like spr_player, spr_coin). Use the size 32x32 for all of these sprites.

Objects


Done with creating the sprites? Let's move on to creating our objects. Find the objects folder from the left pane, right-click on it and choose Create Object. Your object (object0) will be created and the object manager window will open.

First of all, change the name from object0 to obj_player. Yes, obj_ will be used as the object name prefix.

Prefixes: Name prefixes such as spr_ (for sprite names), obj_ (for object names), room_ (for room names) aren't compulsory but they're used so that it's easier to reference them in code. For example: A coin is a coin but while coding, you'll know what you want to reference and it will be easier: spr_coin for the sprite and obj_coin for the object.


Now, under the place where you typed the name of the object will be a menu where you can select the sprite you want to use with the object. Click on it and select spr_player. Click on OK to save the object.

Now, in the same way, create objects for the coin, the wall block and the enemy.

Wow! Do you realise that you're creating your own game? You're not far away from getting it running. Just keep reading!

Done with creating the objects, and assigning sprites to them? Good. Now let's start the next step.

Coding


Double-click on obj_player. In object manager, you'll see two empty panes: the one on the left is the event pane, and the one on the left is the action pane.

Events are the specific events which trigger the actions inside them. For example, actions inside the 'left arrow key' event will be executed when the left arrow key on the keyboard is pressed. The 'Create' event works when the object is created first, and that's the only time the actions inside the create event are executed. Actions inside the 'Step' event will be executed every step: or every frame. By default, there are 30 steps in a game, so it means actions inside the Step event will be executed 30 times a second. Woah! Similarly, there are many events.

Room Speed, which tells how many steps there will be in the room, can be changed from the room settings. Default is 30.

Now, right-click in the event pane and select "Add" or just click on "Add Event" below the pane. A small window will open, which contains all of the existing events. Click on Keyboard, and select Left Arrow Key. Similarly, add events for Right Arrow Key, Up Arrow Key and Down Arrow Key. Now we'll add the code for these events.

Click on the Left Arrow Key Event. Now look at the action pane - in the rightmost pane, there are many events which can be dragged into the action pane. They're called Drag & Drop actions. We'll not use them; we'll use an action which is used to add code. See the many tabs on the right side? Open the control tab. From the actions there, choose the first action under the name "Code". (There will be total 3 actions under 'Code') Drag it into the action pane. A window will open - it's the text editor for entering the code. Enter this code in the window:

x-=3

Let me explain what this does.

x is the horizontal property, so it defines the horizontal position of the object in the room in the number of pixels. Similarly, y is the vertical property - it defines the vertical position of the object. So, x=254 will change the horizontal position of the object to 254 pixels in the room.

If x increases, the object will move right. If it decreases, it'll go left.
If y increases, the object will go down, and if it decreases, it'll move up.

What we're doing is telling the object to move left when Left Arrow Key is pressed - so we're decreasing its x property, by using x-=3 - which means subtract 3 from x.

Now click on the Green Tick at the Top-Left. You'll see that your code action has been added in the action pane. You can open and edit the code any time just by double-clicking on the action.

Now, in the same way, add codes for the other Arrow Key actions. Open the next event. Drag the Code action from the control tab of D&D (Drag and Drop) menu. Here are the codes for the arrow keys: (I suggest you first yourself guess what the code will be based on what I told you in the previous paragraph about reducing and increasing x and y to move)

Right Arrow Key:

x+=3

Up Arrow Key:

y-=3

Down Arrow Key:

y+=3

Added the code? Press OK to save your object. Let's move on to creating the room.

Rooms


Find the Rooms folder in the left pane and... I think you know what to do. Right Click > Create Room. Your room, namely room0, will be created. We'll let this be the name. Another window opens - this one will be the room manager. You'll see an empty space along with a left pane and some options on the top - that empty space is your room, basically what you'll see when you start your game. In the left pane, there will be many tabs. Open the Settings tab, and change the room width and height to 800 and 600, respectively.

Now, open the Objects tab. Before adding objects, change both x snap and y snap to 32, which are found on the top in the room manager window. Now, in the left pane, click on the empty pane under the tabs. A menu will open with all of your objects. Click on the wall object (obj_wall). You'll see its sprite there - it means that the object has been selected. Now, use your mouse to add the wall blocks in the room (that empty space on the right). Left-click to add one or hold Ctrl+Shift while Left-clicking to continuously add them. What you want to do here is create your level - design it. Add the wall blocks so that the player has to navigate through the level to find the coins.

If you misplace any object, they can just be dragged and re-placed, or deleted using Right Click > Delete.

Done with adding the wall blocks? Now select the coin object (obj_coin) from the left pane and add 10 coins in your level. After adding the coins, add a few enemies. Add them at a place where they can move up - where a wall block is not blocking their way. After adding the enemies, select obj_player and add it into the room. That's where our player will start, so choose a nice place.

Now save the room using the same green tick you see in every window.

Now let's add more code. We've just made the player move. Double-click open obj_coin. Click on Add Event and choose Collision and select obj_player. This is the event that triggers when the object (obj_coin) collides with the object you just selected (obj_player). Let's add code in it. Select the event, open the control tab, and drag the Code action into the Action Pane.

Add this code:

score+=1
instance_destroy()

score+=1 will increase the score by one everytime the player gets the coin.
instance_destroy() will delete the object instance of the coin. That's to show that the player had taken the coin.

Click on the Green Tick. Press OK to save the object.

Now, open obj_player. Add a collision event with obj_wall.
Add Event > Collision > obj_wall
Add this code in it:

x=xprevious
y=yprevious

This code restricts the player from walking through the wall block.
xprevious is the previous x property of the object.
yprevious is the previous y property of the object.
When the player collides with the wall, its position is immediately changed to its previous position (before the collision), stopping it there.

Click on the green tick.

Add another collision event, this one with obj_enemy. Add this code:

room_restart()

This will restart the room whenever the player collides with the enemy. Click on the green tick.

Add Step event. It executes 30 times a second. In its code, add:

if x>xprevious image_angle=0
if x<xprevious image_angle=180
if y>yprevious image_angle=270
if y<yprevious image_angle=90

This code rotates the player based on where it's going. Copy this code because we'll need it again. Click on OK.

Now.. It's time to open obj_enemy. Add create event. In its code, add:

vspeed=-1

This code will set its vertical speed to -1, which means it'll go up. Now add step event, and add the code I told you to copy.(the code of obj_player's step event). Now add a collision event with obj_wall and add this code:

direction-=180

It'll reverse its direction and the object (enemy) will move down instead of up. Now if a collision happens again, it'll go up.

Click on OK to save the object.

Now let's test the game!


Press F5 to start the game. Test it. Move your player using the Arrow Keys. Collect the coins. Run into enemies.
Isn't it cool? Your own game!
Now close the game window.

Let's make winning possible.

Open obj_player and in the Step event, add this code.

if score=10 room_goto_next()

This one is simple: it checks if the score is 10, and then opens the next room. This is how it works: after if, comes the condition (score=10, here) and then the action which must be performed if the condition (score=10) is true. Now green tick, OK.

Now, create a new sprite. Name it spr_play. Click on Edit Sprite. Open File menu, select New. Enter the size as width = 600, height = 400 and press OK. Double-click on the sub-image that is created. From the left pane, use the Text tool to write this there:

"You Win!" or "You completed the game!" or whatever you like - it's your game.

There's an option to change the font and size in the left pane, and to change the color in the right pane. Click in the empty area to add the text. After adding it, add another text:

"Click here to play again"
The text must be big enough for the player to click on it.

Now save the sprite. Create an object for it, namely obj_play. Click on Add Event. There'll be a Mouse event. Click on it, and select Left Button. Open the event and add this code:

room_goto(room0)

This will take the user to the first room (room0) when they click on the sprite so that they can play the game again.

So let's create a room for it!

Right-click on the Rooms folder and select Create Room. When the Room Manager for the new room opens, open the settings tab and rename it room_play and change its size to 800 and 600 (like the previous room). Add obj_play in the room, wherever you like.

Testing time!


Press F5. Play the game, collect all of the 10 coins and win. It'll take you to the next room (room_play), and when you click on the text, it'll take you back to your game.

Fun, isn't it?

Adding more levels


You can create as many levels as you want. Just do this: Create a new room, change its size (800,600), add the wall blocks, coins, enemies, and the player, as you did in the first room, but differently: because this is a new level. Make sure the snap x and snap y are 32. After clicking on the green tick, take a look at the Rooms folder in the left pane. It'll be like this:

room0
room_play
room2


This means that you can't access room2, because it comes after room_play. So, what you need to do here is drag room2 where room_play is, so that after the first level, the next level comes, and in the end, room_play.

This way, you can create as many levels as you want.

Press Ctrl+S to save your project.

Creating an executable


Open the File Menu, and select Create Executable. A window will open. Select the folder where you want to save your game as an *.exe. Enter the name at the text field at the bottom. Select Executable from the drop-down list below it, and hit enter. You can now share the exe file you just created to share your game!

Conclusion


So creating a game wasn't that hard after all? Game Maker: Studio really does a great job at helping you create your game. There are many things to learn about this great software - so never stop learning!


If you found this article helpful, please consider sharing it so that it can help other people also. Have some suggestions, need help or did I make a mistake? Comment below or mail me at gurpreetsingh793@gmail.com. Have a great day!


Article Update Log


16 Dec 2015: Updated about the price.
12 Dec 2015: Initial release

Not All is Fine in the Morrowind Universe

$
0
0

I have checked the OpenMW project by PVS-Studio and written this tiny article. Very few bugs were found, so OpenMW team can be proud of their code.

OpenMW


OpenMW is an attempt to reconstruct the popular RPG Morrowind, a full-blown implementation of all of the game's specifics with open source code. To run OpenMW, you will need an original Morrowind disk.

The source code can be downloaded from https://code.google.com/p/openmw/

Suspicious fragments found


Fragment No. 1

std::string getUtf8(unsigned char c,
  ToUTF8::Utf8Encoder& encoder, ToUTF8::FromType encoding)
{
  ....
  conv[0xa2] = 0xf3;
  conv[0xa3] = 0xbf;
  conv[0xa4] = 0x0;
  conv[0xe1] = 0x8c;
  conv[0xe1] = 0x8c;   <<<<====
  conv[0xe3] = 0x0;
  ....
}

PVS-Studio diagnostic message: V519 The 'conv[0xe1]' variable is assigned values twice successively. Perhaps this is a mistake. Check lines: 103, 104. openmw fontloader.cpp 104

I guess it is a typo. It is the 0xe2 index that should be probably used in the marked line.

Fragment No. 2

enum Flags
{
  ....
  NoDuration = 0x4,
  ....
}

bool CastSpell::cast (const ESM::Ingredient* ingredient)
{
  ....
  if (!magicEffect->mData.mFlags & ESM::MagicEffect::NoDuration)
  ....
}

PVS-Studio diagnostic message: V564 The '&' operator is applied to bool type value. You've probably forgotten to include parentheses or intended to use the '&&' operator. openmw spellcasting.cpp 717

Here we deal with a mistake related to operation precedence. At first, the (!magicEffect->mData.mFlags) statement is executed which evaluates either to 0 or 1. Then the statement 0 & 4 or 1 & 4 is executed. But it doesn't make any sense, and the code should most likely look as follows:

if ( ! (magicEffect->mData.mFlags & ESM::MagicEffect::NoDuration) )

Fragment No. 3

void Clothing::blank()
{
  mData.mType = 0;
  mData.mWeight = 0;
  mData.mValue = 0;
  mData.mEnchant = 0;
  mParts.mParts.clear();
  mName.clear();
  mModel.clear();
  mIcon.clear();
  mIcon.clear();
  mEnchant.clear();
  mScript.clear();
}

PVS-Studio diagnostic message: V586 The 'clear' function is called twice for deallocation of the same resource. Check lines: 48, 49. components loadclot.cpp 49

The mIcon object is cleared twice. The second clearing is redundant or something else should have been cleared instead.

Fragment No. 4

void Storage::loadDataFromStream(
  ContainerType& container, std::istream& stream)
{
  std::string line;
  while (!stream.eof())
  {
    std::getline( stream, line );
    ....
  }
  ....
}

PVS-Studio diagnostic message: V663 Infinite loop is possible. The 'cin.eof()' condition is insufficient to break from the loop. Consider adding the 'cin.fail()' function call to the conditional expression. components translation.cpp 45

When working with the std::istream class, calling the eof() function to terminate the loop is not enough. If a failure occurs when reading data, the call of the eof() function will return false all the time. To terminate the loop in this case, you need an additional check of the value returned by fail().

Fragment No. 5

class Factory
{
  ....
  bool getReadSourceCache() { return mReadSourceCache; }
  bool getWriteSourceCache() { return mReadSourceCache; }
  ....
  bool mReadSourceCache;
  bool mWriteSourceCache;
  ....
};

PVS-Studio diagnostic message: V524 It is odd that the body of 'getWriteSourceCache' function is fully equivalent to the body of 'getReadSourceCache' function. components factory.hpp 209

I guess the getWriteSourceCache() function should look like this:

bool getWriteSourceCache() { return mWriteSourceCache; }

Fragments No. 6, 7, 8

std::string rangeTypeLabel(int idx)
{
  const char* rangeTypeLabels [] = {
    "Self",
    "Touch",
    "Target"
  };
  if (idx >= 0 && idx <= 3)
    return rangeTypeLabels[idx];
  else
    return "Invalid";
}

PVS-Studio diagnostic message: V557 Array overrun is possible. The value of 'idx' index could reach 3. esmtool labels.cpp 502

Here we see an incorrect check of an array index. If the idx variable equals 3, an array overrun will occur.

The correct code:

if (idx >= 0 && idx < 3)

A similar defect was found in two other fragments:
  • V557 Array overrun is possible. The value of 'idx' index could reach 143. esmtool labels.cpp 391
  • V557 Array overrun is possible. The value of 'idx' index could reach 27. esmtool labels.cpp 475
Fragment No. 9

enum UpperBodyCharacterState
{
  UpperCharState_Nothing,
  UpperCharState_EquipingWeap,
  UpperCharState_UnEquipingWeap,
  ....
};

bool CharacterController::updateWeaponState()
{
  ....
  if((weaptype != WeapType_None ||
      UpperCharState_UnEquipingWeap) && animPlaying)
  ....
}

PVS-Studio diagnostic message: V560 A part of conditional expression is always true: UpperCharState_UnEquipingWeap. openmw character.cpp 949

This condition is very strange. In its current form, it can be reduced to if (animPlaying). Something is obviously wrong with it.

Fragments No. 10, 11

void World::clear()
{
  mLocalScripts.clear();
  mPlayer->clear();
  ....
  if (mPlayer)
  ....
}

PVS-Studio diagnostic message: V595 The 'mPlayer' pointer was utilized before it was verified against nullptr. Check lines: 234, 245. openmw worldimp.cpp 234

Similar defect: V595 The mBody pointer was utilized before it was verified against nullptr. Check lines: 95, 99. openmw physic.cpp 95

Fragment No. 12

void ExprParser::replaceBinaryOperands()
{
  ....
  if (t1==t2)
    mOperands.push_back (t1);
  else if (t1=='f' || t2=='f')
    mOperands.push_back ('f');
  else
    std::logic_error ("failed to determine result operand type");
}

PVS-Studio diagnostic message: V596 The object was created but it is not being used. The 'throw' keyword could be missing: throw logic_error(FOO); components exprparser.cpp 101

The keyword throw is missing. The fixed code should look like this:

throw std::logic_error ("failed to determine result operand type");

Conclusion


Purchase a PVS-Studio for in your team, and you will save huge amount of time usually spent on eliminating typos and diverse bugs.

Brain Dead Simple Game States

$
0
0

Lately, I've realized that game state management is always vastly overcomplicated. Here's a brain dead simple system that does everything you probably need in a straightforward way.

Just what the heck is a game state?


Well, what happens when you boot up a game? You probably see some credit to the engine, get shown "the way it's meant to be played", and maybe watch a sweet FMV cutscene. Then you get launched into the menu, where you can tighten up the graphics on level 3 and switch the controls to accommodate your DVORAK keyboard. Then you pick your favourite level, and start playing. A half an hour later, you've had too much Mountain Dew, so you have to pause the game for a few minutes to stop the action to be resumed later.

That's about 4 game states right there: introduction, menu, gameplay, pause screen.

Alright, how do we start coding?


The job of a state is pretty simple. Generally, it needs to update something, and then draw something. Sounds like an interface to me.

public interface State {
  public void update(float dt);
  public void draw();
}

You'd then have concrete states like Menu or Play that implement this interface. Now, I'm going to put a little spin on it, by changing the type of the update method.

public interface State {
  public State update(float dt);
  public void draw();
}

Why did I do that? Well, one of the important parts about game states is the ability to change between them. A game wouldn't be very fun if all you could do was watch the intro FMV over and over again. So the update method now returns whichever state should be used next. If there's no change, it should just return itself.

public class Menu implements State {
  public State update(float dt) {
    if(newGameButton.clicked()) {
      return new Play("Level 1");
    }
      
    return this;
  }
    
  public void draw() {
    drawSomeButtons();
  }
}

Now, the state management code becomes extremely simple, and doesn't require any separate manager class or anything. Just stick it in your main method or whatever holds the game loop.

State current = new Intro();

while(isRunning) {
  handleInput();
  current = current.update(calculateDeltaTime());
  current.draw();
  presentAndClear();
}

Wait, that's it?


Yup.

For real?


Nah, just kidding. Here's something really cool about this method.

Take the pause state. You have to be able to unpause and return to what you were doing, unchanged, right? Usually, a stack is advocated. You push the pause state on to the stack, and pop it off when you're done to get back to the play state. You would then only update and draw the topmost state.

I say, screw the stack. Have the pause state take a State in its constructor, which is stored, and then returned instead of the pause state itself when the update method detects that the game should be unpaused. If the pause screen needs to be an overlay over whatever was going on before the game was paused, that's really easy, too!

public class Pause implements State {
  private State previous;

  public Pause(State previous) {
    this.previous = previous;
  }

  public State update(float dt) {
    if(resumeButton.clicked()) {
      return previous;
    }

    return this;
  }

  public State draw() {
    previous.draw();
    applyFancyBlurEffect();
    drawThePauseMenu();
  }
}

Closing Remarks


Although it may seem like this method requires garbage collection, it really doesn't. You might have to slightly complicate the barely logical "management logic" to accomodate languages without automatic destruction, but in general, the idea of handling transitions by returning different states will work just fine.

I'm sure there are many more ways to use/abuse this system that I can't think of right now, and I appreciate all feedback! Thanks for reading, and I hope it helped!
Viewing all 17925 articles
Browse latest View live


<script src="https://jsc.adskeeper.com/r/s/rssing.com.1596347.js" async> </script>