Quantcast
Channel: GameDev.net
Viewing all 17925 articles
Browse latest View live

Action Lists: Simple, Flexible, Extendable AI

$
0
0

As humans, we like to implement solutions which are familiar to us. We get caught up doing things the way we know how to do them, rather than the “best” way to do them. It’s easy to get caught up in thinking like this and as a result we end up using outdated technologies and implement features in ways that our modern contemporaries don’t understand, or are simply less effective or efficient. My purpose with this and future papers will be to expose readers to a broad spectrum of solutions that will hopefully help them in their own coding. Today I’ll be covering Action Lists!

Action Lists are a simple yet powerful type of AI that all game developers should know about. While ultimately not scalable for large AI networks, they allow for relatively complex emergent behavior and are easy to implement. Whether you are just getting into AI programming or are an experienced industry veteran looking to expand your toolkit, this presentation will introduce you to Action Lists and provide concrete examples to help you implement your own solutions. Let’s begin the story.

Once Upon A Time…


Several years ago I was starting the development of King Randall’s Party, a game in which the player builds a castle and tries to defend it against the King who is trying to knock it down. I needed to create a reasonably smart AI that could look at the player’s castle and figure out how to circumvent or destroy it in order to reach its objective – the gold pile the player is defending. This was a big challenge, almost too big to consider all at once. So like any good programmer I broke it down into a more manageable problem set. The first challenges: I needed to get the units to have a specific set of behaviors that they would act according to.


Attached Image: Wallpaper1.jpg


A quick internet search caused my mind to implode, of course. Searching for “Game AI” brought up results on planners, finite state machines, steering behaviors, flocking, A*, pathfinding, etc. I had no clue where to start, so I did what any reasonable, rational person would do. I asked my dog. This isn’t anything new, of course. Whenever I have a tech problem, I ask my dog. Now I know what you’re thinking “Jesse, that’s dumb, and you’re crazy… What do dogs know about computers?” Well, let’s just gloss over that. It may or may not have involved some illegal technology and or college class auditing.

Anyway, I said “Ok Frankie – there is so much going on with AI, I really don’t have a clue where to start. How should I go about creating an AI framework for my game units?” Frankie gave me this pretty withering look that basically informed me that I was an idiot and pretty dumb, despite what my high school teacher Mr. Francis may have told me about there never being any stupid questions. I’m pretty sure Frankie wouldn’t have had nice thoughts about Mr. Francis either. “Jesse”, she asked, “how do you typically start your day?”

Well, I write everything that I need to do that day down in a list and then prioritize it according to how important the task is and how soon it needs to be done. I explained this to Frankie and she responded “And that, is an Action list.” She told me that an Action List is a list of tasks or behaviors that your game units work their way through one at a time. It is a form of finite state system, and could be described as a simple behavior tree with a single branch level. Here is how they work. According to my dog.

How Action Lists Work


First you write down all the behaviors you want your AI to have.


Attached Image: List Behaviors.png


Then you order them according to priority. Lowest to highest.


Attached Image: Ordered List.png


Now we iterate over the list checking each action to see if it can execute and if it can, executing it. We then check the actions Blocking property, and if the item is Blocking further actions we exit the list. We will get into why Blocking is important later.

In our example here, our first action Attack Player will only execute if the AI is close to the player. Let’s say it is not, so it checks if it can build a ladder at this location (and should it), and so on until it finds an action item it can execute such as Break Door. It then executes the Break Door code.


Attached Image: Executing.png


Here is where Blocking comes into play. If Break Door occurs instantly, then it will not block any further actions and the rest of the list can execute. This is typically not the case – actions usually take up more than one frame. So in this case the Break Door Action Item calls unit.Attack(door), which will change the unit’s CurrentState from Waiting to BreakDoor and will return true until the door is broken.

A Simple Finite State Machine


Well ok. That sounds workable. Frankie had made a good suggestion and Action Lists seem like a great fit for my project. But I’d never heard of them before so I had my doubts – most of what I hear floating around about AI has to do with transition-based finite state machines, similar to what Unity3D uses for animations in Mechanim. You define a bunch of states, and identify when and how they transition between each other. In exchange for some belly scratches, Frankie explained to me when you make a transition based finite state machine, you need to define all the states you want to have, and then also define all of the transitions to and from each of those individual states. This can get complicated really, really fast. If you have a Hurt state, you need to identify every other state that can transition to this state, and when. Walking to hurt; jumping to hurt, crouching to hurt, attacking to hurt. This can be useful, but can also get complicated really fast. If your AI requirements are fairly simple, that’s a lot of potentially unnecessary overhead.

Another difficulty with transition-based state machines is that it is difficult to debug. If you set a break point and look at what the AI’s current state is, it is impossible without additional debug code to know how the AI got into its current state, what the previous states were and what transition was used to get to the current state.

Drawbacks of Action Lists


As I dug into action lists some more, I realized that they were perfect for my implementation, but I also realized they had some drawbacks. The biggest flaw is simply the result of its greatest strength – its simplicity. Because it is a single ordered list, I couldn’t have any sort of complex hierarchy of priorities. So if I wanted Attack Player to be a higher priority than Break Door, but lower than Move To Objective, while also having Move To Objective being lower priority than Break Door… that’s not a simple problem to solve with action lists, but trivial with finite state machines.

In summary, action lists are really useful for reasonably simple AI systems, but the more complex the AI you want to model, the more difficult it will be to implement action lists. That being said, there are a few ways you can extend the concept of Action Lists to make them more powerful.

Ways to Extend This Concept


So some of my AI units are multitaskers – they can move and attack at the same time. I could create multiple action lists – one to handle movement and one to handle attacking, but that is can be problematic – what if some types of movement preclude attacking, and some attacks require the unit to stand still? This is where Action Lanes come in.

Action Lanes are an extension to the concept of Blocking. With Action Lanes, Action Items can now identify specific types of Action Items that it blocks from executing while allowing others to execute without problem. Let’s show this in action.

An Action Lane is just an additional way to determine what action. Each Action Item belongs to one or more lanes, and when its Blocking property returns true, it will add the lanes it belongs to Each action has a lane or multiple lanes they are identified with, and they will only block other actions which belong to those lanes. As an example, Attack Player belongs in the Action Lane, Move to Goal belongs in the Movement lane, and Build Ladder belongs in both since the unit must stand still and cannot attack while building. Then we order these items, and if they execute they will block subsequent actions appropriately.


Attached Image: Action Lanes.png


Example Implementation


Now that we’ve gone over the theory, it is useful to step through a practical implementation. First let’s setup our Action List and Action Items. For Action Items I like to decouple implementation, so let’s make an interface.

Attached Image: Action Item Interface.png

Here is an example implementation of the IActionItem for the BreakDoor Action Item.

Attached Image: Break Door Action Item.png

For the Action List itself we can use a simple List. Then we load it up with the IActionItems.

Attached Image: Action List Constructor.png

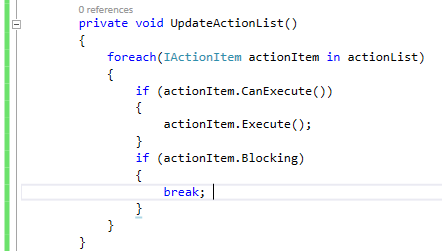
After that, we setup a method that iterates over the list every frame. Remember we also have to handle blocking.

Attached Image: Iteration Method.png

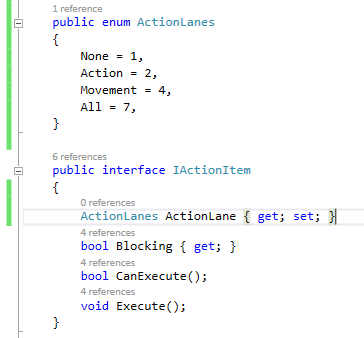
Things get a bit more complicated if you want to use action lanes. In that case we define Action Lanes as a bitfield and then modify the IActionItem interface.

Attached Image: Action Item Interface With Action Lanes.png

Then we modify the iterator to take these lanes into account. Action Items will be skipped over if their lane is blocked, but will otherwise check as normal. If all lanes are blocked then we break out of the loop.

Attached Image: Action Item Iterator With Lanes.png

Conclusion


So that’s a lot to take in. While coding the other day Frankie asked me to summarize my learnings. Thinking about it, there were a few key takeaways for me.
  • Action lists are easier to setup and maintain then small transition-based state systems.
  • They model a recognizable priority system.
  • There are a few ways they can be extended to handle expanded functionality.
As with anything in coding, there is often no best solution. It is important to keep a large variety of coding tools in our toolbox so that we can pick the right one for the problem at hand. Action Lists turned out to be perfect for King Randall’s Party. Perhaps they will be the right solution for your project?


Originally posted on gorillatactics.com

How to Create a Mobile Game on the Cheap

$
0
0

This article originally appeared on medium.com

This is a guide that helps anyone, with software development experience, get started creating their first mobile game.

This year, I made it one of my goals to create a mobile video game. I have been developing software for over a decade, making business applications and platforms. All the while, I have been jotting down ideas for games. I recently released Clear the Zombies! on iOS and Android.

The first choice I had to make was what tools, frameworks and platforms I would use. To help with that choice I created requirements for what I needed these tools to be and do:

  • Cross platform (so that I am efficient with my time and don’t have to learn multiple languages and build the game more than once.)
  • Free to use
  • Easy to test and build
  • Great documentation and community support

The tools I chose and why


More details on how to get started with these platforms are given later in this article.

Game Framework: Phaser
Phaser is a great javascript/canvas based 2D game framework. It is free to use, has excellent documentation, and tons of community-driven examples.

Cross Platform Mobile Framework: Cordova
Cordova is the gold standard for cross platform mobile apps. I had previously used it with Ionic Framework when i was building a business app. It is free and managed by the Apache Software Foundation.

Emulation, Testing, Build, Configuration: Intel XDK
I wish I had discovered this tool when I was working with Ionic. It has a great emulator that displays many devices (iPhones, iPads, Android Devices, etc.) and emulates the core phone capabilities such as geolocation and network status. It also has a preview app that you can install on your phone. The preview app allows you to upload your game to your device without having to build and install your game every time. Best of all, Intel XDK takes care of managing your build configurations, certificates, and your build processes.

Source Control: Bitbucket and SourceTree
Bitbucket has free to use private hosted repos. SourceTree is the best git GUI I have used so far. It takes a bit of time to get used to this tool because there are many bells and whistles, but it is worth the time investment. Also, my friend Jon Gregorowicz got me hooked on the Gitflow Workflow and SourceTree has gitflow management built in.

Image Asset Creation: Inkscape and Piskel
Creating my own sprites and images was by far the most intimidating part of this project. I considered using free sprites and images, but realized very quickly that there would be large inconsistencies with the style, dimensions and scaling that would make my game look like a Frankenstein's monster. I resigned to the fact that I would be making all my own images and sprites and found that I not only really enjoyed it, but it was not as hard as I thought it would be.

Inkscape and Piskel make the process easy. Anil Beniwal introduced me to Inkscape, which is a free svg tool. I mainly used it for scaling and effects. It has great features that make converting a png into an svg (vector graphics) easy and adding masks and filters a cinch. Piskel is a simple but effective tool for making spritesheets. I used this tool to create everything from backgrounds to sprites to buttons.

Analytics: Google Analytics
You will inevitably want to know how users are using your game. Google analytics is an easy and free way to start tracking how many users you have, what screens they are using, and what levels they have achieved.

What type of game should I make?


Since this was my first game, I knew I would spend a considerable amount of time ramping up on the technologies. I wanted to make sure that the game I would be making would not be too ambitious so that I could finish building it in a reasonable amount of time. I wrote down some requirements for myself when designing the game. I would suggest you do the same.
  • A simple core game mechanic that can be developed in a few days and continue to be refined to make the game more fun and challenging.
  • Simple controls.
  • The game screen is static and confined to a set space. This allowed me to avoid camera complexities and simplified my scaling logic for different devices.
Where do I start?

These are high level steps to start you on your way. I do not go into the nitty gritty details because there are many options and most of the features of these tools are described in detail in the documentation for the given tool. What I aim to accomplish with this list is helping you to shortcircuit a lot of the research that I have already done concerning what tools work best for the different parts of game development.

  1. Start by downloading and installing Intel XDK. From here you will create a new project and select XDK’s Phaser template from the templates->games section.
  2. To start understanding phaser and Cordova run through this tutorial by Pablo Farias Navarro. It is great for beginners
  3. Create your core game engine using either mock images or free sprites. This should be the minimum amount of code that can be written to have a working version of your game.
  4. Iterate, iterate, iterate. Create a task list for yourself and knock off items one at a time to build up your game.
  5. Once you have something working that is fun, start to think about replacing the mock images with real ones.
  6. Once you have a working version with good images, sign yourself up to become an Apple and Android developer. There is a cost associated with each of these. Unfortunately, this is the one part that you will have to pay actual money for.
  7. Create your icon and splash screen.
  8. Get your Apple certificates following the documentation from Intel XDK.
  9. Generate marketing materials for the Play Store and App Store. This includes creating your own icons and banners.
  10. Build your apk and ipa files and submit them to the Play Store and iTunes Connect respectively.
  11. Market, market, market.

The devil is in the details


In this section I will go over things I had to figure out on my own about each tool and each step in the process.

Using Intel XDK


As I said earlier, Intel XDK has become my favorite new tool. You can use it for writing code, emulating devices, testing, and building. Personally, I continued to use Sublime for code editing because I am used to it.

XDK’s emulator is great, because unlike developing using a chrome browser, it allows you to test Cordova plugins and the code around them without having to install on a device.

The test tab in combination with Intel’s App Preview app works great for early stages of the game. It will help you to see what your game looks like on a real app without having to build and install. However, it only works with a subset of Cordova plugins. As you start to add more, you will need to do full builds.

The build features are the best I have seen so far for free. It makes the process super easy and delivers a fully signed app that is ready for each of the stores. For iOS, you will need to download a certificate from the Apple Developer Console. You only need to do this once. The step by step guide can be found here.

When building for Android, always use Crosswalk! It is a browser that Intel XDK can build into your apk for consistency. I tried using a straight android build for a while. However, my game was laggy and inconsistent.

Starting to develop with Phaser


Phaser is one of the best application frameworks I have ever used. I have done a lot of web development in the past few years and have had to rely on many different third party packages. Usually, there are at least one or two headaches involved in that process. Phaser, however, is very straight forward, it does exactly what you need it to do, and works exactly as the documentation says.

Scaling

The one big gotcha is scaling. Mobile devices have many different screen sizes and pixel density ratios. This can be a nightmare to code against and test. Here are two resources that helped me understand how to get around this:
Here is my adapted code that I use to set the game size:

var w = window.innerWidth * window.devicePixelRatio,
    h = window.innerHeight * window.devicePixelRatio;
if(h > 800) {
    var div = h / 800; //800 is target
    w = w / div;
    h = 800;
}
var game = new Phaser.Game(w, h, Phaser.AUTO, "game");

Even with this code, you will still have different screen sizes. This could cause you to place a sprite too close to the edge of a screen, putting it in danger of being cut off on some devices. To counteract this, I created a standard “Safe Zone” on the screen that I could guarantee would not be cut off. I would then use that zone as a reference when placing all content. The code for that safe zone looks like this:

this.scaleFactor = window.devicePixelRatio / 3;
//determine the safe zone
this.safeZone = {
    width: this.game.width,
    height: this.game.height,
    x: 0,
    y: 0,
};
var heightWidthRatio = 1.9;
var currentHeightWidthRatio = this.game.height / this.game.width;
if (currentHeightWidthRatio > heightWidthRatio) {
    this.safeZone.height = this.game.width * heightWidthRatio;
    this.safeZone.y = (this.game.height - this.safeZone.height) / 2;
}
else {
    this.safeZone.width = this.game.height / heightWidthRatio;
    this.safeZone.x = (this.game.width - this.safeZone.width) / 2;
}

When placing items (sprites, buttons, text, etc.) onto the screen I always do 3 things. I place them at x: 0, y: 0 to get their natural size. Then I scale them to a percent size of the safe zone using either width or height (By using % sizes you make sure that the screen will look the same on all devices). Finally, I relocate the item to where it should go.

Example adding a sprite:

//Step 1 - place
var sprite = this.game.add.sprite(0, 0, "ZombieSprite");
//Step 2 - scale
sprite.height = this.safeZone.height * .10 //10% of safeZone
sprite.scale.x = sprite.scale.y; //scale width same as height
//Step 3 - relocate
//In this example I will place the sprite in the center of the safeZone
sprite.x = (this.safeZone.width - sprite.width) / 2;
sprite.y = (this.safeZone.height- sprite.height) / 2;

In the below images of my game, you can see the effect the safe zone has on the left and right sides of the screen. The gutter on the iphone is smaller than on the Nexus 6P. I always emulate using the iPhone 4 because it has the smallest screen. If it works on the iPhone 4 it will work anywhere.


Attached Image: screenshot-android-noglare.png Attached Image: screenshot-iphone2073x3701.png
Different safe zone sizes and scaling


States

If you end up having more than one screen in your project, I suggest using states. When you switch to a new state, the old state and all of its sprites will automatically be destroyed. It is an easy way of managing different screens and their setup.

Creating Sprites


I had never created sprites before I created this game. The first thing I did was look for articles on best practices. I found this article, by Derek Yu, simple enough and effective. Don’t worry if your sprites look crappy at first. Applying Derek’s shading techniques will go a long way to making them look great.

I used Piskel to create all my spritesheets. It is great because you can create the sprites in a browser without having to download any software. It allows you to easily make pixel by pixel changes. It also allows you to create each frame of your sprite sheet so you can animate your characters and buttons. In order to standardize I made all of my characters on a 64 x 64 canvas.

Inkscape came in handy whenever I needed to vectorize a png, scale it, add effects or combine images. It was invaluable when I was creating my marketing materials. The most important feature I learned to use was the Path-> Trace Bitmap feature, which allowed me to convert a png to an svg.


Attached Image: piskel.png
One of my zombies for “Clear the Zombies!”. I later vectorized the head in inkscape for my icon.

Attached Image: ic_launcher.png
The vectorized version of the image above.


Splash Screens


Splash screens are great for showing off your brand as the game loads. However, they are not so straightforward because, as I discussed earlier, devices have many different screen sizes.

For iOS the number of screen sizes is limited. You can use inkscape to crop and resize your splash screen and load it into XDK under the projects tab.

Android is a little more difficult, because there are so many devices. To get around this, Google recommends you create a 9-patch image. 9-patch images are images that have stretch zones, telling the device what is ok to stretch and what is not. I tried to find a site to generate these for me automatically, but got fed up and used the Google recommended tool to manually adjust them. The documentation for that tool is here.

Marketing


Your game will not sell itself. You will have to get out there and market it. Two of the most important free tools for marketing are Facebook and Twitter. Create a specific Facebook page and Twitter page and start posting. This article from Soomla had some great ideas.

Conclusion


There is a lot that goes into making a game. With this article, I tried to highlight all of the issues that I thought would hang up a first time game developer. If you want to know more about a specific subject, please reply to this post and I will do my best to respond and update the information herein.

Decoding Audio for XAudio2 with Microsoft Media Foundation

$
0
0

As I was learning XAudio2 I came across countless tutorials showing how to read in uncompressed .wav files and feed them into an XAudio2 source voice. What was even worse was most of these tutorials reinvented the wheel on parsing and validating a .wav file (even the sample on MSDN “How to: Load Audio Data Files in XAudio2” performs such manual parsing). While reinventing the wheel is never a good thing you also might not want to utilize uncompressed audio files in your game because, well... they are just to big! The .mp3 compression format reduces audio file size by about 10x and provides no inherently noticeable degradation in sound quality. This would certainly be great for the music your games play!

Microsoft Media Foundation


Microsoft Media Foundation, as described by Microsoft, is the next generation multimedia platform for Windows. It was introduced as a replacement for DirectShow and offers capabilities such as the following

  1. Playing Media
  2. Transcoding Media
  3. Decoding Media
  4. Encoding Media

NOTE: I use Media to represent audio, video, or a combination of both

The Pipeline Architecture


Media Foundation is well architectured and consists of many various components. These components are designed to connect together like Lego pieces to produce what is known as a Media Foundation Pipeline. A full Media Foundation pipeline consists of reading a media file from some location, such as the file system, to sending the it to one or more optional components that can transform the audio in someway and then finally sending it to a renderer that forwards the media to some output device.

The Media Foundation Source Reader


The Source reader was introduced to allow applications to utilize features of Media Foundation without having to build a full MF Pipeline. For Example, you might want to read and possibly decode an audio file and then pass it to the XAudio2 engine for playback.

Source Readers can be thought of as a component that can read an audio file and produce media samples to be consumed by your application in any way you see fit.

Media Types


Media Types are used in MF to describe the format of a particular media stream that came from possibly a file system. Your applications generally use media types to determine the format and the type of media in the stream. Objects within Media Foundation, such as the source reader, use these as well such as for loading the correct decoder for the media type output you are wanting.

Parts of a Media Type


Media Types consist of 2 parts that provide information about the type of media in a data stream. The 2 parts are described below:

  1. A Major Type
    1. The Major Type indicates the type of data (audio or video)

  2. A Sub Type
    1. The Sub Type indicates the format of the data (compressed mp3, uncompressed wav, etc)


Getting our hands dirty


With the basics out of the way, let’s now see how we can utilize Media Foundation’s Source Reader to read in any type of audio file (compressed or uncompressed) and extract the bytes to be sent to XAudio2 for playback.

First Things First, before we can begin using Media Foundation we must load and initialize the framework within our application. This is done with a call to MSStartup(MF_VERSION). We should also be good citizens and be sure to unload it once we are done using it with MSShutdown(). This seems like a great opportunity to use the RAII idiom to create a class that handles all of this for us.

struct MediaFoundationInitialize
{
  MediaFoundationInitialize()
  {
    HR(MFStartup(MF_VERSION));
  }
  ~MediaFoundationInitialize()
  {
    HR(MFShutdown());
  }
};

int __stdcall wWinMain(HINSTANCE, HINSTANCE, PWSTR, int)
{
 MediaFoundationInitialize mf{};
 return 0;
}

Once Media Foundation has been initialized the next thing we need to do is create the source reader. This is done using the MFCreateSourceReaderFromURL() factory method that accepts the following 3 arguments.

  1. Location to the media file on disk
  2. Optional list of attributes that will configure settings that affect how the source reader operates
  3. The output parameter of the newly allocated source reader

int __stdcall wWinMain(HINSTANCE, HINSTANCE, PWSTR, int)
{
 MediaFoundationInitialize mf{};
 // Create Attribute Store
 ComPtr<IMFAttributes> sourceReaderConfiguration;
 HR(MFCreateAttributes(sourceReaderConfiguration.GetAddressOf(), 1));
 HR(sourceReaderConfiguration->SetUINT32(MF_LOW_LATENCY, true));
 // Create Source Reader
 ComPtr<IMFSourceReader> sourceReader;
 HR(MFCreateSourceReaderFromURL(L"C:\\Users\\TraGicCode\\Desktop\\394506-n-a--1450673416.mp3", sourceReaderConfiguration.Get(), sourceReader.GetAddressOf()));
 return 0;
}

Notice we set 1 attribute for our source reader

  1. MF_LOW_LATENCY – This attribute informs the source reader we want data as quick as possible for in near real time operations

With the source reader created and attached to our media file we can query the source reader for the native media type of the file. This will allow us to do some validation such as verifying that the file is indeed an audio file and also if its compressed so that we can branch off and perform extra work needed by MF to uncompress it.

int __stdcall wWinMain(HINSTANCE, HINSTANCE, PWSTR, int)
{
  MediaFoundationInitialize mf{};
  // Create Attribute Store
  ComPtr<IMFAttributes> sourceReaderConfiguration;
  HR(MFCreateAttributes(sourceReaderConfiguration.GetAddressOf(), 1));
  HR(sourceReaderConfiguration->SetUINT32(MF_LOW_LATENCY, true));
  // Create Source Reader
  ComPtr<IMFSourceReader> sourceReader;
  HR(MFCreateSourceReaderFromURL(L"C:\\Users\\TraGicCode\\Desktop\\394506-n-a--1450673416.mp3", sourceReaderConfiguration.Get(), sourceReader.GetAddressOf()));
  // Query information about the media file
  ComPtr<IMFMediaType> nativeMediaType;
  HR(sourceReader->GetNativeMediaType(MF_SOURCE_READER_FIRST_AUDIO_STREAM, 0, nativeMediaType.GetAddressOf()));
  
  // Check if media file is indeed an audio file
  GUID majorType{};
  HR(nativeMediaType->GetGUID(MF_MT_MAJOR_TYPE, &majorType));
  if (MFMediaType_Audio != majorType)
  {
    throw NotAudioFileException{};
  }
  // Check if media file is compressed or uncompressed
  GUID subType{};
  HR(nativeMediaType->GetGUID(MF_MT_MAJOR_TYPE, &subType));
  if (MFAudioFormat_Float == subType || MFAudioFormat_PCM == subType)
  {
    // Audio File is uncompressed
  }
  else
  {
    // Audio file is compressed
  }
  return 0;
}

If the audio file happens to be compressed (such as if we were reading in an .mp3 file) then we need to inform the source reader we would like it to decode the audio file so that it can be sent to our audio device. This is done by creating a Partial Media Type object and setting the MAJOR and SUBTYPE options for the type of output we would like. When passed to the source reader it will look throughout the system for registered decoders that can perform such requested conversion. Calling IMFSourceReader::SetCurrentMediaType() will pass if a decoder exists or fail otherwise

int __stdcall wWinMain(HINSTANCE, HINSTANCE, PWSTR, int)
{
  MediaFoundationInitialize mf{};
  // Create Attribute Store
  ComPtr<IMFAttributes> sourceReaderConfiguration;
  HR(MFCreateAttributes(sourceReaderConfiguration.GetAddressOf(), 1));
  HR(sourceReaderConfiguration->SetUINT32(MF_LOW_LATENCY, true));
  // Create Source Reader
  ComPtr<IMFSourceReader> sourceReader;
  HR(MFCreateSourceReaderFromURL(L"C:\\Users\\TraGicCode\\Desktop\\394506-n-a--1450673416.mp3", sourceReaderConfiguration.Get(), sourceReader.GetAddressOf()));
  // Query information about the media file
  ComPtr<IMFMediaType> nativeMediaType;
  HR(sourceReader->GetNativeMediaType(MF_SOURCE_READER_FIRST_AUDIO_STREAM, 0, nativeMediaType.GetAddressOf()));
  
  // Check if media file is indeed an audio file
  GUID majorType{};
  HR(nativeMediaType->GetGUID(MF_MT_MAJOR_TYPE, &majorType));
  if (MFMediaType_Audio != majorType)
  {
    throw NotAudioFileException{};
  }
  // Check if media file is compressed or uncompressed
  GUID subType{};
  HR(nativeMediaType->GetGUID(MF_MT_MAJOR_TYPE, &subType));
  if (MFAudioFormat_Float == subType || MFAudioFormat_PCM == subType)
  {
    // Audio File is uncompressed
  }
  else
  {
    // Audio file is compressed
    // Inform the SourceReader we want uncompressed data
    // This causes it to look for decoders to perform the request we are making
    ComPtr<IMFMediaType> partialType = nullptr;
    HR(MFCreateMediaType(partialType.GetAddressOf()));
    // We want Audio
    HR(partialType->SetGUID(MF_MT_MAJOR_TYPE, MFMediaType_Audio));
    // We want uncompressed data
    HR(partialType->SetGUID(MF_MT_SUBTYPE, MFAudioFormat_PCM));
    HR(sourceReader->SetCurrentMediaType(MF_SOURCE_READER_FIRST_AUDIO_STREAM, NULL, partialType.Get()));
  }
  return 0;
}

Now that we have the source reader configured we must next create a WAVEFORMATEX object from the source reader. This data structure essentially represent the fmt chunk in a RIFF file. This is needed so that XAudio2 or more generally anything that wants to play the audio knows the speed at which playback should happen. This is done by Calling IMFSourceReader::MFCreateWaveFormatExFromMFMediaType(). This function takes the following 3 parameters

  1. The Current Media Type of the Source Reader
  2. The address to a WAVEFORMATEX struct that will be filled in by the function
  3. The address of an unsigned int that will be filled in with the size of the above struct

int __stdcall wWinMain(HINSTANCE, HINSTANCE, PWSTR, int)
{
  MediaFoundationInitialize mf{};
  // Create Attribute Store
  ComPtr<IMFAttributes> sourceReaderConfiguration;
  HR(MFCreateAttributes(sourceReaderConfiguration.GetAddressOf(), 1));
  HR(sourceReaderConfiguration->SetUINT32(MF_LOW_LATENCY, true));
  // Create Source Reader
  ComPtr<IMFSourceReader> sourceReader;
  HR(MFCreateSourceReaderFromURL(L"C:\\Users\\TraGicCode\\Desktop\\394506-n-a--1450673416.mp3", sourceReaderConfiguration.Get(), sourceReader.GetAddressOf()));
  // Query information about the media file
  ComPtr<IMFMediaType> nativeMediaType;
  HR(sourceReader->GetNativeMediaType(MF_SOURCE_READER_FIRST_AUDIO_STREAM, 0, nativeMediaType.GetAddressOf()));
  
  // Check if media file is indeed an audio file
  GUID majorType{};
  HR(nativeMediaType->GetGUID(MF_MT_MAJOR_TYPE, &majorType));
  if (MFMediaType_Audio != majorType)
  {
    throw NotAudioFileException{};
  }
  // Check if media file is compressed or uncompressed
  GUID subType{};
  HR(nativeMediaType->GetGUID(MF_MT_MAJOR_TYPE, &subType));
  if (MFAudioFormat_Float == subType || MFAudioFormat_PCM == subType)
  {
    // Audio File is uncompressed
  }
  else
  {
    // Audio file is compressed
    // Inform the SourceReader we want uncompressed data
    // This causes it to look for decoders to perform the request we are making
    ComPtr<IMFMediaType> partialType = nullptr;
    HR(MFCreateMediaType(partialType.GetAddressOf()));
    // We want Audio
    HR(partialType->SetGUID(MF_MT_MAJOR_TYPE, MFMediaType_Audio));
    // We want uncompressed data
    HR(partialType->SetGUID(MF_MT_SUBTYPE, MFAudioFormat_PCM));
    HR(sourceReader->SetCurrentMediaType(MF_SOURCE_READER_FIRST_AUDIO_STREAM, NULL, partialType.Get()));
  }
  ComPtr<IMFMediaType> uncompressedAudioType = nullptr;
  HR(sourceReader->GetCurrentMediaType(MF_SOURCE_READER_FIRST_AUDIO_STREAM, uncompressedAudioType.GetAddressOf()));
  WAVEFORMATEXTENSIBLE d;
  WAVEFORMATEX * waveformatex;
  unsigned int waveformatlength;
  HR(MFCreateWaveFormatExFromMFMediaType(uncompressedAudioType.Get(), &waveformatex, &waveformatlength));
  return 0;
}

lastly we synchronously read all the audio from the file and store them in a vector<byte>.

NOTE: In production software you would definitely not want to synchronously read bytes into memory. This is only meant for this example

int __stdcall wWinMain(HINSTANCE, HINSTANCE, PWSTR, int)
{
  MediaFoundationInitialize mf{};
  // Create Attribute Store
  ComPtr<IMFAttributes> sourceReaderConfiguration;
  HR(MFCreateAttributes(sourceReaderConfiguration.GetAddressOf(), 1));
  HR(sourceReaderConfiguration->SetUINT32(MF_LOW_LATENCY, true));
  // Create Source Reader
  ComPtr<IMFSourceReader> sourceReader;
  HR(MFCreateSourceReaderFromURL(L"C:\\Users\\TraGicCode\\Desktop\\394506-n-a--1450673416.mp3", sourceReaderConfiguration.Get(), sourceReader.GetAddressOf()));
  // Query information about the media file
  ComPtr<IMFMediaType> nativeMediaType;
  HR(sourceReader->GetNativeMediaType(MF_SOURCE_READER_FIRST_AUDIO_STREAM, 0, nativeMediaType.GetAddressOf()));
  
  // Check if media file is indeed an audio file
  GUID majorType{};
  HR(nativeMediaType->GetGUID(MF_MT_MAJOR_TYPE, &majorType));
  if (MFMediaType_Audio != majorType)
  {
    throw NotAudioFileException{};
  }
  // Check if media file is compressed or uncompressed
  GUID subType{};
  HR(nativeMediaType->GetGUID(MF_MT_MAJOR_TYPE, &subType));
  if (MFAudioFormat_Float == subType || MFAudioFormat_PCM == subType)
  {
    // Audio File is uncompressed
  }
  else
  {
    // Audio file is compressed
    // Inform the SourceReader we want uncompressed data
    // This causes it to look for decoders to perform the request we are making
    ComPtr<IMFMediaType> partialType = nullptr;
    HR(MFCreateMediaType(partialType.GetAddressOf()));
    // We want Audio
    HR(partialType->SetGUID(MF_MT_MAJOR_TYPE, MFMediaType_Audio));
    // We want uncompressed data
    HR(partialType->SetGUID(MF_MT_SUBTYPE, MFAudioFormat_PCM));
    HR(sourceReader->SetCurrentMediaType(MF_SOURCE_READER_FIRST_AUDIO_STREAM, NULL, partialType.Get()));
  }
  ComPtr<IMFMediaType> uncompressedAudioType = nullptr;
  HR(sourceReader->GetCurrentMediaType(MF_SOURCE_READER_FIRST_AUDIO_STREAM, uncompressedAudioType.GetAddressOf()));
  WAVEFORMATEXTENSIBLE d;
  WAVEFORMATEX * waveformatex;
  unsigned int waveformatlength;
  HR(MFCreateWaveFormatExFromMFMediaType(uncompressedAudioType.Get(), &waveformatex, &waveformatlength));
  std::vector<BYTE> bytes;
  // Get Sample
  ComPtr<IMFSample> sample;
  while (true)
  {
    DWORD flags{};
    HR(sourceReader->ReadSample(MF_SOURCE_READER_FIRST_AUDIO_STREAM, 0, nullptr, &flags, nullptr, sample.GetAddressOf()));
    // Check for eof
    if (flags & MF_SOURCE_READERF_ENDOFSTREAM)
    {
      break;
    }
    // Convert data to contiguous buffer
    ComPtr<IMFMediaBuffer> buffer;
    HR(sample->ConvertToContiguousBuffer(buffer.GetAddressOf()));
    // Lock Buffer & copy to local memory
    BYTE* audioData = nullptr;
    DWORD audioDataLength{};
    HR(buffer->Lock(&audioData, nullptr, &audioDataLength));
    for (size_t i = 0; i < audioDataLength; i++)
    {
      bytes.push_back(*(audioData + i));
    }
    // Unlock Buffer
    HR(buffer->Unlock());
  }
  return 0;
}

Now that we have the WAVEFORMATEX object and vector<byte> of our audio file we are reading to send it to XAudio2 for playback!

int __stdcall wWinMain(HINSTANCE, HINSTANCE, PWSTR, int)
{
  MediaFoundationInitialize mf{};
  // Create Attribute Store
  ComPtr<IMFAttributes> sourceReaderConfiguration;
  HR(MFCreateAttributes(sourceReaderConfiguration.GetAddressOf(), 1));
  HR(sourceReaderConfiguration->SetUINT32(MF_LOW_LATENCY, true));
  // Create Source Reader
  ComPtr<IMFSourceReader> sourceReader;
  HR(MFCreateSourceReaderFromURL(L"C:\\Users\\TraGicCode\\Desktop\\394506-n-a--1450673416.mp3", sourceReaderConfiguration.Get(), sourceReader.GetAddressOf()));
  // Query information about the media file
  ComPtr<IMFMediaType> nativeMediaType;
  HR(sourceReader->GetNativeMediaType(MF_SOURCE_READER_FIRST_AUDIO_STREAM, 0, nativeMediaType.GetAddressOf()));
  
  // Check if media file is indeed an audio file
  GUID majorType{};
  HR(nativeMediaType->GetGUID(MF_MT_MAJOR_TYPE, &majorType));
  if (MFMediaType_Audio != majorType)
  {
    throw NotAudioFileException{};
  }
  // Check if media file is compressed or uncompressed
  GUID subType{};
  HR(nativeMediaType->GetGUID(MF_MT_MAJOR_TYPE, &subType));
  if (MFAudioFormat_Float == subType || MFAudioFormat_PCM == subType)
  {
    // Audio File is uncompressed
  }
  else
  {
    // Audio file is compressed
    // Inform the SourceReader we want uncompressed data
    // This causes it to look for decoders to perform the request we are making
    ComPtr<IMFMediaType> partialType = nullptr;
    HR(MFCreateMediaType(partialType.GetAddressOf()));
    // We want Audio
    HR(partialType->SetGUID(MF_MT_MAJOR_TYPE, MFMediaType_Audio));
    // We want uncompressed data
    HR(partialType->SetGUID(MF_MT_SUBTYPE, MFAudioFormat_PCM));
    HR(sourceReader->SetCurrentMediaType(MF_SOURCE_READER_FIRST_AUDIO_STREAM, NULL, partialType.Get()));
  }
  ComPtr<IMFMediaType> uncompressedAudioType = nullptr;
  HR(sourceReader->GetCurrentMediaType(MF_SOURCE_READER_FIRST_AUDIO_STREAM, uncompressedAudioType.GetAddressOf()));
  WAVEFORMATEXTENSIBLE d;
  WAVEFORMATEX * waveformatex;
  unsigned int waveformatlength;
  HR(MFCreateWaveFormatExFromMFMediaType(uncompressedAudioType.Get(), &waveformatex, &waveformatlength));
  std::vector<BYTE> bytes;
  // Get Sample
  ComPtr<IMFSample> sample;
  while (true)
  {
    DWORD flags{};
    HR(sourceReader->ReadSample(MF_SOURCE_READER_FIRST_AUDIO_STREAM, 0, nullptr, &flags, nullptr, sample.GetAddressOf()));
    // Check for eof
    if (flags & MF_SOURCE_READERF_ENDOFSTREAM)
    {
      break;
    }
    // Convert data to contiguous buffer
    ComPtr<IMFMediaBuffer> buffer;
    HR(sample->ConvertToContiguousBuffer(buffer.GetAddressOf()));
    // Lock Buffer & copy to local memory
    BYTE* audioData = nullptr;
    DWORD audioDataLength{};
    HR(buffer->Lock(&audioData, nullptr, &audioDataLength));
    for (size_t i = 0; i < audioDataLength; i++)
    {
      bytes.push_back(*(audioData + i));
    }
    // Unlock Buffer
    HR(buffer->Unlock());
  }
  // Create XAudio2 stuff
  auto xAudioEngine = CreateXAudioEngine();
  auto masteringVoice = CreateMasteringVoice(xAudioEngine);
  auto sourceVoice = CreateSourceVoice(xAudioEngine, *waveformatex);
  XAUDIO2_BUFFER xAudioBuffer{};
  xAudioBuffer.AudioBytes = bytes.size();
  xAudioBuffer.pAudioData = (BYTE* const)&bytes[0];
  xAudioBuffer.pContext = nullptr;
  sourceVoice->Start();
  HR(sourceVoice->SubmitSourceBuffer(&xAudioBuffer));
  // Sleep for some time to hear to song by preventing the main thread from sleep
  // XAudio2 plays the sound on a seperate audio thread <img src="http://tragiccode.com/wp-includes/images/smilies/simple-smile.png" alt=":)" class="wp-smiley" style="height: 1em; max-height: 1em;" />
  Sleep(1000000);
  return 0;
}

And There you have it. Not too bad if you ask me!

Online Video Game Engines: Discover Why You Should Use Them

$
0
0

Onine video game engines are a new concept for many developers who are used to using desktop tools. In this article, we’re going to go through the advantages and disadvantages that a solution like this offers when compared to the classic desktop ones. It must be kept in mind that some of the advantages described here don’t exist yet in any online video game engine, but they should be possible at a technological level. In some cases, they’re advantages that we’ve already seen in other types of creative collaboration and online solutions and they would be perfectly applicable to an online video game development engine.

The tendency to use web applications to perform tasks that used to be done in desktop applications is nothing new. The revolution of Software as a service (SaaS) and of the first projects using applications with centralized hosting goes back to 1960. It’s a tendency that has been developing faster and faster in the last few years thanks especially to all the new web technologies that have come out recently. We’ve seen this evolution in all types of services and tools, some of which are listed here:

  • email: perhaps the clearest example is email. More and more people manage their personal and business email from a browser. Email management web applications, such as Gmail and Outlook, have become more efficient, usable, and productive, and are used on a massive scale from any device.
  • office IT: this is another clear example of how different office applications, such as text editors, spreadsheets, presentation editors, etc. have migrated to the web. Since 2005, Google Docs has progressively been creating an alternative to the classics, Microsoft Office for Windows or iWork for Mac. In fact, Google claimed in 2015 that their their plan was to take away 80% of Microsoft’s business from MS Office. Microsoft’s response, launched in 2011, was an online version of their suite, Office 365. Here’s a great comparative analysis of both solutions.
  • image editing: in this area, there is no clear success story like in the other two areas above, but many initiatives have come up in the last few years to rise up as the model for the online Photoshop. Examples such as Pixlr.com or Fotor.com show the potential of this type of web app. In any case, even if they aren’t as widely received, image editing webapps are integrating themselves well into other types of services. One example of this is how Aviary (later purchased by Adobe) integrated itself as the image editor inside the newsletter management service of Mailchimp. The basic image editing functions are integrated into the online newsletter creation process, easing the workflow for the campaign author.
There are definitely many areas where change has already happened or is in the process. The sector of the ERPs and the CRMs is another example. In web page design, we’ve seen how we’ve gone from spending the last ten years using tools like Dreamweaver to seeing how WordPress has become the tool for creating 25% of the websites in the world.

This last piece of information is very important and relevant to us, because in our judgment, this perfectly represents the spirit of WiMi5: to construct a web environment that allows anyone, from neophytes to professionals, to create a video game, where there is also an ecosystem of people with different roles who collaborate to extend the platform, to create video games or to exchange components to make their development easier. In fact, this is the reason we’ve adopted our slogan: WiMi5 is the WordPress of video games.

Well, let’s get on now with the list of advantages and disadvantages of using an online video game engine to develop your projects.


HTML5-game-engine-1024x576.png


Current Advantages of Using an Online Video Game Engine


No dependence on platform


An online editor allows you to work on any operating system that has a web browser, regardless of whether it’s a Mac, Windows, or Linux machine. Nothing needs to be installed since you’re accessing via a browser. Access is instantaneous.

Permanent saving


An online video game engine normally makes saving a project continuous; for example, on WiMi5, all operations are automatically saved. This makes the developer’s job easier since they don’t have to be saving a project constantly in order to avoid unexpected losses.

Security


If your computer fails, has a virus, gets fried, is stolen, has its hard drive crash, or is hit by any other type of bad luck or misfortune, it won’t affect the development of the video game. All the data are stored on the cloud and available at any time from any device.

Immediate updates and improvements


Given that the development tool’s software is managed directly by the service provider, they can update the current version at any time with a new one, introducing improvements and fixing bugs permanently. This makes updating to new versions of the game engine greatly easier, since the game developer doesn’t need to download new versions or install patches.

From the web, for the web


Finally, there is one advantage that almost establishes itself as an ideological position: Creating content for the web from the web. Because of the speed of distribution, agility, simplicity, coherence, and consistency in the development and creation; the adaptation of the final product to the medium; and an endless number of other reasons, creating content for the web from the web is a winning bet. At WiMi5, we believe the web is going to be the next great gaming platform. And it seems logical to develop games from the web itself if the technology allows for it. This is now a reality with HTML5, and all that’s needed is to consolidate and mature the different online video game development tools that are appearing, including WiMi5.

Integration with other web services and applications


Another advantage that an online development engine offers is the possibility to integrate with other web services and applications. In the purest mashup style, an online video game engine can be integrated, for example, with the APIs of services such as Dropbox, Google Drive, or Box for storing assets; Charbeat or New Relic for analytics; GitHub or Bitbucket for version control; Trello or Wunderlist for task management; any social network; etc, etc. The possibilities are endless.

Future Advantages of Using an Online Video Game Engine


Version control


We’ve all worked with Google Docs at some point, and we know how well it handles the control of the different versions of documents. An online video game engine based on infrastructure residing in the cloud allows you, as with Google Docs, to control the versions based on the modifications and changes carried out by the developer. Moreover, it should also let the developer be able to decide when to save a specific version and go onto the next.

Work in collaboration in real time


With an online video game engine, several developers, with different profiles, can work on the same project. A designer may be modifying the graphics of a background while a programmer is defining the parallax for that same background. What’s more, they can be doing it in real time, each seeing what the other is doing. To all this, we can add a user management system with different roles to cover the different areas of the development company.

Immediate communication


In an online, collaborative games development tool, communication can be immediate and very focused on the question at hand. Developers can communicate via instant messaging systems integrated into the tool itself. They can also work with a system based on the comments that are being left about the different elements of the game, such as assets, scripts, etc.


WiMi5_HTML5-game-engine-1024x576.png


Disadvantages of an online video game engine


Need for a permanent connection


This is something obvious: if there’s no Internet connection, you can’t use an online service. While there are of course some solutions, such as how Google Docs allows you to work in offline mode, this loses many of the virtues that online development in real time offers. It’s also necessary for the Internet connection to have a minimum level of quality as far as bandwidth is concerned. While developing a videogame, very large assets, in terms of filesize, may be used, and working with them can use up a lot of bandwidth.

Server access


In general, SaaS services are criticized by users who don’t have access to a server and the data and files that are executed from it, since this is controlled by the company providing the service. In fact, Richard Stallman considers that the use of this type of service is a violation of the principles of Free Software. In any case, this can’t be applied to all SaaS products, since on many occasions, these products have free source code, allowing users to access all the files and source files that make up the service. In any case, this issue has a lot to do with the culture or belief that having all the data on one’s own computer is better. The trend now is for this belief to be waning, helped along especially by cloud data storage services such as Dropbox, Drive, etc.

Conclusion


The online game engines look promising. Some solutions are already working and stablishing new standards of a new way of creating video games.

The 3 most interesting examples of online game engines are PlayCanvas, Goo Create and WiMi5. PlayCanvas and Goo Create are both focused on 3D game development while WiMi5 is focused on 2D game creation. WiMi5 also integrates publishing and monetization as main features of its game engine.

Sony C#/.NET Component Set Analysis

$
0
0

Some of you may know that we have recently released version 6.00 of our analyzer, that now has C# support. The ability to scan C# projects increases the number of open-source projects we can analyze. This article is about one such check. This time it is a project, developed by Sony Computer Entertainment (SCEI).

What have we checked?


Sony Computer Entertainment is a video game company. Being a branch of Sony Corporation, it specializes in video games and game consoles. This company develops video games, hardware and software for PlayStation consoles.


image2.png


Authoring Tools Framework (ATF) is a set of C#/.NET components for making tools on Windows®. ATF has been used by most Sony Computer Entertainment first party game studios to make custom tools. This component set is used by such studios as Naughty Dog, Guerrilla Games and Quantic Dream. Tools developed with these program components were used during the creation of such well know games as 'The Last of Us' and 'Killzone'. ATF is an open-source project which is available at this GitHub repository.

Analysis tool


To perform the source code analysis, we used PVS-Studio static code analyzer. This tool scans projects written in C/C++/C#. Every diagnostic message has a detailed description in the documentation with examples of incorrect code and possible ways to fix the bugs. Quite a number of the diagnostic descriptions have a link to corresponding sections of error base, where you can see information about the bugs that were found in real projects with the help of these diagnostics.


image4.png


You can download the analyzer here and run it on your (or somebody's) code.

Examples of errors


public static void DefaultGiveFeedback(IComDataObject data, 
                                       GiveFeedbackEventArgs e)
{
  ....
  if (setDefaultDropDesc && (DropImageType)e.Effect != currentType)
  {
    if (e.Effect != DragDropEffects.None)
    {
      SetDropDescription(data, 
        (DropImageType)e.Effect, e.Effect.ToString(), null);
    }
    else
    {
      SetDropDescription(data, 
        (DropImageType)e.Effect, e.Effect.ToString(), null);
    }
    ....
  }
}

Analyzer warning: V3004 The 'then' statement is equivalent to the 'else' statement. Atf.Gui.WinForms.vs2010 DropDescriptionHelper.cs 199

As you see in the code, the same method with similar arguments will be called, in spite of the e.Effect != DragDropEffects.None being true or not. It's hard to suggest any ways to fix this code fragment, without being a developer of this code, but I think it is clear that this fragment needs a more thorough revision. What exactly should be fixed, is a question which should be directed to the author of this code.

Let's look at the following code fragment:

public ProgressCompleteEventArgs(Exception progressError, 
            object progressResult, 
            bool cancelled)
{
  ProgressError = ProgressError;
  ProgressResult = progressResult;
  Cancelled = cancelled;
}

Analyzer warning: V3005 The 'ProgressError' variable is assigned to itself. Atf.Gui.Wpf.vs2010 StatusService.cs 24

It was supposed that during the method call, the properties would get values, passed as arguments; at the same time the names of properties and parameters differ only in the first letter case. As a result - ProgressError property is assigned to itself instead of being given the progressError parameter.

Quite interesting here, is the fact that it's not the only case where capital and small letters get confused. Several of the projects we've checked have the same issues. We suspect that we'll find a new error pattern typical for C# programs soon. There is a tendency to initialize properties in a method, where the names of parameters differ from the names of the initialized properties by just one letter. As a result, we have errors like this. The next code fragment is probably not erroneous, but it looks rather strange, to say the least.

public double Left { get; set; }
public double Top  { get; set; }

public void ApplyLayout(XmlReader reader)
{
  ....
  FloatingWindow window = new FloatingWindow(
                                this, reader.ReadSubtree());
  ....
  window.Left = window.Left;
  window.Top = window.Top;
  ....
}

Analyzer warning: V3005 The 'window.Left' variable is assigned to itself. Atf.Gui.Wpf.vs2010 DockPanel.cs 706 | V3005 The 'window.Top' variable is assigned to itself. Atf.Gui.Wpf.vs2010 DockPanel.cs 707

In the analyzer warnings you can see that the window object properties Left and Top are assigned to themselves. In some cases this variant is perfectly appropriate, for example when the property access method has special logic. But there is no additional logic for these properties, and so it is unclear why the code is written this way.

Next example:

private static void OnBoundPasswordChanged(DependencyObject d,
                      DependencyPropertyChangedEventArgs e)
{
    PasswordBox box = d as PasswordBox;

    if (d == null || !GetBindPassword(d))
    {
        return;
    }

    // avoid recursive updating by ignoring the box's changed event
    box.PasswordChanged -= HandlePasswordChanged;
    ....
}

Analyzer warning: V3019 Possibly an incorrect variable is compared to null after type conversion using 'as' keyword. Check variables 'd', 'box'. Atf.Gui.Wpf.vs2010 PasswordBoxBehavior.cs 38

We have already seen quite a number of errors of this type in the C# projects that we checked. By casting an object to a compatible type using as operator the programmer gets a new object, but further in the code the source object is compared to null. This code can work correctly, if you are sure that the d object will always be compatible with the PasswordBox type. But it is not so (for now or if there are more changes in the program); you can easily get NullReferenceException in code that used to work correctly. So in any case this code needs to be reviewed.

In the following example, conversely, the programmer clearly tried to make the code as secure as possible, although it's not quite clear what for.

public Rect Extent
{
    get { return _extent; }
    set
    {
        if (value.Top    < -1.7976931348623157E+308  || 
            value.Top    >  1.7976931348623157E+308  || 
            value.Left   < -1.7976931348623157E+308  ||
            value.Left   >  1.7976931348623157E+308  || 
            value.Width  >  1.7976931348623157E+308  || 
            value.Height >  1.7976931348623157E+308)
        {
            throw new ArgumentOutOfRangeException("value");
        }
        _extent = value;
        ReIndex();
    }
}

Analyzer warning: V3022 Expression is always false. Atf.Gui.Wpf.vs2010 PriorityQuadTree.cs 575

This condition will always be false. Let's look into the code and see why.

This is an implementation of the property that has Rect type, hence value also has Rect type. Top, Left, Width, Height are properties of this type, that have double type. This code checks if these property values exceed the range of values, that the double type takes. We also see that "magic numbers" are used here for comparison, not constants, defined in the double type. That's why this condition will always be false, since the double type values are always within the value range.

Apparently, the programmer wanted to secure the program from a non-standard implementation of double type in the compiler. Nevertheless, it looks rather strange, so it was reasonable for the analyzer to issue a warning, suggesting that the programmer double-check the code.

Let's go on.

public DispatcherOperationStatus Status { get; }
public enum DispatcherOperationStatus
{
  Pending,
  Aborted,
  Completed,
  Executing
}
public object EndInvoke(IAsyncResult result)
{
  DispatcherAsyncResultAdapter res = 
    result as DispatcherAsyncResultAdapter;
  if (res == null)
    throw new InvalidCastException();

  while (res.Operation.Status != DispatcherOperationStatus.Completed
         || res.Operation.Status == DispatcherOperationStatus.Aborted)
  {
    Thread.Sleep(50);
  }

  return res.Operation.Result;
}

Analyzer warning: V3023 Consider inspecting this expression. The expression is excessive or contains a misprint. Atf.Gui.Wpf.vs2010 SynchronizeInvoke.cs 74

The condition of the while loop is redundant, it could be simplified by removing the second subexpression. Then the loop can be simplified in the following way:

while (res.Operation.Status != DispatcherOperationStatus.Completed)
  Thread.Sleep(50);

Next example, quite an interesting one:

private Vec3F ProjectToArcball(Point point)
{
  float x = (float)point.X / (m_width / 2);    // Scale so bounds map
                                               // to [0,0] - [2,2]
  float y = (float)point.Y / (m_height / 2);

  x = x - 1;                           // Translate 0,0 to the center
  y = 1 - y;                           // Flip so +Y is up
  if (x < -1)
    x = -1;
  else if (x > 1)
    x = 1;
  if (y < -1)
    y = -1;
  else if (y > 1)
    y = 1;
  ....
}

Analyzer warning: V3041 The expression was implicitly cast from 'int' type to 'float' type. Consider utilizing an explicit type cast to avoid the loss of a fractional part. An example: double A = (double)(X) / Y;. Atf.Gui.OpenGL.vs2010 ArcBallCameraController.cs 216 | V3041 The expression was implicitly cast from 'int' type to 'float' type. Consider utilizing an explicit type cast to avoid the loss of a fractional part. An example: double A = (double)(X) / Y;. Atf.Gui.OpenGL.vs2010 ArcBallCameraController.cs 217

This is one of those cases where it's very hard for a third-party developer to say for sure if there is an error in this code or not. On the one hand - integer division with implicit casting to a real type looks strange. On the other hand, sometimes it can be done deliberately, regardless of the precision loss.

It's difficult to say what was meant here. Perhaps the programmer didn't want to lose the precision of the code, but it will still occur as a result of m_width / 2 operation. In this case we should rewrite the code in the following way:

float x = point.X / ((float)m_width / 2);

On the other hand, there is a possibility that an integer number was meant to be written to x, as further on we see operations of comparison with integer values. But in this case, there was no need to do explicit casting to float type.

float x = point.X / (m_width / 2);

Our analyzer continues developing and obtaining new diagnostics. The next error was found with the help of our new diagnostic. But as this diagnostic wasn't in the release version of the analyzer, there will be no link to the documentation, but I hope the idea is clear:

public static QuatF Slerp(QuatF q1, QuatF q2, float t)
{
  double dot = q2.X * q1.X + q2.Y * q1.Y + q2.Z * q1.Z + q2.W * q1.W;

  if (dot < 0)
    q1.X = -q1.X; q1.Y = -q1.Y; q1.Z = -q1.Z; q1.W = -q1.W;

  ....
}

Analyzer warning: V3043 The code's operational logic does not correspond with its formatting. The statement is indented to the right, but it is always executed. It is possible that curly brackets are missing. Atf.Core.vs2010 QuatF.cs 282

You can see that a sum of several products is evaluated and the result is written to the dot variable. After that if the dot value is negative, there is inversion of all values of this operation. More precisely, the inversion was meant to be here, judging by the code formatting. In reality, only X property of q1 will be inverted, all other properties will be inverted regardless of the value of dot variable. Solution for this problem is curly brackets:

if (dot < 0)
{
  q1.X = -q1.X; 
  q1.Y = -q1.Y; 
  q1.Z = -q1.Z; 
  q1.W = -q1.W;
}

Let's go on.

public float X;
public float Y;

public float Z;
public void Set(Matrix4F m)
{
  ....
  ww = -0.5 * (m.M22 + m.M33);
  if (ww >= 0)
  {
    if (ww >= EPS2)
    {
      double wwSqrt = Math.Sqrt(ww);
      X = (float)wwSqrt;
      ww = 0.5 / wwSqrt;
      Y = (float)(m.M21 * ww);
      Z = (float)(m.M31 * ww);
      return;
    }
  }
  else
  {
    X = 0;
    Y = 0;
    Z = 1;
    return;
  }

  X = 0;
  ww = 0.5 * (1.0f - m.M33);
  if (ww >= EPS2)
  {
    double wwSqrt = Math.Sqrt(ww);
    Y = (float)wwSqrt;                   //<=
    Z = (float)(m.M32 / (2.0 * wwSqrt)); //<=
  }

  Y = 0; //<=
  Z = 1; //<=
}


Analyzer warning: V3008 The 'Y' variable is assigned values twice successively. Perhaps this is a mistake. Check lines: 221, 217. Atf.Core.vs2010 QuatF.cs 221 | V3008 The 'Z' variable is assigned values twice successively. Perhaps this is a mistake. Check lines: 222, 218. Atf.Core.vs2010 QuatF.cs 222

We have intentionally provided an additional code fragment so that the error is more evident. Y and Z are instance fields. Depending on the conditions, some values are written to these fields and then method execution is terminated. But in the body of the last if operator, the programmer forgot to write the return operator, so the fields will be assigned not those values, as it was supposed. This being the case, the correct code could look like this:

X = 0;
ww = 0.5 * (1.0f - m.M33);
if (ww >= EPS2)
{
  double wwSqrt = Math.Sqrt(ww);
  Y = (float)wwSqrt;                   
  Z = (float)(m.M32 / (2.0 * wwSqrt)); 
  return;
}

Y = 0; 
Z = 1;

Perhaps this is enough. These fragments seemed the most interesting to us, that's why we've brought them here. There were more bugs found, but we haven't provided low severity level examples here, instead opting to show the mid to high severity level examples.

Conclusion


image6.png


As you see, no one is immune to failure, it's quite easy to assign an object to itself, or miss some operator due to carelessness. At times, such errors are hard to detect visually in big projects, moreover most of them will not immediately show up - some of them will shoot you in the foot half a year later. To avoid such misfortune, it's a good idea to use an analyzer that is able to detect bugs during the early phases of development, decreasing the development costs, keeping you sane, and your legs safe.

The Unity Tools Used to Develop Our FPS

$
0
0

Hey, there. My name is Guillermo, I'm one of the co-founders of CremaGames, and this is my first post on GameDev.net.

After a few friends and gamedevs told me they liked the Unity tools we recommended in the studio devlog, and that I should republish it here, I thought: what the hell, let's try it. So I hope you find the list helpful for your own games, because they are essential for us and Immortal Redneck wouldn't exist without their help

I think I can say our new game, Immortal Redneck, is kind of big, but these tools have worked for us in smaller projects, too. Obviously, before trying them, and before paying for them, be sure you need it and that there's no other free or paid alternatives. After all, there's a lot of variety in the world of Unity tools.
Anyway, let's get on with it.

Behavior Designer


Attached Image: PHhawOx.png


Behavior Designer was our choice when we needed a solution to implement Immortal Redneck's AI. It was compatible with other AI solutions, with state machines and with Behavior Tree. Before choosing BD, we tried Rain. It was free, and that was great; but we had lots of efficiency problems. Behavior Designer was a lot more compatible, had official support and we could work with a visual interface, not only with lines of code, which is always welcomed by programmers and artists equally.

A* Pathfinding


Attached Image: Ue9EzSV.png


We wanted enemies to move around scenes in their own, different patterns. Unity's default navigation system didn't let us move a navmesh once it was generated into a scene, so we looked for alternatives and quickly found and fell in love with A* Pathfinding.

This plugin let us create meshes a lot faster in execution time and integrated quite well with Behavior Designer, which was a great plus. We particularly had to make a few changes in certain areas so the meshes stayed with the rooms themselves. This wasn't strictly necessary, but it reduced loading times by a good margin.

Instant Good Day


Immortal Redneck's outdoors are the first impression you have of our game, so we wanted the place to be great and special. One of the first things we decided was that it needed a day and night cycle, even if most players won't stay long enough outside to watch it entirely.

After looking for a lot of assets, we opted for InstantGoodDay. It seemed like the best solution given our needs. We wanted to change every little detail of the animation so the cycle looked original and unique, and InstantGoodDay allows you to change every hour of the cycle. It has lots of values, from fog to lighting and also colors and stars in the sky. We worked a lot with it and we integrated StylizeFog by our own.

Colorful


uSvZphv.gif


A huge effects library, with lots of post-processed stuff. At this moment, we are only using it for the transition from the outer camera in the main menu to the inside of the sarcophagus. Obviously, we'll use it with more stuff, like rapidly changing the rooms interiors and their mood.

Clean Empty Directories


Having an empty folder is not such a big deal, but when you are working in a big game like Immortal Redneck and when you have a git repository it starts to get annoying. This plugin's job is to erase all the empty folders without a constant use by any user. So even if that's not a big deal, it's a good way to keep your stuff tidied up.

Editor Auto Save


I'm sure everyone making games has suffered an unexpected failure while working. Sometimes it's your computer, sometimes it's Unity and sometimes it's something or someone else, like your cat. The outcome: hours of work lost in a fraction of a second. We've been there lots of times. So much crying...

Anyway, we looked for a solution and we found Editor Auto Save. It's the best plugin around for this: it saves every scene and project (along with all the modified prefabs) on regular basis and every time you do some specific action (like playing) so you don't lose much stuff if you forgot to pay your bills. Ahem.

DOTween


We've know DOTween for some time now. We started using it while developing OMG Zoo Rescue, and we loved it. This plugin let us code animations in a fast, easy way. It's perfect for menus and UI, but also sprites and even models in 3D and cutscenes.


Attached Image: BwBqfVD.gif


Also, Mobsferatu's intro and ending were made with DOTween, so that's how much we love and trust it.

Master Audio


Even though Unity 5 has improved its audio systems a lot, there are better alternatives outside the official channel. Since the beginning, our friends at Sonotrigger told us that we would probably have to use something else so they could do their magic work with Immortal Redneck's sound effects and music.

So we chose Master Audio. Not only does it give us access to a lot of tools, but our main reason to use it was so the audio team could integrate everything easily in the game without a lot of programming work. It's about resources and managing our time.

PrefabEvolution


Attached Image: YnhrKat.png


Nested prefabs is one of the most requested features for Unity – that's why they are a part of the company's roadmap now. So, meanwhile, we had to find a third party solution, and we chose Prefab Evolution for Immortal Redneck because it's the most used and supported. Thanks to this asset we could use nested prefabs and reuse particles in different objects. It worked great and allowed us to do exactly what we wanted.

Sadly, we had some problems and we ended up ditching it. Immortal Redneck is big, and that didn't go well with PrefabEvolution. Compiling and testing were stealing us a lot of time, so you have to keep an eye on what your game is going to be before using this, otherwise, great tool.

Maybe you build a unified system made just for your needs. That's actually what we are doing at the moment: we are changing our workflow so we don't need so many nested prefabs and we can use one tool of our own creation in the cases we really need to do it.

Rewired


Attached Image: oYgseZo.png


Unity Input is one of the least advanced tools since the engine conception. With a big game like ours, we wanted a lot of flexibility with our control system and needed a lot of compatibility with PC peripherals. Thanks to Rewired, everything is made around actions and are mapped with each device. Also, since it doesn't have any native code, it would work in consoles if needed.

ShaderForge


Attached Image: EouAS0L.jpg


ShaderForge is one of the best assets we've used and we can't stop suggesting you use it. Working with shaders is our Achilles heel: we don't have a person specifically coding shaders. Thanks to ShaderForge, our artists started making shaders without programming knowledge and with really great results. For example, this is one of the shaders we've built in Immortal Redneck.

StylizedFog


Attached Image: gI8C6Bd.png


A fantastic asset so you can have, heh, stylized fog in your game. You can use gradient colors so it paints the fog with those tones, and you can even mix two colors. When you have InstantGoodDay too, you can build some cool scenes with fog, changing open areas and such. We're going to use it in Immortal Redneck indoors, too. That's how much we liked it.

TextMeshPro


A Unity classic. We've been using it since our first game with the engine (Ridiculous Triathlon) and it's been with us since then. If you need to make nice texts in Unity, we don't know a better tool than TextMeshPro. This plugin allow us to use words independently of their resolution and/or size and you can apply various effects (like shadows, outlines, gradients, glowing) easily. See those damage numbers? TextMeshPro.

UFPS


1EiMtni.gif
(The hammer animation is ours, but the rest is UFPS)


UFPS helped us with Immortal Redneck's engine fundamentals. We used it in the beginning so we had a solid foundation that we could modify as much as possible. At this moment, we have changed everything in UFPS so it adapts to our most specific needs. We kept the procedural animations and event system, but excluding these, there's little stuff left. It's the best starting point if you are willing to build lots of stuff on it.
And that's it! What tools do you usually use? Should we try an alternative to ours?
Finally, if you want to keep updated with Immortal Redneck, be sure to follow us on Twitter or like our Facebook profile. Thanks in advance!

Unreal Engine 4 C++ Quest Framework

$
0
0

Lately, I have been working on a simple horror game in UE4 that has a very simple Objective system that drives the gameplay. After looking at the code, I realized it could serve as the basis of a framework for a generic questing system. Today I will share all of that code and explain each class as it pertains to the framework.

The following classes to get started on a simple quest framework are AQuest and AObjective, using the UE4 naming conventions for classes. AObjective is metadata about the quest as well the actual worker when it comes to completing parts of a quest. AQuest is a container of objectives and does group management of objectives. Both classes are derived from AInfo as they are purely classes of information and do not need to have a transform or collision within the world.

Objectives:

Since it is the foundation for a quest, I will first layout and explain AObjective. The header of AObjective goes as follows:

// Fill out your copyright notice in the Description page of Project Settings.

#pragma once

#include "GameFramework/Info.h"
#include "Objective.generated.h"

UCLASS()
class QUESTGAME_API AObjective : public AInfo
{
 	GENERATED_BODY()
 
public: 
 	// Sets default values for this actor's properties
 	AObjective();

 	// Called when the game starts or when spawned
 	virtual void BeginPlay() override;
 
 	// Called every frame
 	virtual void Tick( float DeltaSeconds ) override;

 	UPROPERTY( EditDefaultsOnly, BlueprintReadOnly, Category = "O" )
    FText Description;

 	UPROPERTY( EditDefaultsOnly, BlueprintReadOnly, Category = "O" )
    FName ObjectiveName;

 	UPROPERTY( EditDefaultsOnly, BlueprintReadOnly, Category = "O" )
    bool MustBeCompletedToAdvance;

 	UPROPERTY( EditDefaultsOnly, BlueprintReadOnly, Category = "O" )
    int32 TotalProgressNeeded;

 	UPROPERTY( EditDefaultsOnly, BlueprintReadOnly, Category = "O" )
    int32 CurrentProgress;

	UFUNCTION( BlueprintCallable, Category = "O" )
    void Update( int32 Progress );

 	UFUNCTION( BlueprintCallable, Category = "O" )
    virtual bool IsComplete( ) const;

	UFUNCTION( BlueprintCallable, Category = "O" )
    virtual float GetProgress( ) const;
};

Not that bad of a deal. The only responsibilities of an AObjective is to track the completion of the sub-portion of an AQuest and offer some idea of what the player must do.

The objective is tracked by the CurrentProgress and TotalProgressNeeded properties. Added by the supplied helper functions, Update, IsComplete, and GetProgress, we can get a reasonable amount of data about this tiny portion of a quest. These functions give you all the functionality needed to start a questing framework for your UE4 game.

There is one boolean property that has not been mentioned: MustBeCompletedToAdvance. Depending on the use case, this could be used to ensure a sequential order in objectives or having required and optional objectives. I will implement it as the first in this tutorial. Only minor changes later on are needed to use it as an indicator of optional or required quests. Or, you could just add a new property to support both.

There are two more properties that help us out with AObjective management: ObjectiveName and Description. ObjectiveName can be thought of as a unique identifier for the implemented AObjective. The ObjectiveName's purpose is for player feedback. For instance, the FText value could be (in simple string terms) "Get a rock". It is nothing specific to the game, it is only something to be used as a hint in either a UI or other visual element to let the player know that they need to do something in order to complete the objective.

Next, we can look at the small amount of code that is used to define AObjective.

// Fill out your copyright notice in the Description page of Project Settings.

#include "QuestGame.h"
#include "Objective.h"


// Sets default values
AObjective::AObjective( ) :
 Description( ),
 ObjectiveName( NAME_None ),
 TotalProgressNeeded( 1 ),
 CurrentProgress( 0 ),
 MustBeCompletedToAdvance( true )
{
  // Set this actor to call Tick() every frame.  You can turn this off to improve performance if you don't need it.
 	PrimaryActorTick.bCanEverTick = true;

}

// Called when the game starts or when spawned
void AObjective::BeginPlay()
{
 	Super::BeginPlay();
}

// Called every frame
void AObjective::Tick( float DeltaTime )
{
 	Super::Tick( DeltaTime );

}

void AObjective::Update( int32 Progress )
{
 	CurrentProgress += Progress;
}

bool AObjective::IsComplete( ) const
{
 	return CurrentProgress >= TotalProgressNeeded;
}

float AObjective::GetProgress( ) const
{
 	check( TotalProgressNeeded != 0 )
 	return (float)CurrentProgress / (float)TotalProgressNeeded;
}

Again, you will be hard pressed to say "that is a lot of code". Indeed, the most complex code is the division in the GetProgress function.

Wait, why do we call/override BeginPlay or Tick? Well, that is an extreme implementation detail. For instance, what if, while an AObjective is active, you want to tick a countdown for a time trialed AObjective.

For BeginPlay we could implement various other details such as activating certain items in the world, spawning enemies, and so on and so forth. You are only limited by your code skills and imagination.

Right, so how do we manage all of these objectives and make sure only relevant AObjectives are available? Well, we implement an AQuest class in which it acts as an AObjective manager.

Quests:

Here is the declaration of an AQuest to get you started:

// Fill out your copyright notice in the Description page of Project Settings.

#pragma once

#include "GameFramework/Info.h"
#include "Quest.generated.h"

UCLASS()
class QUESTGAME_API AQuest : public AInfo
{
  GENERATED_BODY()
 
public: 
  // Sets default values for this actor's properties
  AQuest();

  // Called when the game starts or when spawned
  virtual void BeginPlay() override;

  // Called every frame
  virtual void Tick( float DeltaSeconds ) override;

public:
  UPROPERTY( EditDefaultsOnly, BlueprintReadWrite, Category = "Q" )
    TArray<class AObjective*> CurrentObjectives;

  UPROPERTY( EditDefaultsOnly, BlueprintReadWrite, Category = "Q" )
    TArray<TSubclassOf<AObjective>> Objectives;
  
  UPROPERTY( EditDefaultsOnly, BlueprintReadOnly, Category = "Q" )
    USoundCue* QuestStartSoundCue;

  UPROPERTY( EditDefaultsOnly, BlueprintReadOnly, Category = "Q" )
    FName QuestName;

  UPROPERTY( EditDefaultsOnly, BlueprintReadOnly, Category = "Q" )
    FText QuestStartDescription;

  UPROPERTY( EditDefaultsOnly, BlueprintReadOnly, Category = "Q" )
    FText QuestEndDescription;

  UFUNCTION( BlueprintCallable, Category = "Q" )
    bool IsQuestComplete( ) const;

  UFUNCTION( BlueprintCallable, Category = "Q" )
    bool CanUpdate( FName Objective );

  UFUNCTION( BlueprintCallable, Category = "Q" )
    void Update( FName Objective, int32 Progress );

  UFUNCTION( BlueprintCallable, Category = "Q" )
    bool TryUpdate( FName Objective, int32 Progress );

  UFUNCTION( BlueprintCallable, Category = "Q" )
    float QuestCompletion( ) const; 
};

Not much bigger than the AObjective class is it? This is because all AQuest does is wrap around a collection of AObjective's and provides some utility functions to help manage them.

The Objectives property is a simple way to configure an AQuest's objectives via the Blueprints Editor, and the CurrentObjectives is a collection of all live AObjective's that are configured for the given AQuest.

There are several user-friendly properties such as a USoundCue, FName, and FText types that help give audio visual feedback to the player. For instance, when a player starts a quest, a nice sound plays - like a chime - and the QuestStartDescription text is written to the player's HUD and a journal implementation. Then, when a player completes a quest, a get is called for the QuestEndDescription property and writes it to a journal implementation. But those are all specific implementation details related to your game and is limited only by coding skills and imagination.

All of the functions for AQuest are wrappers to operate on collections of AObjectives to update and query for completion. All AObjectives in the AQuest are referenced and found by FName property types. This allows for updating different instances of AObjectives that are essentially the same, but differ at the data level. It also allows the removal of managing pointers. As another argument, it decouples knowledge of what an AObjective object is from other classes, so completing quests via other class implementations only requires the knowledge of an AQuest - or the container for the AQuest - object and default types supplied by the engine such as int32 and FName.

How does this all work? Well, just like before, here is the definition of AQuest:

// Fill out your copyright notice in the Description page of Project Settings.

#include "QuestGame.h"
#include "Objective.h"
#include "Quest.h"


AQuest::AQuest() :
  QuestName( NAME_None ),
  CurrentObjectives( ),
  QuestStartDescription( ),
  QuestEndDescription( )
{
}

void AQuest::BeginPlay()
{
	Super::BeginPlay();
    UWorld* World = GetWorld();
    if ( World )
    {
     for ( auto Objective : Objectives )
     {
       CurrentObjectives.Add(World->SpawnActor(Objective));
     }
    }
}

// Called every frame
void AQuest::Tick( float DeltaTime )
{
  Super::Tick( DeltaTime );
}

bool AQuest::IsQuestComplete() const
{
  bool result = true;
  for ( auto Objective : CurrentObjectives )
  {
    result &= Objective->IsComplete();
  }
  return result;
}

bool AQuest::CanUpdate( FName Objective )
{
  bool PreviousIsComplete = true;
  for ( auto Obj : CurrentObjectives )
  {
    if ( PreviousIsComplete )
    {
      if ( Objective == Obj->ObjectiveName )
        return true;
      else
        PreviousIsComplete = Obj->IsComplete() |
        !Obj->MustBeCompletedToAdvance;
    }
    else
    {
      return false;
    }
  }
  return true;
}

void AQuest::Update( FName Objective, int32 Progress )
{
  for ( auto Obj : CurrentObjectives )
  {
    if ( Obj->ObjectiveName == Objective )
    {
      Obj->Update( Progress );
      return;
    }
  }
}

bool AQuest::TryUpdate( FName Objective, int32 Progress )
{
  bool result = CanUpdate( Objective );
  if ( result )
  {
    Update( Objective, Progress );
  }
  return result;
}

float AQuest::QuestCompletion( ) const 
{
  int32 NumObjectives = CurrentObjectives.Num( );
  if( NumObjectives == 0 ) return 1.0f;

  float AggregateCompletion = 0.0f;
  for( auto Objective : CurrentObjectives )
  {
    AggregateCompletion += Objective->GetProgress( );
  }
  return AggregateCompletion / (float)NumObjectives;
}

Probably the most complex code out of all of this is the CanUpdate method. It checks to see, sequentially (so order of AObjective configuration matters), if an AObjective is completed and if it is required to complete any other AObjectives after it. This is where the bitwise OR comes in. So basicly, we cannot advance to the requested AObjective if any of the previous AObjectives are not complete and are set to MustBeCompletedToAdvance (or as the listeral code says you CAN advance if the previous AObjective IS complete OR it does not required to be completed in order to advance).

The IsComplete function is just and aggregate check to see if all AObjectives are complete - defining a completed AQuest. The QuestCompletion method is a simple averaging of all AObjective completion percentages.

Also, the AQuest class has a simple function to wrap up the CanUpdate and Update calls into one neat little function called TryUpdate. This allows a check for the ability to update before applying the requested progress update and returns an indicator of success or failure. This is useful when code outside of AQuest wants to attempt AObjective updates without caring about much else.

Finally, for the same reason of AObjective's BeginPlay and Tick functions, AQuest also overrides these to allow your coding skills and imagination to fly.

Hopefully, this was a good introduction into the groundwork of designing a questing framework for your Unreal Engine 4 game. If you did enjoy it, comment or like it. If there is enough interest I will continue onwards with Part II: Nesting Quests and Objectives. That part will be a tutorial just like this, with full code samples, explaining how to structure the framework to nest multiple AObjectives into an AObjective to create a structure of sub-objectives as well as the same pattern applied to AQuest to supply sub-quests.

Originally posted on Blogspot

A Brain Dump of What I Worked on for Uncharted 4

$
0
0

Posted Image
 
Original blog post
 
This post is part of My Career Series.
 
Now that Uncharted 4 is released, I am able to talk about what I worked on for the project. I mostly worked on AI for single-player buddies and multiplayer sidekicks, as well as some gameplay logic. I'm leaving out things that never went in to the final game and some minor things that are too verbose to elaborate on. So here it goes:
 
 
The Post System
 
Before I start, I'd like to mention the post system we used for NPCs. I did not work on the core logic of the system; I wrote client code that makes use of this system.Posts are discrete positions within navigable space, mostly generated from tools and some hand-placed by designers. Based on our needs, we created various post selectors that rate posts differently (e.g. stealth post selector, combat post selector), and we pick the highest-rated post to tell an NPC to go to.
 
Posted Image
 
 
Buddy Follow
 
The buddy follow system was derived from The Last of Us.The basic idea is that buddies pick positions around the player to follow. These potential positions are fanned out from the player, and must satisfy the following linear path clearance tests: player to position, position to a forward-projected position, forward-projected position to the player.
 
Posted Image
 
Climbing is something present in Uncharted 4 that is not in The Last of Us. To incorporate climbing into the follow system, I added the climb follow post selector that picks climb posts for buddies to move to when the player is climbing.
 
Posted Image
 
It turned out to be trickier than I thought. Simply telling buddies to use regular follow logic when the player is not climbing, and telling them to use climb posts when the player is climbing, is not enough. If the player quickly switch between climbing and non-climbing states, buddies would oscillate pretty badly between the two states. So I added some hysteresis, where the buddies only switch states when the player has switched states and moved far enough while maintaining in that state. In general, hysteresis is a good idea to avoid behavioral flickering.
 
 
Buddy Lead
 
In some scenarios in the game, we wanted buddies to lead the way for the player. I ported over and updated the lead system from The Last of Us, where designers used splines to mark down the general paths we wanted buddies to follow while leading the player.
 
Posted Image
 
In case of multiple lead paths through a level, designers would place multiple splines and turned them on and off via script.
 
Posted Image
 
The player's position is projected onto the spline, and a lead reference point is placed ahead by a distance adjustable by designers. When this lead reference point passes a spline control point marked as a wait point, the buddy would go to the next wait point. If the player backtracks, the buddy would only backtrack when the lead reference point gets too far away from the furthest wait point passed during last advancement. This, again, is hysteresis added to avoid behavioral flickering.
 
I also incorporated dynamic movement speed into the lead system. "Speed planes" are placed along the spline, based on the distance between the buddy and the player along the spline. There are three motion types NPCs can move in: walk, run, and sprint. Depending on which speed plane the player hits, the buddy picks an appropriate motion type to maintain distance away from the player. Designers can turn on and off speed planes as they see fit. Also, the buddy's locomotion animation speed is slightly scaled up or down based on the player's distance to minimize abrupt movement speed change when switching motion types.
 
Posted Image
 
 
Buddy Cover Share
 
In The Last of Us, the player is able to move past a buddy while both remain in cover. This is called cover share.
 
Posted Image
 
In The Last of Us, it makes sense for Joel to reach out to the cover wall over Ellie and Tess, who have smaller profile than Joel. But we thought that it wouldn't look as good for Nate, Sam, Sully, and Elena, as they all have similar profiles. Plus, Uncharted 4 is much faster-paced, and having Nate reach out his arms while moving in cover would break the fluidity of the movement. So instead, we decided to simply make buddies hunker against the cover wall and have Nate steer slightly around them.
 
Posted Image
 
The logic I used is very simple. If the projected player position based on velocity lands within a rectangular boundary around the buddy's cover post, the buddy aborts current in-cover behavior and quickly hunkers against the cover wall.
 
Posted Image
 
 
Medic Sidekicks
 
 
I was in charge of multiplayer sidekicks, and I'd say medics are the most special among all. Medic sidekicks in multiplayer require a whole new behavior that is not present in single-player: reviving downed allies and mirroring the player's cover behaviors.
 
Posted Image
 
Medics try to mimic the player's cover behavior, and stay as close to the player as possible, so when the player is downed, they are close by to revive the player. If a nearby ally is downed, they would also revive the ally, given that the player is not already downed. If the player is equipped with the RevivePak mod for medics, they would try to throw RevivePaks at revive targets before running to the targets for revival; throwing RevivePaks reuses the grenade logic for trajectory clearance test and animation playback, except that I swapped out the grenades with RevivePaks.
 
Posted Image
 
 
Stealth Grass
 
 
Crouch-moving in stealth grass is also something new in Uncharted 4. For it to work, we need to somehow mark the environment, so that the player gameplay logic knows whether the player is in stealth grass. Originally, we thought about making the background artists responsible of marking collision surfaces as stealth grass in Maya, but found out that necessary communication between artists and designers made iteration time too long. So we arrived at a different approach to mark down stealth grass regions. I added an extra stealth grass tag for designers in the editor, so they could mark the nav polys that they'd like the player to treat as stealth grass, with high precision. With this extra information, we can also rate stealth posts based on whether they are in stealth grass or not. This is useful for buddies moving with the player in stealth.
 
Posted Image
 
 
Perception
 
 
Since we don't have listen mode in Uncharted 4 like The Last of Us, we needed to do something to make the player aware of imminent threats, so the player doesn't feel overwhelmed by unknown enemy locations. Using the enemy perception data, I added the colored threat indicators that inform the player when an enemy is about to notice him/her as a distraction (white), to perceive a distraction (yellow), and to acquire full awareness (orange). I also made the threat indicator raise a buzzing background noise to build up tension and set off a loud stinger when an enemy becomes fully aware of the player, similar to The Last of Us.
 
Posted Image
 
 
Investigation
 
This is the last major gameplay feature I worked on before going gold. I don't usually go to formal meetings at Naughty Dog, but for the last few months before gold, we had a at least one meeting per week driven by Bruce Straley or Neil Druckmann, focusing on the AI aspect of the game. Almost after every one of these meetings, there was something to be changed and iterated for the investigation system. I went through many iterations before arriving at what we shipped with the final game.
 
There are two things that create distractions and would cause enemies to investigate: player presence and dead bodies. When an enemy registers a distraction (distraction spotter), he would try to get a nearby ally to investigate with him as a pair. The closer one to the distraction becomes the investigator, and the other becomes the watcher. The distraction spotter can become an investigator or a watcher, and we set up different dialog sets for both scenarios ("There's something over there. I'll check it out." versus "There's something over there. You go check it out.").
 
In order to make the start and end of investigation look more natural, I staggered the timing of enemy movement and the fading of threat indicators, so the investigation pair don't perform the exact same action at the same time in a mechanical fashion.
 
Posted Image
 
If the distraction is a dead body, the investigator would be alerted of player presence and tell everyone else to start searching for the player, irreversibly leaving ambient/unaware state. The dead body discovered would also be highlighted, so the player gets a chance to know what gave him/her away.
 
Posted Image
 
Under certain difficulties, consecutive investigations would make enemies investigate more aggressively, having a better chance of spotting the player hidden in stealth grass. In crushing difficulty, enemies always investigate aggressively.
 
 
Dialog Looks
 
This is also among the last few things I worked on for this project.Dialog looks refers to the logic that makes characters react to conversations, such as looking at the other people and hand gestures. Previously in The Last of Us, people spent months annotating all in-game scripted dialogs with looks and gestures by hand. This was something we didn't want to do again. We had some scripted dialogs that are already annotated by hand, but we needed a default system that handles dialogs that are not annotated, which I put together. The animators are given parameters to adjust the head turn speed, max head turn angle, look duration, cool down time, etc.
 
Posted Image
 
 
Jeep Momentum Maintenance
 
One of the problems we had early on regarding the jeep driving section in the Madagascar city level, is that the player's jeep can easily spin out and lose momentum after hitting a wall or an enemy vehicle, throwing the player far behind the convoy and failing the level.
 
My solution was to temporarily cap the angular velocity and change of linear velocity direction upon impact against walls and enemy vehicles. This easy solution turns out pretty effective, making it much harder for players to fail the level due to spin-outs.
 
Posted Image
 
 
Vehicle Deaths
 
Driveable vehicles are first introduced in Uncharted 4. Previously, only NPCs can drive vehicles, and those vehicles are constrained to spline rails. I was in charge of handling vehicle deaths.There are multiple ways to kill enemy vehicles: kill the driver, shoot the vehicle enough times, bump into an enemy bike with your jeep, and ram your jeep into an enemy jeep to cause a spin-out. Based on various causes of death, a death animation is picked to play for the dead vehicle and all its passengers. The animation blends into physics-controlled ragdolls, so the death animation smoothly transitions into physically simulated wreckage.
 
Posted Image
 
For bumped deaths of enemy bikes, I used the bike's bounding box on the XZ plane and the contact position to determine which one of the four directional bump death animations to play.
 
Posted Image
 
As for jeep spin-outs, I test the jeep's rotational deviation from desired driving direction against a spin-out threshold.
 
Posted Image
 
When playing death animations, there's a chance that the dead vehicle can penetrate walls. I used a sphere cast, from the vehicle's ideal position along the rail if it weren't dead, to where the vehicle's body actually is. If a contact is generated from the sphere cast, I shifted the vehicle in the direction of the contact normal by a fraction of penetration amount, so the de-penetratiton happens gradually across multiple frames, avoiding positional pops.
 
Posted Image
 
I did a special type of vehicle death, called vehicle death hint. They are context-sensitive death animations that interact with environments. Animators and designers place these hints along the spline rail, and specify entry windows on the splines. If a vehicle is killed within an entry window, it starts playing the corresponding special death animation. This feature started off as a tool to implement the specific epic jeep kill in the 2015 E3 demo.
 
 
Bayer Matrix for Dithering
 
We wanted to eliminate geometry clipping the camera when the camera gets too close to environmental objects, mostly foliage. So we decided to fade out pixels in pixel shaders based on how close the pixels are to the camera. Using transparency was not an option, because transparency is not cheap, and there's just too much foliage. Instead, we went with dithering, combining a pixel's distance from the camera and a patterned Bayer matrix, some portion of the pixels are fully discarded, creating an illusion of transparency.
 
Posted Image
 
Our original Bayer matrix was an 8x8 matrix shown on this Wikipedia page. I thought it was too small and resulted in banding artifacts. I wanted to use a 16x16 Bayer matrix, but it was no where to be found on the internet. So I tried to reverse engineer the pattern of the 8x8 Bayer matrix and noticed a recursive pattern. I would have been able to just use pure inspection to write out a 16x16 matrix by hand, but I wanted to have more fun and wrote a tool that can generate Bayer matrices sized any powers of 2.
 
Posted Image
 
After switching to the 16x16 Bayer matrix, there was a noticeable improvement on banding artifacts.
 
Posted Image
 
 
Explosion Sound Delay
 
This is a really minor contribution, but I'd still like to mention it. A couple weeks before the 2015 E3 demo, I pointed out that the tower explosion was seen and heard simultaneously and that didn't make sense. Nate and Sully are very far away from the tower, they should have seen and explosion first and then heard it shortly after. The art team added a slight delay to the explosion sound into the final demo.
 
 
Traditional Chinese Localization
 
I didn't switch to Traditional Chinese text and subtitles until two weeks before we were locking down for gold, and I found some translation errors. Most of the errors were literal translations from English to Traditional Chinese and just did't work in the contexts. I did not think I would have time to play through the entire game myself and look out for translation errors simultaneously. So I asked multiple people from QA to play through different chapters of the game in Traditional Chinese, and I went over the recorded gameplay videos as they became available. This proved pretty efficient; I managed to log all the translation errors I found, and the localization team was able to correct them before the deadline.
 
 
That's It
 
These are pretty much the things I worked on for Uncharted 4 that are worth mentioning. I hope you enjoyed reading it. :)


Design Guide for Room Scale VR

$
0
0

Introduction</h1>

I've been doing virtual reality game development for a year now. In terms of relative industry time, I'm old and experienced. I wouldn't call myself an expert though -- there are many far more knowledgeable people than I and I defer to their expertise.


This article covers many of the unique design challenges a VR developer will face within a roomscale play environment, how many VR developers are currently handling these design problems, and how I've handled them. There are a lot of general VR design choices which can impose some big unforeseen technical challenges and restrictions. I share my lessons learned and experiences so that anyone else considering working in VR can benefit from them. In the interests of being broadly applicable and useful, this article focuses more heavily on the design challenges and concepts of an implementation than the math and code implementation details.


Reader Assumptions

In the interest of getting deeper into the technical details quickly, I'm going to assume that everyone here knows what virtual reality is and generally how it works. If you don't, there are plenty of articles available online to give you a basic understanding.


Commonly used terms

Room Scale: This is the physical play area which a person uses to walk around in. Often this will be somebody's living room or bedroom.
World Space: This is an in-game coordinate system for defining object positions relative to the center of the game world.
Avatar: This is the character representation of the player within the virtual reality environment.
Player: The human being in physical space controlling an avatar within VR.
Motion Controller: A pair of hand held hardware input devices which are used to track hand positions and orientations over time.
HMD: Stands for "Head Mounted Device", which is the VR goggles people wear.

The priorities of a VR developer and designer

1. Do NOT make the player sick.

Motion sickness is a real thing in VR. I've experienced it many times, and I can make other people experience it as well. It is nauseating and BAD. Do everything you can to avoid it. I have nothing but contempt for developers who intentionally try to cause people to get motion sick, even if its a part of their 'game design'. I have a working theory on what exactly causes the motion sickness, but I'll start by talking about a few popular VR experiences and what caused the motion sickness.


The first VR game I tried was a mech warrior style game called "VOX Machinae", where you are a pilot driving around a mech. With the original mech warrior, you had jump jets which allowed you to accellerate into the sky for a short period of time. This game copied that idea. I have pretty good spatial awareness and can handle small bursts of accelleration, but in this game, you could be airborne for many seconds and you also could change your velocity in midair. Then you land and resume walking. All of these things caused me to feel motion sick for various reasons:


The initial jump jet thrust into the air was no problem for me. Changing my flight direction in midair was a huge problem though. When you're in flight, you don't have anything to use as a visual reference for your delta velocity. You see the ground below you moving slightly and your brain tries really hard to precisely nail down where it's spatially located, but there isn't any nearby visual reference to use for relative changes. If the designer insists on using jump jets, what they should do is place small detail objects in the air (dust motes, rain drops, particles, etc). Avoid letting players change velocity in midair.


The second part which caused me discomfort was the actual landing, when the mech hits the ground. I don't remember exactly, but I think the mech had a bit of bounce-back when it landed, where the legs would insulate most of the force of the landing. Visually, you'd get a bit of a bob. Remember that braking is also a form of accelleration, and accelleration is a big culprit of motion sickness.


One other notable VR experience was this game called "The sightline chair". It was supposed to be a comfortable experience, but the ending was stomach churning. The gist of the game is that you sit in a chair and look around. The world changes when you're not looking at it, so you gradually move from a forest to a city, to who knows what. At the very end of the experience, you are sitting in a chair at the top of a sky scraper scaffolding, on a flimsy board. I don't necessarily have a fear of heights, but looking down was scary because I knew what was about to happen next: I would fall. The scaffolding collapses, and not only does the chair you're in fall down, it SPINS BACKWARDS. Do NOT do this. NO SPINNING THE PLAYER! I didn't even let the falling sequence finish, I just closed my eyes and immediately ended the "game".


Someone had published a rollercoaster VR experience which they built rather quickly in Unreal Engine 4. I knew it would make me motion sick, but I was studying the particular causes of motion sickness and had to try it out for science (VR devs suffer for their players!). The rollercoaster experience took place in a giant bedroom and followed a track with curves, dips, rises, and other motions. Essentially, they are taking your camera and moving it on rails at different speeds. So, I was expecting accellerations and thus sickness. The first time I went through the rollercoaster, I felt somewhat bad afterwards. I then did it again, and felt much worse. The lesson here is that motion sickness is a compounding, accruing effect which can last long after the VR experience is over. If you have even a little bit of stuff which causes people to get motion sick, it will build up over time and people will gradually start feeling worse and worse.


I think it's also worth noting that a VR developer will need a very high end computer. I went to a hackathon last summer and had a pretty nauseating experience. First, I drank one beer and was slightly buzzed. First mistake. Then, I went to see some enthusiast guys demo on an Oculus DK1, which is an old relic by todays standards. Second mistake. I decided to stand up. Third mistake. He ran the demo on a crappy laptop. Fourth mistake. Then he ran some crappy demo with lots of funky movements and bad frame rates. Fifth mistake. I could only get about half way through before I started feeling like I was about to fall over on my face, so I had to stop. Don't do any of this! It's not worth it.


Anyways, let's talk about the game I'm developing and what I discovered to be trouble spots. The game begins at the top of a wizard tower. You can go between levels in the tower by walking down flights of stairs. I have two types of stair ways.


  1. Stairs which descend straight down
  2. Stairs which curve and descend

The curved stairs generally cause SPINNING and spinning generally causes motion sickness. The stairs which take players between levels of the tower are okay, but there's a chance that players can jump down instead of taking one stair at a time (which potentially causes motion sickness). So, to protect the player from themselves, I put banister railings and furniture to block the player from jumping down directly. They could still try if they were determined, but I did my part to promote wizard safety and broken knees. I find it helps to imagine that an occupational health and safety inspector is going to come look at the environment I built and tell me where I need to put safeguards to protect the player from unintentional hazards. Of course, that's not going to actually happen, but it gets you thinking about your world as if people actually had to live in it and how they'd design it for their own health and safety.


The other surprising cause of motion sickness is the terrain and movement speed of the player. Your terrain should generally be SMOOTH. From a level designers standpoint, it's tempting to add a bit of roughness to the terrain to make it look less artificial, but every bump in the terrain causes the player VR headset to go up and down, and this is a small form of accelleration, which, causes accruing motion sickness over time. Smooth out your terrain with a smoothing brush. If you want hills or valleys, make the slopes gradual and smooth. The faster a player travels over any object which causes the camera to go up and down (stairs, rocks, logs, etc) the more likely they are experience motion sickness and get sick. To hide the smoothness of your terrain, use foliage and other props to cover it up.


Keep in mind that when you are building a VR game and designing things within it, you will be building up a tolerance for motion sickness susceptibility. You become a bad test subject for motion sickness. Try to find willing guinea pigs who have very little experience with VR. When you find these willing guinea pigs, be very sure to do a pre-screening of their current state! And, very importantly, keep a barf bag nearby! We had two incidents during testing:


  1. A player had been feeling sick and nautious before playing our VR game. The VR exacerbated the sickness and he had to stop.
  2. A player had drank bad juice or something and it wasn't agreeing with her stomach. She didn't say anything about it, but had to stop the VR game and ran out and puked into a garbage bag.

Was it our game which caused sickness, or were these people feeling sick prior to playing? It was impossible to isolate the true cause because we weren't conducting a highly controlled test. This is why you pre-screen people so that you can control your studies a bit better.


At the end of the day, VR developers owe it to their loyal players to make their VR experience the best, most comfortable experience possible. Uncomfortable experiences, no matter how great the game is, will cause people to stop playing the game. Nobody will see your final boss monster or know how your epic story ends if they stop playing after 5 minutes due to motion sickness.


2. Design to enhance player immersion, avoid breaking it.

Virtual Reality is not a new form of cinema and it's not gaming. VR is also not a set of fancy, expensive goggles people wear, though it is a necessary component to creating virtual reality. Virtual Reality, and the goal of a VR developer, is to transfer the wearer and their sense of being (presence) into a new artificial world and do our best to convince them that it is real. Our job is to convince players that what they're seeing, hearing, feeling, touching, and sensing is real. Of course, we all know it isn't 'real', but it can seem to be very convincing, almost to a frightening level of immersion. So, a player loans to us many of their senses and their suspension of disbelief, and in exchange, we give them a really fun, immersive experience. The second most important goal of a VR developer is to create and maintain that sense of immersion, that feeling of actually being somewhere totally different, of being someone else entirely different.


Generally speaking, the virtual reality players game experience should match their expectations of how they think the environment should look and react. If you create a scene with a tree in it, players are going to walk up to that tree and look all around it and expect it to look like a tree from every angle. That tree should be appropriately scaled to the player avatar, and should not glitch in any way. Remember that you don't control the camera position and orientation, the player does. So, consider the possibility that the player will look at your objects from any angle and distance. If the object mesh is poorly done, immersion is broken. If the object texture is wrong, immersion is broken. If the object UV coordinates and skinning is wrong and you've got seams, immersion is broken. If players can walk through what they expect to be a solid object, immersion is broken.


You can also have immersion breaking sounds. You can also have narrative dialogue which "breaks the fourth wall". There isn't a definitive list of do's and don'ts for immersion in VR. My approach is to use more of an imaginative heurustic, where I try to close my eyes, become the character standing in this world, and imagine how it needs to look, sound, and behave. Players will try to do things they expect won't work, so a big part of "VR Magic" is to react to these unexpected player tests of VR. For example, if you have a pet animal, players will try to play with it and pet it. If you pet it, the animal should react positively. Valve nailed it with their new mechanical dog. You can pick up a stick in the game world and throw it. The mechanical dog will bark and run after it and bring it back. Then you can roll the mechanical dog over and rub its belly, which causes its tail to wag and legs to wiggle in a very cute way.


Whatever you do build in VR, test it! Test it as often as you can, and get as many other people as you can to try it out. Watch carefully how they play, what they do, where they get stuck, how they test the environment response to their expectations, etc. No VR experience should ever be built in isolation or a vacuum.


3. Hit Your HMD Frame Rate

For a lot of my development, I've mostly ignored this rule. Particularly for the Oculus Rift. Their hardware can smooth between frames, so if you drop below the target frame rate, the game is still playable on the Rift. I felt comfortable at 45 frames per second and immersion didn't break. However, switching to the HTC Vive was a different story. Their hardware has a screen refresh rate set at 90 hertz, so if you are running anywhere below 90fps, you WILL see judder when you move your head around, and this will break immersion and cause motion sickness to build up. When you're building your VR game, profile often and fix latency causing issues in your build. Always be hitting your framerate.


Some players are much more sensitive to framerate latency, so if you aren't hitting your frame rate and they're reporting motion sickness, you can't rule out framerate as being a cause of it, which causes problem isolation to be much more difficult.


4. Full Body Avatars

I may be in a very small camp of VR developers advocating for full body avatars, but I think it is super valuable to producing an immersive and compelling VR experience. This is particular to first person perspective games, so platformer style games may safely ignore this. The goal in creating a full body avatar is to give the player a body to call their own. This can become a powerful experience and creates lots of interesting opportunities. It is very magical to be able to look down and see your arm, wiggle your fingers in real life, and see the avatar wiggling its fingers exactly the same way. To build a sense of self-identity, we place a mirror within the very beginning part of our VR game. You can see your avatar looking back at you, and as you move your head from left to right, up and down, you see the corresponding avatar head movements reflected in the mirror. What's particularly interesting about immersive full body avatars is that the things which happen to the avatar character feel like they're happening to your own self, and you can experience the world through the perspective of a body which is very different from your own. If you're a man, you can be a woman. If you're a woman, you can be a man. You can change skin color to examine different racial and cultural norms. You can become a zombie and experience what its like to see the world through their eyes. etc. You're not just in someone elses shoes, you're in their body.


Beyond creating character empathy, this also creates a very exciting opportunity to create first hand experiences which are impossible in any other form of media: Imagine a non player character coming up to you and giving you a nice warm hug. The only reason you would believe it wasn't real is because you can't feel the slight constriction around your player torso which real hugs give -- but emotionally and from the perspective of personal intimate space, they are the very same. When you possess a full body avatar, you also build a sense of 'personal space', where if something invades that bubble, you feel it yourself -- if its something dangerous or intimidating, you reel back in fear. If its something familiar and intimate, you feel warm and happy.


Aside from just being a form of self-identification, a full body avatar also works as a communication device between the player and the game. If the player is walking, they should not only see the world moving around them relative to their movement, but they should be able to look down and see their feet moving in the direction of travel. If the player is hurt, they can look at their arms or body to see their damage (blood? torn clothing? wounds?). Our best practice is to keep the body mesh seperate from the head mesh. The head mesh is not rendered for the owning player, but other players and cameras can see it. The reason you want to hide the head mesh from the owning player is because you don't want the player to see the innards of their own head (such as eye balls, mouth, hair, etc). If you want though, you can place a hat on the players head which enters into their peripherial vision.


5. Tone down the speed and intensity

VR games are immersive and players feel like they're physically in your world. This alone magnifies the intensity of any experience players are going to have, so if you're used to designing highly intense, fast paced game play, you're going to want to dial it down to at least half. I think that it's actually possible to give people PTSD from VR, so be careful. You also want to be mindful of common fears people have, such as spiders, and keep those to a minimum. Modern games also tend to have a very fast walk and run speeds designed to keep players in the action. It feels good and polished on a traditional monitor, but if you do this in VR, you feel like you're running 40 miles per hour.


Horror and psychological thrillers are going to be popular go to genres for VR game studios trying to get a strong reaction out of players. However, I will forever condemn anyone who puts jump scares into their VR game. If you do this, I will hate you and I won't even try your game, no matter how 'good' people say it is. Jump scares are a cheap gimmick used to get a momentary rise out of someone and they're used by design hacks who've got nothing better up their designer sleeves. Jump scares are about as horrible as comic sans or the papyrus font. They're not fun, they're not scary, and they're not interesting. Don't use them.


When it comes to locomotion speeds in a room scale environment, players are going to be walking around at a natural walking pace which is comfortable for their environment and dimensions of their play area. Generally, this is going to be quite slow compared to what we're used to in traditional video games! You may feel tempted to change the ratio of real world movement to game world movement, but through lots of first hand testing, I can assure you that this is actually a bad idea. We NEED our physical movement and our visual appearance of movement to have a 1:1 ratio. This sets the tone for what the movement speed of the avatar should be if you're planning to artificially move them as well (through input controls): The avatar should move at a speed which is as close to the players natural, comfortable walking speed. This value can be empirically derived through play testing. The technique I used to get my value is as follows:


  1. Make sure your avatar movement has a 1:1 ratio with player movement. If the player moves forward 1 meter, the avatar should move forward 1 meter as well.
  2. Start at one end of the play space and physically walk to the other end, and measure the approximate amount of time it took. This is your own walking speed.
  3. Measure the distance your avatar covered over this period of time. This is the distance your avatar needs to cover if its being moved through input controls. Divide this distance by the time it took you to cover this distance in your room environment, and you'll have an approximate speed for your artificial movement.

The speed of your avatars movements and player walking speeds will have a huge impact on your level design, game pacing, monster movement speeds and corresponding animations. You'll generally want to make your levels less expansive and tighter, so players aren't spending 15 seconds walking uneventfully through a corridor or along a forest path. The walking speeds and awareness of surroundings also puts a huge limit on how much action a player can handle simultaneously. With traditional games, we can constantly be walking and running around while shooting guns and slinging spells, and using the mouse to whip around in an instant, but with room scale VR, we naturally tend to either be exclusively moving or performing an action, but rarely both at the same time. From user testing, generally people can only effectively focus on about one or two monsters simultaneously in VR, and even this delivers a satisfyingly intense experience. Adding additional monsters would only overwhelm players and their capacity to handle them effectively, so take these considerations into mind when designing monster encounters, particularly if monsters can approach the players from all directions.


The last point to consider carefully is avatar death and the impact it has on the player. In traditional forms of media, we're a bit more disconnected from our characters dying because it's not happening to us personally. When it happens to you yourself, it feels a bit more shocking and we tend to have a bit more of an instinctual self-preservation type response. So, the emotional reaction to our own death is a bit stronger in VR. The rule of thumb I'm using is to lower the intensity of the death experience proportionate to its frequency (via design). If death rarely happens, you can allow it to be somewhat jarring. If death happens frequently, you want to tone down the intensity. Whatever technique you use for this, keep a critical eye towards preserving immersion and presence.


Unique Roomscale VR Considerations

I've found that designing and building for seated VR is much more simple than standing or room scale VR. However, room scale VR is much more fun and immersive, but that comes with an added layer of complexity for things you have to try to account for and handle. I'll briefly go through the challenges for room scale VR:


Measure the height of the player

Players come in a range of heights, from 130cm to 200cm. If a player is standing in their living room with a VR headset, their height should have no bearing on the height in game. So, before a player gets into the game, you should have a calibration step where the player is instructed to stand up straight and tall, and then you measure their height. You can then take the height of the player and compare it against the height of the player avatar and figure out an eye offset and a height ratio. The player will see the VR world through the eyes of their avatar, and if you design the world for the avatar, you can be assured that everyone has the same play experience since you've calibrated the player height to the avatar height. You also know that if a players head goes down 10cm, the proportion of their skeletal movement is going to differ based on how tall they are, and you can use this information to appropriately animate the avatar proportionate to player skeletal position.


Derive the player torso orientation

This is a surprisingly hard problem. If you have an avatar representing the player (which you should!), then you need to know where to place that avatar and what pose to put that avatar in. The VR avatar should ideally match the players body. To find the player torso, you have three devices which return a position and orientation value every frame. You know where the players head is located, where their left hand and right hand are, and the orientations for each one. To find the center position and rotation of the player torso, keep in mind that a player may be looking over their left or right shoulder and may have their arms in any crazy position. Fortunately, players themselves have some physical constraints you can rely on: Unless the player is an owl, they can't rotate their head beyond their shoulders, so the head yaw direction is always going to be within 90 degrees of their torso orientation. As long as the player keeps the left hand motion controller in the left hand, and the right in the right hand, you can also make some distinctions about the physical capabilities of each motion controller. If the pitch of the motion controller is beyond +/- 90 degrees, then the arm is bending at the elbow and it is probably upside down. You can get the "forward" vector of both motion controllers, whether they're upside down or not, and use that direction as a factor for determining the actual torso position and orientation. The other important consideration to keep in mind is that a player can be looking down or tilting their head back, or rolling their head left or right, all of which change the position of the head relative to the torso. I tested my own physical limits at the extremes, captured my head roll and pitch values and the position offsets, and then used an inverse lerp to determine the head offset from the torso position. This assumes of course, that the player head is always going to be attached to their body. You can also add in some logic to measure the distance of the motion controllers from the head mounted display device. If the controllers are outside of a persons physical arm length, you can assume that they aren't actually holding the motion controllers and can use some logic to help the player see where these motion controllers are in their play space.


When you know the forward direction of the motion controllers and the head rotation, you can get a rough approximation of the actual torso position. I just average together the head yaw and the yaws of the motion controllers to get the torso yaw, but this could probably be improved a lot more. The torso position is going to be some fixed value below the head position, accounting for the head rotation offsets and the players calibrated height and their proportions.


Why is the player torso orientation important? Well, if the player walks forward, they walk in the direction their torso is facing. You want to let players look over their shoulder and look around while walking straight forward.


Modeling and Animation in VR:

If you're using a fully body avatar to represent the player, your animation requirements are going to be a lot lighter. A lot of the characters bones are going to be driven by the players body position. You'll almost certainly always have to create a standing, walking and running animation and do blending between the three animations. There are two VERY important bits to keep in mind here:


1. Do NOT use head bobbing. If the camera is attached to the player avatar in any way, this causes unnecessary motion, which causes sickness.


2. The poses should have the shoulders squared and the torso facing forward at all times. Don't slant the body orientation. The poses should ideally also have the arms hanging at the sides. The arms will stay out of sight until the player brings the motion controllers upwards. The reason you don't want the torso to be slanted is because when the player reaches both arms straight out, the avatar arm lengths need to match the player arm lengths -- if the avatar torso is slanted, one shoulder will be further back and one arm will be further out than the other.


Inverse Kinematics:

Since you know the position of the players hands and head, you can use inverse kinematics (IK) to drive a lot of the avatar skeleton. Through trial and error, we found that the palm position is slightly offset from the motion controller position, but this varies by hardware device. We use IK to place the palm at the motion controller position and that drives the elbow bone and shoulder rotations.


You'll also have a problem where players will use their hands to move through physically blocking objects in VR. There's nothing in physical reality stopping their hand from moving through a virtual reality object, but you can block the avatars hand from passing through it by using a line trace between the avatars palm position and the motion controllers palm position, then setting the avatar palm position to the impact point. So, rather than having a hand phase through a wall or table, you can have these virtual objects block it in a convincing way.


Artificial Intelligence in VR:

One surprise we've found is how much "life" good artificial intelligence and animation brings to characters in game. This is an important part of creating a convincing environment which conforms to the expectations of the player. When writing and designing the AI for a character, I try to put myself into the position of the character and think about what information and knowledge it has and try to respond to it in the most intelligent way possible. There will be *some* need for cheating, but you can get a lot of immersion and presence mileage out of well done AI and response to player actions. If you're having trouble figuring out the AI behaviors for a particular character, you can take control over that character and move around the world and figure out how and when to use its various actions. This can also lead to some interesting multiplayer game modes if you have the extra time.


Sound Design:

You actually don't want to get too fancy with sounds. You want to record and play your sound effects in MONO, but when you place them within your VR environment, you want those sounds to have the correct position and attenuation relative to the players head. Most engines should already handle this for you. One other consideration you'll want to look at is the environment the sound is playing in. Do you have echos or reverberations from sound bouncing off the walls in VR? You'll also want to be careful with your sound attenuation settings. Some things, like a burning torch, can play a burning, crackling sound, but the attenuation volume could follow a logarithmic scale instead of a fixed linear scale. A lot of these things will require experimentation and testing.


One other important consideration is thinking about where exactly a sound is coming from in 3D space. If you have a large character who speaks, does the voice emanate from their mouth position? their throat position? their body position? What happens if this sound origin moves very near the players head but the character does not? I haven't tried this yet, but one possibility is to play the sound from multiple positions at the same time.


It's also very important to note the importance of sound within VR. Remember, VR is not just an HMD. It's an artificial world which immerses the players senses. Everything that can have a sound effect, should have a believable sound effect. I would suggest that while people think that VR is all about visual effects, sound makes up for 50% of the total experience.


When it comes to narrative and voice overs, the production process is relatively unchanged from other forms of media. Whatever you do, just test everything out to make sure it makes sense and fits the context of the experience you're creating.


Locomotion:

This is probably one of the most difficult problems roomscale VR developers face. The dilemma is that a player is going to be playing in a room with a fixed size, such as a living room. Let's pretend that its 5 meters by 5 meters. When the player moves through this play space, their avatar should move through it with a corresponding 1:1 ratio. What happens if the game world is larger than the size of the players living room? Maybe your game world is 1km by 1km, but the players living room is 5m by 5m. The solution you choose is going to be dependent on the game you're creating and how its designed, so there isn't a 'silver bullet' which works for every game.


Here are my own requirements for a locomotion solution:
  1. It has to be intuitive, easy and natural to use. Player instruction should be minimal.
  2. It can't use hardware the player doesn't have. In other words, use out-of-the-box hardware.
  3. It can't make players sick
  4. It should not detract from the gameplay
  5. It should not break the game design
These are some of the locomotion solutions:

Option 1: Design around it. Some notable VR developers have decided that the playable VR area is going to be exactly the size of the players play area. "Job Simulator" will have the world dynamically resize to fit the size of your playable area, but the playable area isn't much larger than a cubicle. "Hover Junkers" designs around the locomotion problem by having the player standing on a moving platform, and the moving platform is the size of their playable area. Fantastic Contraption does the same thing. These are fine work arounds, and if you never have to solve a locomotion problem...it's never going to be a problem!


Option 2: Teleportation. This seems to be the 'industry standard' for movement around a game world which is larger than the living room. There are many variations of this technique, but it essentially all works the same: The player uses the motion controller to point to where they want to go, press a button, and they instantly move there. One benefit of this method is that it causes very little motion sickness and you can keep the players avatar within a valid position in the game world. One huge draw back of this is that it can cause certain games to have broken mechanics -- if you are surrounded by bad guys, it is much less intense if you can simply just teleport out of trouble. You also have a potential problem where players can teleport next to a wall and then walk through it in room space.


Option 3: Rotate the game world. This is a novel technique someone else came up with recently, where you essentially grab the game world and rotate the world around yourself. As you reach the edge of your living room, the player would turn 180 degrees and then grab the game world and rotate it 180 degrees as well. This *works* but I anticipate it has several draw backs in practice. First, the player has to constantly be interrupting their game to manage their position state within VR. This is very immersion breaking. Second, if the players living room is very small, the number of times they have to grab and rotate the world is going to become very frequent. What portion of the game would players be spending walking around and rotating the world? The third critique is that when the player grabs and rotates the world, they are effectively stopping their movement, so they're constantly stopping and going in VR. This won't work well for games where you have to run away from something, but could work well for casual environment exploration games.


Option 4: Use an additional hardware input device, such as Virtuix Omni. This is a perfect ideal. You don't have to know the direction of the players torso because locomotion is done by the players own feet. It's also a very familiar locomotion system which requires no training and interruption of hands. However, there are going to be three critical drawbacks. First, *most* people are not going to actually have this hardware available, so you have to design your VR game for the lowest common denominator in terms of hardware support. Second, I believe it's going to be a lot more physically tiring to constantly run your legs (would anyone feel like a hamster in a hamster wheel?). This puts physical endurance limits on how long a player can play your VR game (12 hour gaming sessions are going to be rare.) Third, the hardware holds your hips in place, so ducking and jumping is not going to be something players can do easily. Aside from these issues, this would be perfect and I look forward to a future where this hardware is prolific and polished.


Option 5: "Walk-a-motion". This is the locomotion technique I recently invented, so I'm a bit biased. I walk about a mile to work every day and I noticed that when I walk, I generally swing my arms from side to side. So, my approach is to use arm swinging as a locomotion technique for VR. The speed at which you swing your arms determines your movement speed, and its on a tiered levels, so slow leisurely swings will make you walk at a constant slow pace. If you increase your arm speed, you increase your constant walk speed. If you pump your arms a lot faster, your character runs. This moves the avatar in the direction of the player torso orientation, so it's important to know where the torso is facing despite head orientations. The advantage of this system is that it acts as an input command for the avatar to walk forward, so you automatically get in game collision detection. To change avatar walk directions, you just turn your own torso in the direction you want to walk forward. You can still walk around within your play area as usual, though it can become disorienting to walk backwards while swinging your arms to move forwards. This also does require you to use your arms to move, so that creates a significant limitation on being able to "run and gun" in certain games. It also looks kind of stupid to stand in place and swing your arms or move them up and down furiously, but you already look kind of silly wearing an HMD anyways. It's also a lot less tiring than running your feet on a treadmill, but it's also slightly less 'natural'. No additional hardware is required however, and no teleportation means the player can actually be chased by monsters or run off of cliffs.


To get this to work, I have two tracks on either side of the player character. I grab the motion controller positions and project their points onto these two tracks (using dot products). If the left hand value is decreasing and the right hand value is increasing, or vice versa, and the hands are below the waist, we can read this as a movement input. I also keep track of the hand positions over the last 30 frames and average them together to smooth out the inputs so that we're moving based on a running average instead of frame by frame inputs. Since we're running anywhere between 75-90 frames per second, this is very acceptable and responsive. It's worth noting that natural hand swinging movements don't actually move in a perfect arc centered on the torso. Through testing, I found that my arms move forward about twice as far as they move backwards, so this informs where you place the tracks. I've also experimented with calibrating the arm swinging movements per player, but there is a danger that the player will swing their arms around wildly and totally mess up the calibration. You will want to keep the movement tracks at the sides of the player, so you'll have to either read the motion controller inputs in local space or transform the tracks into a coordinate space relative to the avatar.


A future optimization could be to use traced hand arcs and project the motion controller positions onto them, but after trying to implement it, I realized it was additional complexity without a significant gain.


Option 6: Push button locomotion: This is by far the simplest locomotion solution, where you face the direction you want your avatar to travel, and then you push a button on your motion controller. While its simple to implement, it does have a few limitations as well. First, you will be using a button to move forward. The motion controllers don't have many buttons, so this is quite a sacrifice. Second, the button has two states: up or down. So, you're either moving forward at maximum speed or not moving at all. The WASD keyboard controls have the same limitation, but it is familiar. If you want the player to use a game pad instead of motion controllers, you can also use the thumbsticks to give lateral and backwards movements. However, I don't recommend using game pads for room scale VR because the cords are generally not long enough and you lose out on the new capabilities of motion controllers.


Option 7: Move on rails: Some games will have the avatar moving on a preset, fixed pathway. Maybe your avatar is walking down a trail at a constant speed, and you only control where they look and what they do? This can work well for certain games such as rail shooters, but it does mean that the freedom of movement and control is taken away from the player.


Option 8: The player is riding on something that moves: In this case, you might be riding something like a horse and you're guiding its movement by pulling on reins. Or maybe you're on a magic carpet and you steer the carpets movement by rotating a sphere of some sort. These are really good alternative solutions, though there is one pretty big limitation: You can't really use these convincingly indoors.


Option 9: A combination of everything and fakery: If you are very careful about how you design your levels and environments, you could totally fake it and make it seem like there is actually locomotion when there really isn't. For example, if the player is walking around within a building, don't let the dimensions of the building be larger than the play space. If the player exits the building, perhaps they have to get on a horse to cross the street to get to the next building. Or perhaps get in a car and drive to the next town over. Maybe when a player enters into a new building, the orientation of the building interior is designed to align with the players location so that you maximize the walkable space. The trick is to figure our clever ways to make the player not move outside the bounds of their play space while giving the appearance that they're moving vast distances in the VR world, and to do that, you want to minimize the actual amount of walking around the player has to do.


Object Collision:

This has been a problem which has challenged a lot of room scale VR developers. The problem is that players know that the virtual reality environment is not real, so if there is a blocking obstacle or geometry of some sort and the player can move by walking around in their living room, there is no reason why the player doesn't just walk through the object in virtual reality. This means that walls are merely suggestions. Doors are just decorations, whether they're locked or not. Monsters which would block your path can simply be passed through. In a sense, the player is a ghost who can walk through anything in VR because nothing is physically stopping them from doing so in their play space. This can be dangerous as well if a player is in a tall building and decides to walk through the wall and exits the building and falls (motion sickness!). Some developers have chosen to create volumes which cause the camera to fade to black when the player passes through a blocking volume. Other VR developers acknowledge the problem and claim that it's against a players psychological instincts to pass through blocking geometry, so they ignore it and let players stop themselves. Through experimentation, I found that intentionally walking through walls in VR has a secondary danger: You forget which walls are virtual and which ones are not (SteamVR has a chaperone system which creates a grid withing VR which indicate where your real world walls are located).


I spent a week trying to figure out how to solve this problem, and I can finally say that I have solved it. I can confidently say that I am an idiot because it took me so long to find such a simple solution. Let's back up for a moment though and examine where we've all been going wrong. The "wrong" thing to do is read the HMD position every frame and set the avatar to its corresponding position in world space. For example, if your HMD starts at [0,0,0] on frame #0 and then goes to [10,0,0] on frame #1, you don't set the avatar position to the equivalent world space coordinates. That's what I was doing, and it was wrong! What you actually want to do is get the movement delta for the HMD each frame and then apply an accrued movement input request to your avatar. So, in the example above, the delta would be calculated by subtracting the last frame HMD position [0,0,0] from the current frame HMD position [10,0,0] to get [10,0,0]. You then want to give your avatar a movement input on the resulting direction vector. This would cause your head movement to be a movement input, no different than a WASD keyboard input. If the avatar is blocked by geometry, it won't pass through it. And you can safely set the HMD camera on the characters shoulder so that it isn't clipping through the geometery as well. In effect, you can't block the player from physically moving forward in their living room, but you can block the avatar and the HMD camera from moving forward with the player. It's not quite unsettling, but players will quickly learn that they can't move through solid objects in VR and they'll stop trying. Problem solved. It took me a week to figure out where I went wrong and the solution was so elegantly simple that I felt like the worlds dumbest developer (my other attempts were ten times more complicated, but were a necessary step in the eventual path to the correct solution).


Conclusion and final thoughts

VR is a very new form of media and there are no established hard rules to follow. There are very few (if any) experts, so take everyones word with a grain of salt. The best way to find what works and doesn't work is to try things out and see if they work. I find that it saves a lot of time to spend a good ten minutes trying to think through a design implementation in my imagination and playing it through in my head before trying to implement it. It's a lot faster and more efficient to anticipate problems in the conceptual phase and fix them before you start implementing them. In my experience, you really can't do a lot of "up front" design for VR. There's a high risk that whatever you come up with just won't work right in VR. You'll want to use a fast iteration software development life cycle and test frequently. You'll also want to get as many people as you can to try out your VR experience so that you can find trouble areas, blind spots, and figure out where your design assumptions are wrong.


You'll also want to monitor your own health state carefully. Developing in VR and iterating rapidly between VR and game dev can cause wooziness, and these woozy feelings can actually slow down the pace of your development as you're trying to mentally recover from the effects. Take breaks!

</p></p>

Integrating Socket.io with Unity 5 WebGL

$
0
0

Introduction


WebSockets are a great choice to implement networking in your Unity WebGL games. WebSockets provide two-way persistent connection to a server. Unfortunately, WebSockets in Unity WebGL is limited at this time. There is a sample source library package in the Unity Store from the Unity Team, however, websocket functionality is not fully implemented. This article proposes the use of Javascript Socket.io to implement persistent p2p communication through a web server.


A particular useful aspect of Socket.io is that the server code can be written in Javascript. This allows for the code to be analogous on both the server and client sides for better clarity and maintenance.


Explaining the Concept


There are three major parts to this approach in order to implement Socket.io with your WebGL game:


  1. Setting up a network communication script within Unity
  2. Creating the javascript client code
  3. Creating the javascript server code

Data is then passed back and forth to the Unity Game by converting the data to/from JSON objects and strings.


Implementation


Project Setup

In order to try this method out for yourself Node.js must be installed on your server. Once installed, open up a command line terminal and change directory to your Unity Project WebGL Build. Then create a JSON file titled package.json in that directory with the following contents:


{
	"dependencies": {
  	"express": "4.13.4",
  	"socket.io": "1.4.5"
	}	
}

The actual latest version can be obtained from the command "npm info express version". After the file is created:


  1. Run "npm install" to download node modules for express and socket.io into your build directory.
  2. Create a folder "public" in the root of your unity build directory
  3. Create a blank "client.js" script inside the "public" folder

Unity Specific Code


The following is an example template that you would use to interact with the external client-side javascript that would in turn interact with the server script.


The JSONUtility class is leveraged in the example, since only string data can be passed via Application.externalCall and its corresponding receiver method on the client javascript side.


Data can be passed for execution in the browser using:

Application.ExternalCall (string functionName, string dataParameter);

Ideally, we should set some data classes first before coding the nnetwork manager to aid in conversion to/from Json Objects using JSONUtility:


// Sample Data Classes that could be stringified by JSONUtility
public class User
{
    public string uid;
    public string displayname;
    
    public User(string u,string d)
    {
        uid = u;
        displayname = d;
    }
}

public class MatchJoinResponse
{
    public bool result;
}

Next create a C# script named "NetworkManager" and attach to a GameObject in your scene:


using UnityEngine;

public class NetworkManager : MonoBehaviour
{
    public void ConnectToServer(User user)
    { 
        Application.ExternalCall ("Logon", JsonUtility.ToJson (user));
    }
    
    public void OnMatchJoined(string jsonresponse)
    {
        MatchJoinResponse mjr = JsonUtility.FromJson<MatchJoinResponse> (jsonresponse);
        if(mjr.result)
        {
            Debug.Log("Logon successful");
        }
        else
        {
            Debug.Log("Logon failed");
        }
    }
    
    public void BroadcastQuit()
    {
        Application.ExternalCall ("QuitMatch");
    }
}

When you rebuild your Unity project. Make sure you now add the following lines to the "index.html" file:


<script type="text/javascript" src="/socket.io/socket.io.js"></script>
<script type="text/javascript" src="client.js"></script>

Client Javascript

The client javascript accepts calls from the Unity Game running in the previous section and connects with the server in the next section. Calls are forwarded back to the Unity Game with the following call:


SendMessage(string GameObjectName, string MethodName, string data);

The example uses a timeout to prevent locking up your game in the event the server is down. In the client.js file:

var connection;
var logonTimeout;

var logonCallback = function (res)
{
    
    clearTimeout(logonTimeout);
    // Send Message back to Unity GameObject with name 'XXX' that has NetworkManager script attached
    SendMessage('XXX','OnMatchJoined',JSON.stringify(response));
};

function Logon(str)
{
    var data = JSON.parse(str); 
    connection = io.connect();
    // Setup receiver client side function callback
    connection.on('JoinMatchResult', logonCallback);
    // Attempt to contact server with user data
    connection.emit('JoinMatchQueue', data);
    
    // Disconnect after 30 seconds if no response from server
    logonTimeout = setTimeout(function(){
        connection.disconnect();
        connection = null;
        var response ={result:false};
        // Send Message back to Unity GameObject with name 'XXX' that has NetworkManager script attached
        SendMessage('XXX','OnMatchJoined',JSON.stringify(response)); 
    },30000);       
}

function QuitMatch()
{
    if(connection)
    {
        connection.disconnect();
        connection = null;  
    }
}

Server Javascript

The example server is setup using express for routing and file delivery simplicity. The server and client functions are analogous in this example.


// Variable Initialization
var express = require('express'),
app = express(),
server = require('http').createServer(app),
port = process.env.PORT || 3000,
io = require('socket.io')(server);

// Store Client list
var clients = {};

// Allow express to serve static files in folder structure set by Unity Build
app.use("/TemplateData",express.static(__dirname + "/TemplateData"));
app.use("/Release",express.static(__dirname + "/Release"));
app.use(express.static('public'));

// Start server
server.listen(port);

// Redirect response to serve index.html
app.get('/',function(req, res)
        {
            res.sendfile(__dirname + '/index.html');
        });

// Implement socket functionality
io.on('connection', function(socket){
    socket.on('JoinMatchQueue', function(user){
        socket.user = user;
        clients[user.uid] = socket;
        var response ={result:true};
        socket.emit('JoinMatchResult', response);
        console.log(user.uid + " connected");
    });
    socket.on('disconnect', function()
    {
        delete clients[socket.user.uid];
        console.log(socket.user.uid + " disconnected");
    });
});

Once saved, the server can then be started on your home computer with Node.js with the command line "node server.js".


Other Notes

There is most likely a performance consideration in your game. Data is converted to and from JSON objects and strings from the browser and back in the game; each conversion is necessary overhead in this approach. I would be interested in hearing if anyone implementing this method has any information regarding any performance hit experienced.


Also, if implementing Socket.io on an Azure server, make sure the following line is also added in the website's web.config file:


<webSocket enabled="false"/>

This disables the IIS WebSockets module, which includes its own implementation of WebSockets and conflicts with Node.js specific WebSocket modules such as Socket.IO.


Conclusion

This article presented a way to network with Socket.io and WebGL builds of Unity.


Obviously a better way to execute Socket.io and Unity interoperability would be a plugin solely hosted in the Unity environment. The solution presented in this article is a extensible alternative until such time that Unity implements websocket functionality natively into its game engine. Finally, there is added benefit in that the javascript client and server codes will be very similar.


<h3>Article Update Log</h3>

10 Apr 2016: Initial release

Building tools for Unity to improve your workflow

$
0
0

I think we all consider Editor Tools a great and really useful aspect of Unity. Working with it has allowed us to create prototypes really fast and makes a lot easier to build prototypes, to add new objects easily and to assign variables. It’s a huge improvement in our work flow. The thing is, as Immortal Redneck grew bigger, we started to needing our own tools and we could use Unity editor to build them fast.


We’ve already written about what assets we’be bought to make our development a little more straight-forwarded, but sometimes there’s none for your needs. So, why not making it ourselves? It’s not the first time we’ve built our own tools to improve our workflow, and Immortal Redneck wouldn’t be different. So let me show you what we have.


Game Design Tool


Immortal Redneck is a big game – at least for us. In addition to the amount of development hours, it would require a lot of balancing: there’s guns, enemies and skills, so we wanted this task to be as easy and simple as possible.


Attached Image: GameDesignTool_Weapons.png

That’s why we built this tool, to change things almost on the fly. Right now, we can alter:


  • Global parameters like drop rates and spawn times between enemies
  • Each class statistics (HP, Attack, Defense, etc.)
  • Enemies’ stats. In the future, we want to change their global behavior and change when they attack, when the hold, at what distance they start moving…
  • Weapons’ damage, range, spread, ammo, recoil…
  • The skill tree’s levels, gold rates, statistics it changes…

Attached Image: GameDesignTool_Skills.png
Attached Image: GameDesignTool_Enemies.png

Room Utils


We want our game to have a lot of rooms, so we needed to have the capacity to create them fast and well. We coded a few tools to this intention.


In first place, we created a menu that looks like ProGrids so we can mix everything. We can duplicate objects in each axys really fast because that’s what took us most time in the first days of development. Also, it was excruciatingly boring and repetitive thing for the team to do.


Attached Image: RoomUtils_Duplicate.gif

There’s another tool that allow us to check each asset we’ve created on a catalogue, and paste what we want into the scene. It’s almost automatic and works really well. We can place the asset in the place we are looking at or select something in the scene and replace it with something from the catalogue. This is a really, really fast way to replace a whole floor or wall.


Attached Image: RoomUtils_Catalog.png

RoomScene Inspector

Each one of our rooms is a scene due to a optimization requirements. Even though Unity 5.3 has evolved a lot in this matter, it’s still kind of hard to work with them in comparison with using prefabs, for example.


Attached Image: RoomSceneInspector.png

We decided to work that way, creating various scenes and using a ScriptableObject as a reference for each room. This ScriptableObject has the data of each scene, but we can also use it to open them, add them to Build Settings and more stuff.


We work constantly with Custom Inspectors in Unity because of this, and that’s why we’ve extended the default editor and added more options. We’ve even added a room preview because Unity is not allowing that at the moment and it’s something that we need to quickly identify what we are changing in the scene.


Create PBR Material


Attached Image: CreatePBRMaterial.png

Working with PBR (Physically Based Rendering), as we are doing in each asset of our game, requires three textures (Albedo, Mask1 and Normal) every time. This implies that each time we import something into Unity, we have to create a Material for that object and assign the three texture each one at a time.


It’s not a very taxing process, but when you start adding textures of everything in the game, it takes sometime and gets boring. We coded a little tool that automatically create the material by selecting the three texture on the project. It ended up being one of the most useful tools in our development.


MultiCamera Screenshot


Most screenshot plugins only let you use one game camera. Since Immortal Redneck uses two – one for the player, another for the weapon – we created our own tool to capture all the cameras we wanted.


Attached Image: MulticameraScreenshot.png

Once we had it, we made it better with overlay options, so we could add our logo and insert the always necessary ‘pre-alpha’ title without opening Photoshop.


Every promotional screenshot you’ve seen has been capture with MultiCamera Screenshot.


Combine Utils


Meshes that use the same materials can be combined in Unity to improve its performance. There’s various plugins to do this, but we are using our own tool because it looks better.


Again, we took ProGrid’s style and created our own window. It looks great and it has a lot of options: creating a group of objects to combine, another one to erase a group, another to combine them and the last one to separate the group.


Object Randomizer


In order to build the three pyramids of Immortal Redneck, our artists made different rock blocks that they would have to pile to create the pyramids sides.


Attached Image: ObjectRandomizerGif.gif

To do this manually would be hard, so we coded a little tool that would take rock lines with little variations. This way, our artists could create as many lines as they wanted and build the pyramid faster without repeating patterns. Later, they made some little changes, but the pyramids were done in a jiffy.


Attached Image: ObjectRandomizer.png

Gizmos


Unity has a very interesting feature: it merges Gizmos with scripts. Gizmos are conceived to show graphics over the scene so some stuff is easily seen on it.


Attached Image: Gizmos_1.png

For example, in the room above, we’ve got gizmos showing spawn positions and interest points for their AI.


Red spheres show the enemies avatar so we can see where they’ll spawn, while red squares do the same with walking creatures.


In a similar fashion, blue spheres represent the flying enemies’ interest points and the orange squares on the floor are interest points for the walking ones.


At first, it might seem crowded and confusing, but it really helps a lot once you get used to it.


Components Clipboard


Attached Image: ComponentsClipboard.png

Anyone that’s worked with Unity has experienced this: you test the game, you change something, you stop it and then you cry when you realize nothing has been saved.


Sometimes, you need to change a value while playing so you see on real time how that affects the game. We coded a script that worked as a clipboard so you copy your values so you can paste them after stopping the game. It’s simple and easy to use, and it saved our artists a lot of time.

Procedural Generation: Pros and Cons

$
0
0

Originally posted at procgen.wordpress.com

Doi8ovs.jpg

In this article I discuss the pros and cons of using procedural generation (ProcGen). This type of analysis is a good way for you to understand when you should use it and it varies depending on what you want to do. Some case examples in my previous post here.


The root cause for some of these arguments in favor or against might be the same. Here are a few of the most common pro and con arguments:


([+] for pro, [-] for con, [+/-] for depends)


[+/-] Efficiency: How fast we can design our scenes? Whether ProcGen is more efficient than manual content sculpting, really depends on what you are doing. If you want to model a single 3D building, for instance, then maybe ProcGen might not be as efficient as the manual method. On the other hand, if you are to create 10, 50 or 100 buildings for a city then you could reconsider. In short, ProcGen can have a larger overhead than manual modelling but after you “break even” timewise, ProcGen can become infinitely more efficient.


[+/-] Cost: How much time and money does it take to create? When it comes to the cost of using manual vs ProcGen, efficiency plays a big role when you consider the saying “time is money”. Another factor that influences cost is whether you create your own ProcGen system or use existing solutions such as SpeedTree, Houdini or Sceelix (shameless plug). Although you need to pay for the licenses, it may compensate the time your team saves.


0F04EYE.gif


[-] Control: The ease to define certain designs and properties. When you want to create content with total control and specific details your best bet is to create the content manually. For your time, wallet and sanity’s sake.


[+] Monotony free: If you have to create 100 3D buildings by hand, that can be a very tiresome and repetitive job. This is a point commonly made by game designers in favor of ProcGen.


[+] Scalability: The ease to create small scenes as well as large. Once you determine the properties and parameters of the content you want to generate procedurally (which generates the overhead previously mentioned), the time it takes a PC to generate any amount of content depends solely on the limitations of the PC. Basically, from making 10 building to 100 can be a matter of seconds.


[+] Compression: As you may remember from the high ProcGen purity game from my previous post, a whole 3D first-person shooter level fit into a 96kb executable because all its content (3D meshes, textures, sounds) were generated procedurally. When the game loaded up it used up over 300mb of RAM.


[+] Paranoia: Is this tree distribution random enough? Or the number of branches and sub-branches for that matter? Aaahhh… ProcGen can give you more peace of mind in that sense, if you feed truly random seeds to a properly bounded system. Testing is always important specially if generation is at runtime.

sI5v1c6.jpg


[+] Consistency: The guarantee that elements follow the same style and working principles. Almost in the opposite side of the spectrum from the previous point: Do these trees look like they’re from different planets? If you have a well rounded ProcGen system or tool specification, you can better guarantee greater consistency between content of the same type than if you did them manually. If you don’t, it can be a problem. Again, testing is important.


[+] Reusability: Being able to make the most out of your work. Some ProcGen systems have a high reusability factor. Changing a few parameters could generate a whole new set of content. This also brings value you should consider, if you decide to create one. The more you can reuse it, the better the investment is of creating or specifying one.


[+/-] Manageability: The ease of controlling the resulting output. If you are talking about creating large quantities of content, ProcGen can give you centralized control over the overall result. If you are dealing with small quantities, manual creation will give you more control. Some ProcGen tools also give you more control by giving you visual languages (normally node-based) with parameterization.


[+] Adaptability: change to obey the rules you defined in your system. If you make a building double its original height, then the number of floors could automatically double. If the ProcGen system you use is well developed, you may change one of its parameters and the resulting output will adapt to meet the constraints you have in place.


bWGAGTL.gif


These are the broad strokes. There are also some general considerations you should have when you use procedural generation, but that I’ll leave for my next post.

Static, zero-overhead (probably) PIMPL in C++

$
0
0

PIMPL (Pointer to IMPLementation, or "opaque pointer") is an idiom used for when you need "super" encapsulation of members of a class - you don't have to declare privates, or suffer all of the #include bloat or forward declaration boilerplate entailed, in the class definition. It can also save you some recompilations, and it's useful for dynamic linkage as it doesn't impose a hidden ABI on the client, only the one that is also part of the API.

Typical exhibitionist class:

// Foo.hpp
#include <big_header.hpp>
    
class Foo {
public:
	Foo(int);

private:
	// how embarrassing!
	Dongle dongle;
};

// Foo.cpp
Foo(int bar) : dongle(bar) {}

Now, it's developed a bad case of PIMPLs and decides to cover up:
// Foo_PIMPL.hpp
class Foo {
public:
	// API stays the same...
	Foo(int);

	// with some unfortunate additions...
	~Foo();
	Foo(Foo const&);
	Foo &operator =(Foo const&);

private:
	// but privates are nicely tucked away!
	struct Impl;
	Impl *impl;
};

// Foo_PIMPL.cpp
#include <big_header.hpp>

struct Foo::Impl {
	Dongle dongle;
};

Foo(int bar) {
	impl = new Impl{Dongle{bar}}; // hmm...
}

~Foo() {
	delete impl; // hmm...
}

Foo(Foo const&other) {
	// oh no
}

Foo &operator =(Foo const&other) {
	// I hate everything
}

There are a couple big caveats of PIMPL, and that's of course that you need to do dynamic memory allocation and suffer a level of pointer indirection, plus write a whole bunch of boilerplate! In this article I will propose something similar to PIMPL that does not require this sacrifice, and has (probably) no run time overhead compared to using standard private members.

Pop that PIMPL!


So, what can we do about it?

Let's start by understanding why we need to put private fields in the header in the first place. In C++, every class can be a value type, i.e. allocated on the stack. In order to do this, we need to know its size, so that we can shift the stack pointer by the right amount. Every allocation, not just on the stack, also needs to be aware of possible alignment restrictions. Using an opaque pointer with dynamic allocation solves this problem, because the size and alignment needs of a pointer are well-defined, and only the implementation has to know about the size and alignment needs of the encapsulated fields.

It just so happens that C++ already has a very useful feature to help us out: std::aligned_storage in the <type_traits> STL header. It takes two template parameters - a size and an alignment - and hands you back an unspecified structure that satisfies those requirements. What does this mean for us? Instead of having to dynamically allocate memory for our privates, we can simply alias with a field of this structure, as long as the size and alignment are compatible!

Implementation


To that end, let's design a straightforward structure to handle all of this somewhat automagically. I initially modeled it to be used as a base class, but couldn't get the inheritance of the opaque Impl type to play well. So I'll stick to a compositional approach; the code ended up being cleaner anyways.

First of all, we'll template it over the opaque type, a size and an alignment. The size and alignment will be forwarded directly to an aligned_storage.
#include <type_traits>

template<class Impl, size_t Size, size_t Align>
struct Pimpl {
	typename std::aligned_storage<Size, Align>::type mem;
};

For convenience, we'll override the dereference operators to make it look almost like we're directly using the Impl structure.
Impl &operator *() {
	return reinterpret_cast<Impl &>(mem);
}

Impl *operator ->() {
	return reinterpret_cast<Impl *>(&mem);
}

// be sure to add const versions as well!

The last piece of the puzzle is to ensure that the user of the class actually provides a valid size and alignment, which ends up being quite trivial:
Pimpl() {
	static_assert(sizeof(Impl) <= Size, "Impl too big!");
	static_assert(Align % alignof(Impl) == 0, "Impl misaligned!");
}

You could also add a variadic template constructor that forwards its parameters to the Impl constructor and constructs it in-place, but I'll leave that as an exercise to the reader.

To end off, let's convert our Foo example to our new and improved PIMPL!
// Foo_NewPIMPL.hpp
class Foo {
public:
	// API stays the same...
	Foo(int);
    
	// no boilerplate!

private:
	struct Impl;
	// let's assume a Dongle will always be smaller than 16 bytes and require 4-byte alignment
	Pimpl<Impl, 16, 4> impl;
};

// Foo_NewPIMPL.cpp
#include <big_header.hpp>

struct Foo::Impl {
	Dongle dongle;
};

Foo(int bar) {
	impl->dongle = Dongle{bar};
}

Conclusion


There's not much to say about it, really. Aside from the reinterpret_casts, there's no reason there could be any difference at run time, and even then the only potential difference would be in the compiler's ability to optimize.

As always, I appreciate comments and feedback!

Serious Sam shooter anniversary - finding bugs in the code of the Serious Engine v.1.10

$
0
0

The first-person shooter 'Serious Sam' celebrated its release anniversary on March, 2016. In honor of this, the game developers form the Croatian company Croteam decided to open the source code for the game engine, Serious Engine 1 v.1.10. It provoked the interest of a large number of developers, who got an opportunity to have a look at the code and improve it. I have also decided to participate in the code improvement, and wrote an article reviewing the bugs that were found by PVS-Studio analyzer.


Introduction


Serious Engine is a game engine developed by a Croatian company Croteam. V 1.1o, and was used in the games 'Serious Sam Classic: The First Encounter', and 'Serious Sam Classic: The Second Encounter'. Later on, the Croteam Company released more advanced game engines - Serious Engine 2, Serious Engine 3, and Serious Engine 4; the source code of Serious Engine version 1.10 was officially made open and available under the license GNU General Public License v.2

The project is easily built in Visual Studio 2013, and checked by PVS-Studio 6.02 static analyzer.

Typos!


image2.png
V501 There are identical sub-expressions to the left and to the right of the '==' operator: tp_iAnisotropy == tp_iAnisotropy gfx_wrapper.h 180

class CTexParams {
public:

  inline BOOL IsEqual( CTexParams tp) {
    return tp_iFilter     == tp.tp_iFilter &&
           tp_iAnisotropy == tp_iAnisotropy && // <=
           tp_eWrapU      == tp.tp_eWrapU &&
           tp_eWrapV      == tp.tp_eWrapV; };
  ....
};


I have changed the formatting of this code fragment to make it more visual. The defect, found by the analyzer became more evident - the variable is compared with itself. The object with the name 'tp' has a field 'tp_iAnisotropy', so, by the analogy with the neighboring part of the code, a part of the condition should be 'tp_iAnisotropy'.

V501 There are identical sub-expressions 'GetShadingMapWidth() < 32' to the left and to the right of the '||' operator. terrain.cpp 561

void CTerrain::SetShadowMapsSize(....)
{
  ....
  if(GetShadowMapWidth()<32 || GetShadingMapHeight()<32) {
    ....
  }

  if(GetShadingMapWidth()<32 || GetShadingMapWidth()<32) { // <=
    tr_iShadingMapSizeAspect = 0;
  }
  ....
  PIX pixShadingMapWidth  = GetShadingMapWidth();
  PIX pixShadingMapHeight = GetShadingMapHeight();
  ....
}


The analyzer found a suspicious code fragment which checks the width and height of a map, of the width, to be more exact, because we can see two similar checks "GetShadingMapWidth()<32" in the code. Most probably, the conditions should be:

if(GetShadingMapWidth()<32 || GetShadingMapHeight()<32) {
  tr_iShadingMapSizeAspect = 0;
}


V501 There are identical sub-expressions '(vfp_ptPrimitiveType == vfpToCompare.vfp_ptPrimitiveType)' to the left and to the right of the '&&' operator. worldeditor.h 580

inline BOOL CValuesForPrimitive::operator==(....)
{
  return (
 (....) &&
 (vfp_ptPrimitiveType == vfpToCompare.vfp_ptPrimitiveType) &&//<=
 (vfp_plPrimitive == vfpToCompare.vfp_plPrimitive) &&
 ....
 (vfp_bDummy == vfpToCompare.vfp_bDummy) &&
 (vfp_ptPrimitiveType == vfpToCompare.vfp_ptPrimitiveType) &&//<=
 ....
 (vfp_fXMin == vfpToCompare.vfp_fXMin) &&
 (vfp_fXMax == vfpToCompare.vfp_fXMax) &&
 (vfp_fYMin == vfpToCompare.vfp_fYMin) &&
 (vfp_fYMax == vfpToCompare.vfp_fYMax) &&
 (vfp_fZMin == vfpToCompare.vfp_fZMin) &&
 (vfp_fZMax == vfpToCompare.vfp_fZMax) &&
 ....
);


The condition in the overloaded comparison operator takes 35 lines. No wonder the author was copying the strings to write faster, but it's very easy to make an error coding in such a way. Perhaps there is an extra check here, or the copied string was not renamed, and the comparison operator doesn't always return a correct result.

Strange comparisons


V559 Suspicious assignment inside the condition expression of 'if' operator: pwndView = 0. mainfrm.cpp 697

void CMainFrame::OnCancelMode()
{
  // switches out of eventual direct screen mode
  CWorldEditorView *pwndView = (....)GetActiveView();
  if (pwndView = NULL) {                             // <=
    // get the MDIChildFrame of active window
    CChildFrame *pfrChild = (....)pwndView->GetParentFrame();
    ASSERT(pfrChild!=NULL);
  }
  CMDIFrameWnd::OnCancelMode();
}


There is quite a number of strange comparisons in the code of the engine. For example, in this code fragment we get a pointer "pwndView", which is then assigned with NULL, making the condition always false.

Most likely the programmer meant to write the inequality operator '!=' and the code should have been like this:

if (pwndView != NULL) {
  // get the MDIChildFrame of active window
  CChildFrame *pfrChild = (....)pwndView->GetParentFrame();
  ASSERT(pfrChild!=NULL);
}


Two more similar code fragments:V559 Suspicious assignment inside the condition expression of 'if' operator: pwndView = 0. mainfrm.cpp 710
V547 Expression is always false. Probably the '||' operator should be used here. entity.cpp 3537

enum RenderType {
  ....
  RT_BRUSH       = 4,
  RT_FIELDBRUSH  = 8,
  ....
};

void
CEntity::DumpSync_t(CTStream &strm, INDEX iExtensiveSyncCheck)
{
  ....
  if( en_pciCollisionInfo == NULL) {
    strm.FPrintF_t("Collision info NULL\n");
  } else if (en_RenderType==RT_BRUSH &&       // <=
             en_RenderType==RT_FIELDBRUSH) {  // <=
    strm.FPrintF_t("Collision info: Brush entity\n");
  } else {
  ....
  }
  ....
}


One variable with the name "en_RenderType" is compared with two different constants. The error is in the usage of '&&' logical and operator. A variable can never be equal to two constants at the same time, that's why the condition is always false. The '||' operator should be used in this fragment.

V559 Suspicious assignment inside the condition expression of 'if' operator: _strModURLSelected = "". menu.cpp 1188

CTString _strModURLSelected;

void JoinNetworkGame(void)
{
  ....
  char strModURL[256] = {0};
  _pNetwork->ga_strRequiredMod.ScanF(...., &strModURL);
  _fnmModSelected = CTString(strModName);
  _strModURLSelected = strModURL; // <=
  if (_strModURLSelected="") {    // <=
    _strModURLSelected = "http://www.croteam.com/mods/Old";
  }
  ....
}


An interesting bug. A request is performed in this function, and the result with the name "strModURL" is written in the buffer (url to "mod"). Later this result is saved in the object under the name "_strModURLSelected". This is its own class implementation that works with strings. Because of a typo, in the condition "if (_strModURLSelected="")" the url that was received earlier will be replaced with an empty string, instead of comparison. Then the operator, casting the string to the 'const char*' type takes action. As a result we'll have verification against null of the pointer which contains a link to the empty string. Such a pointer can never be equal to zero. Therefore, the condition will always be true. So, the program will always use the link that is hard coded, although it was meant to be used as a default value.

V547 Expression is always true. Probably the '&&' operator should be used here. propertycombobar.cpp 1853

CEntity *CPropertyComboBar::GetSelectedEntityPtr(void) 
{
 // obtain selected property ID ptr
 CPropertyID *ppidProperty = GetSelectedProperty();
 // if there is valid property selected
 if( (ppidProperty == NULL) || 
 (ppidProperty->pid_eptType != CEntityProperty::EPT_ENTITYPTR) ||
 (ppidProperty->pid_eptType != CEntityProperty::EPT_PARENT) )
 {
   return NULL;
 }
 ....
}


The analyzer detected a bug that is totally different from the previous one. Two checks of the "pid_eptType" variable are always true because of the '||' operator. Thus, the function always returns, regardless of the value of the "ppidProperty" pointer value and "ppidProperty->pid_eptType" variable.

V547 Expression 'ulUsedShadowMemory >= 0' is always true. Unsigned type value is always >= 0. gfxlibrary.cpp 1693

void CGfxLibrary::ReduceShadows(void)
{
  ULONG ulUsedShadowMemory = ....;
  ....
  ulUsedShadowMemory -= sm.Uncache();  // <=
  ASSERT( ulUsedShadowMemory>=0);      // <=
  ....
}


An unsafe decrement of an unsigned variable is executed in this code fragment, as the variable "ulUsedShadowMemory" may overflow, at the same time there is Assert() that never issues a warning. It is a very suspicious code fragment, the developers should recheck it.

V704 'this != 0' expression should be avoided - this expression is always true on newer compilers, because 'this' pointer can never be NULL. entity.h 697

inline void CEntity::AddReference(void) { 
  if (this!=NULL) { // <=
    ASSERT(en_ctReferences>=0);
    en_ctReferences++; 
  }
};


There are 28 comparisons of 'this' with null in the code of the engine. The code was written a long time ago, but according to the latest standard of C++ language, 'this' pointer can never be null, and therefore the compiler can do the optimization and delete the check. This can lead to unexpected errors in the case of more complicated conditions. Examples can be found in the documentation for this diagnostic.

At this point Visual C++ doesn't work like that, but it's just a matter of time. This code is outlawed from now on.

V547 Expression 'achrLine != ""' is always true. To compare strings you should use strcmp() function. worldeditor.cpp 2254

void CWorldEditorApp::OnConvertWorlds()
{
  ....
  char achrLine[256];                // <=
  CTFileStream fsFileList;

  // count lines in list file
  try {
    fsFileList.Open_t( fnFileList);
    while( !fsFileList.AtEOF()) {
      fsFileList.GetLine_t( achrLine, 256);
      // increase counter only for lines that are not blank
      if( achrLine != "") ctLines++; // <=
    }
    fsFileList.Close();
  }
  ....
}


The analyzer detected wrong comparison of a string with an empty string. The error is that the (achrLine != "") check is always true, and the increment of the "ctLines" is always executed, although the comments say that it should execute only for non-empty strings.

This behavior is caused by the fact that two pointers are compared in this condition: "achrLine" and a pointer to the temporary empty string. These pointers will never be equal.

Correct code, using the strcmp() function:

if(strcmp(achrLine, "") != 0) ctLines++;


Two more wrong comparisons:V547 Expression is always true. To compare strings you should use strcmp() function. propertycombobar.cpp 965
V547 Expression 'achrLine == ""' is always false. To compare strings you should use strcmp() function. worldeditor.cpp 2293

Miscellaneous errors


V541 It is dangerous to print the string 'achrDefaultScript' into itself. dlgcreateanimatedtexture.cpp 359

BOOL CDlgCreateAnimatedTexture::OnInitDialog() 
{
  ....
  // allocate 16k for script
  char achrDefaultScript[ 16384];
  // default script into edit control
  sprintf( achrDefaultScript, ....); // <=
  ....
  // add finishing part of script
  sprintf( achrDefaultScript,        // <=
           "%sANIM_END\r\nEND\r\n",  // <=
           achrDefaultScript);       // <=
  ....
}


A string is formed in the buffer, then the programmer wants to get a new string, saving the previous string value and add two more words. It seems really simple.

To explain why an unexpected result can manifest here, I will quote a simple and clear example from the documentation for this diagnostic:

char s[100] = "test";
sprintf(s, "N = %d, S = %s", 123, s);


As a result we would want to have a string:

N = 123, S = test


But in practice, we will have the following string in the buffer:

N = 123, S = N = 123, S =


In similar situations, the same code can lead not only to incorrect text, but also to program abortion. The code can be fixed if you use a new buffer to store the result. A safe option:

char s1[100] = "test";
char s2[100];
sprintf(s2, "N = %d, S = %s", 123, s1);


The same should be done in the Serious Engine code. Due to pure luck, the code may work correctly, but it would be much safer to use an additional buffer to form the string.

V579 The qsort function receives the pointer and its size as arguments. It is possibly a mistake. Inspect the third argument. mesh.cpp 224

// optimize lod of mesh
void CMesh::OptimizeLod(MeshLOD &mLod)
{
  ....
  // sort array
  qsort(&_aiSortedIndex[0]           // <=
        ctVertices
        sizeof(&_aiSortedIndex[0]),  // <=
        qsort_CompareArray);
  ....
}


The function qsort() takes the size of the element of array to be sorted as the third argument. It is very suspicious that the pointer size is always passed there. Perhaps the programmer copied the first argument of the function to the third one, and forgot to delete the ampersand.

V607 Ownerless expression 'pdecDLLClass->dec_ctProperties'. entityproperties.cpp 107

void CEntity::ReadProperties_t(CTStream &istrm) // throw char *
{
  ....
  CDLLEntityClass *pdecDLLClass = en_pecClass->ec_pdecDLLClass;
  ....
  // for all saved properties
  for(INDEX iProperty=0; iProperty<ctProperties; iProperty++) {
    pdecDLLClass->dec_ctProperties;  // <=
    ....
  }
  ....
}


It's unclear, what the highlighted string does. Well, it's clear that it does nothing. The class field is not used in any way, perhaps this error got here after refactoring or the string was left unchanged after debugging.

V610 Undefined behavior. Check the shift operator '<'. The left operand '(- 2)' is negative. layermaker.cpp 363

void CLayerMaker::SpreadShadowMaskOutwards(void)
{
  #define ADDNEIGHBOUR(du, dv)                                  \
  if ((pixLayerU+(du)>=0)                                       \
    &&(pixLayerU+(du)<pixLayerSizeU)                            \
    &&(pixLayerV+(dv)>=0)                                       \
    &&(pixLayerV+(dv)<pixLayerSizeV)                            \
    &&(pubPolygonMask[slOffsetMap+(du)+((dv)<<pixSizeULog2)])) {\
    ....                                                        \
    }

  ADDNEIGHBOUR(-2, -2); // <=
  ADDNEIGHBOUR(-1, -2); // <=
  ....                  // <=
}


The macro "ADDNEIGHBOUR" is declared in the body of the function, and is used 28 times in a row. Negative numbers are passed to this macro, where they are shifted. According to the latest standards of the C++ language, the shift of a negative number results in undefined behavior.

V646 Consider inspecting the application's logic. It's possible that 'else' keyword is missing. sessionstate.cpp 1191

void CSessionState::ProcessGameStream(void)
{
  ....
  if (res==CNetworkStream::R_OK) {
    ....
  } if (res==CNetworkStream::R_BLOCKNOTRECEIVEDYET) { // <=
    ....
  } else if (res==CNetworkStream::R_BLOCKMISSING) {
    ....
  }
  ....
}


Looking at the code formatting, we may assume that the keyword 'else' is missing in the cascade of conditions.

One more similar fragment: V646 Consider inspecting the application's logic. It's possible that 'else' keyword is missing. terrain.cpp 759

V595 The 'pAD' pointer was utilized before it was verified against nullptr. Check lines: 791, 796. anim.cpp 791

void CAnimObject::SetData(CAnimData *pAD) {
  // mark new data as referenced once more
  pAD->AddReference();                      // <=
  // mark old data as referenced once less
  ao_AnimData->RemReference();
  // remember new data
  ao_AnimData = pAD;
  if( pAD != NULL) StartAnim( 0);           // <=
  // mark that something has changed
  MarkChanged();
}


In the end I would like to give an example of an error with potential dereference of a null pointer. If you read the analyzer warning, you will see how dangerous the pointer "pAD" is in this small function. Almost immediately after the call of "pAD->AddReference()", the check "pAD != NULL"is executed, which denotes a possible passing of a pointer to this function.

Here is a full list of dangerous fragments that contain pointers:
V595 The '_ppenPlayer' pointer was utilized before it was verified against nullptr. Check lines: 851, 854. computer.cpp 851
V595 The '_meshEditOperations' pointer was utilized before it was verified against nullptr. Check lines: 416, 418. modelermeshexporter.cpp 416
V595 The '_fpOutput' pointer was utilized before it was verified against nullptr. Check lines: 654, 664. modelermeshexporter.cpp 654
V595 The '_appPolPnts' pointer was utilized before it was verified against nullptr. Check lines: 647, 676. modelermeshexporter.cpp 647
V595 The 'pModelerView' pointer was utilized before it was verified against nullptr. Check lines: 60, 63. dlginfopgglobal.cpp 60
V595 The 'pNewWT' pointer was utilized before it was verified against nullptr. Check lines: 736, 744. modeler.cpp 736
V595 The 'pvpViewPort' pointer was utilized before it was verified against nullptr. Check lines: 1327, 1353. serioussam.cpp 1327
V595 The 'pDC' pointer was utilized before it was verified against nullptr. Check lines: 138, 139. tooltipwnd.cpp 138
V595 The 'm_pDrawPort' pointer was utilized before it was verified against nullptr. Check lines: 94, 97. wndanimationframes.cpp 94
V595 The 'penBrush' pointer was utilized before it was verified against nullptr. Check lines: 9033, 9035. worldeditorview.cpp 9033

Conclusion


The analysis of Serious Engine 1 v.1.10 showed that bugs can live in the program for a very long time, and even celebrate anniversaries! This article contains only some of the most interesting examples from the analyzer report. Several warnings were given as a list. But the whole report has quite a good number of warnings, taking into account that the project is not very large. The Croteam Company have more advanced game engines - Serious Engine 2, Serious Engine 3 and Serious Engine 4. I hate to think, how much of the unsafe code could get into the new versions of the engine. I hope that the developers will use a static code analyzer, and make the users happy, producing high-quality games. Especially knowing that the analyzer is easy to download, easy to run in Visual Studio, and for other systems there is a Standalone utility.

Procedural Generation: Implementation Considerations

$
0
0

Originally posted at procgen.wordpress.com


This article discusses considerations when you are implementing procedural generation (procgen) systems.

Define Objectives


If you are dealing with runtime (real or load-time) procedural generators in a game, you need to create rules in a way to guarantee that the game objectives are not compromised. The right rule set and logic can sometimes be tricky to fine tune and narrow down.

Testing


As part of guaranteeing the previous line, runtime ProcGen systems require you to thoroughly test its results. The more freedom you give your ProcGen system to create content the more you need to test it. You really want to make sure the resulting content is plausible, so that nothing weird is generated or something that stops you from completing the game’s objective.

<div style="margin-left:20px;">AQvZTUR.gif</div>

Perception


The question is: do all these trees look alike? Is this room memorable? Or will the user distinguish similar type content? If you want them to, you should make sure you know what aspects and details help you to achieve this perception. GalaxyKate brought this to my attention and you can read her interesting post on it (and her experience on spore) on her Tumblr here.

ProcGen by necessity


There are some types of games that require you to use ProcGen systems, like Infinite runners and Roguelikes, or games that learn and adapt with your inputs and gameplay. There are also other good to have situations like creating special effects or textures (like with Substance).

<div style="margin-left:20px;">PdlMznw.gif</div>

Prototyping


If you have a ProcGen system or tool, it could help you to prototype game levels that require content in scale, like open-worlds. If you are using ProcGen at design-time you can use the resulting content as your starting point.

Rewarding


Another thing you need to worry about is the sense of reward, if the generated content somehow influences it. Normally, you’ll want the game to give you a sense of accomplishment, be rewarding and fun. Again, testing is important. Tanya Short from Kitfox Games talked about it at GDC 2015 (below).
<div style="margin-left:20px;">sM0T0Dc.jpg</div>

Replayability


If you have a runtime ProcGen system that guarantees a good variation of your game experience every time you play it, that can increase the game’s longevity, meaning people would take longer to get bored of it. Gives it a sense of novelty that can, at times, surprise even its creator.

Discussion Value


You need to manage this value properly. Runtime ProcGen, depending on the cases, will give you less walkthrough material (sometimes more) to talk about with other gamers. This mainly because each player will have a different experience. On the other hand, there are other things you can discuss. Minecraft gives you a lot of creative power which you can share with others. Infinite games, for instance, use the point system to allow gamer comparison.

Art perfection


It’s not easy to get ProcGen to produce art like a human artist would. It can be difficult for (random) runtime ProcGen art to satisfy 100% of the time. This mainly because it can be difficult to test all possible outputs and, if you decide to change one little variable, you can define a whole new set of outputs.

I hope you guys enjoyed this list. Let me know if you have any comments or other considerations that I missed :)

Vulkan 101 Tutorial

$
0
0

This article was originally posted on my blog at http://av.dfki.de/~jhenriques/development.html.


Vulkan 101 Tutorial


Welcome. In this tutorial we will be learning about Vulkan with the steps and code to render a triangle to the screen.

First, let me warn you that this is not a beginner's tutorial to rendering APIs. I assume you have some experience with OpenGL or DirectX, and you are here to get to know the particulars of Vulkan. My main goal with this "tutorial" is to get to a complete but minimal C program running a graphical pipeline using Vulkan on Windows (Linux maybe in the future). If you are interested in the in-progress port of this code to Linux/XCB you can check this commit 15914e3). Let's start.

House Keeping


I will be posting all the code on this page. The code is posted progressively, but you will be able to see all of it through the tutorial. If you want to follow along and compile the code on your own you can clone the following git repo:

git clone https://bitbucket.org/jose_henriques/vulkan_tutorial.git


I have successfully compiled and run every commit on Windows 7 and 10 running Visual Studio 2013. My repo includes a build.bat that you should be able to use to compile the code. You do need to have the cl compiler on your path before you can call the build.bat from your console. You need to find and run the right vcvars*.bat for your setup. For the setup I'm using you can find it at "C:\Program Files (x86)\Microsoft Visual Studio 12.0\VC\bin\x86_amd64\vcvarsx86_amd64.bat".

For each step I will point out the commit that you can checkout to compile yourself. For example, to get the initial commit with the platform skeleton code, you can do the following:

git checkout https://bitbucket.org/jose_henriques/vulkan_tutorial/commits/39534dc3819998cbfd55012cfe76a5952254ee78


[Commit: 39534dc]

There are some things this tutorial will not be trying to accomplish. First, I will not be creating a "framework" that you can take and start coding your next engine. I will indeed not even try to create functions for code that repeats itself. I see some value in having all the code available and explanatory in a tutorial, instead of having to navigate a couple of indirections to get the full picture.

This tutorial concludes with a triangle on the screen rendered through a vertex and fragment shader.

You can use this code free of charge if that will bring you any value. I think this code is only useful to learn the API, but if you end up using it, credits are welcome.

Windows Platform Code


[Commit: 39534dc]

This is your typical windows platform code to register and open a new window. If you are familiar with this feel free to skip. We will be starting with this minimal setup and adding/completing it until we have our rendering going. I am including the code but will skip explanation.

#include <windows.h>
                        
LRESULT CALLBACK WindowProc( HWND hwnd, UINT uMsg, WPARAM wParam, LPARAM lParam ) {
    switch( uMsg ) {
        case WM_CLOSE: { 
            PostQuitMessage( 0 );
            break;
        }
        default: {
            break;
        }
    }
    
    // a pass-through for now. We will return to this callback
    return DefWindowProc( hwnd, uMsg, wParam, lParam );
}

int CALLBACK WinMain( HINSTANCE hInstance, HINSTANCE hPrevInstance, LPSTR lpCmdLine, int nCmdShow ) {

    WNDCLASSEX windowClass = {};
    windowClass.cbSize = sizeof(WNDCLASSEX);
    windowClass.style = CS_OWNDC | CS_VREDRAW | CS_HREDRAW;
    windowClass.lpfnWndProc = WindowProc;
    windowClass.hInstance = hInstance;
    windowClass.lpszClassName = "VulkanWindowClass";
    RegisterClassEx( &windowClass );

    HWND windowHandle = CreateWindowEx( NULL, "VulkanWindowClass", "Core",
                                        WS_OVERLAPPEDWINDOW | WS_VISIBLE,
                                        100, 
                                        100, 
                                        800,    // some random values for now. 
                                        600,    // we will come back to these soon.
                                        NULL,
                                        NULL,
                                        hInstance,
                                        NULL );
                               
    MSG msg;
    bool done = false;
    while( !done ) {
        PeekMessage( &msg, NULL, NULL, NULL, PM_REMOVE );
        if( msg.message == WM_QUIT ) {
            done = true;
        } else {
            TranslateMessage( &msg ); 
            DispatchMessage( &msg );
        }

        RedrawWindow( windowHandle, NULL, NULL, RDW_INTERNALPAINT );
    }

    return msg.wParam;
}


If you get the repo and checkout this commit you can use build.bat to compile the code. This is the contents of the batch file if you just want to copy/paste and compile on your own:

@echo off

mkdir build
pushd build
cl /Od /Zi ..\main.cpp user32.lib
popd


This will compile our test application and create a binary called main.exe in your project/build folder. If you run this application you will get a white window at position (100,100) of size (800,600) that you can quit.

Dynamically Loading Vulkan


[Commit: bccc3df]

Now we need to learn how we get Vulkan on our system. It is not made very clear by Khronos or by LunarG whether you need or not their SDK. Short answer is no, you do not need their SDK to start programming our Vulkan application. In a later chapter I will show you that even for a validation layer, you can skip the SDK.

We need two things: the library and the headers. The library should already be on your system, as it is provided by your GPU driver. On Windows it is called vulkan-1.dll (libvulkan.so.1 on Linux) and should be in your system folder.
Khronos says that the headers provided with a loader and/or driver should be sufficient. I did not find them on my machine so I got them from the Khronos Registry vulkan-docs repo:

git clone https://github.com/KhronosGroup/Vulkan-Docs.git


I also needed the Loader and Validation Layers repo:

git clone https://github.com/KhronosGroup/Vulkan-LoaderAndValidationLayers.git


We will need the Loader and Validation Layers later, but for now copy vulkan.h and vk_platform.h to your application folder. If you are following along with the git repo, I added these headers to the commit.

We include Vulkan.h and start loading the API functions we need. We will be dynamically loading Vulkan functions and we want to make sure we are using Windows platform specific defines. So we will add the following code:

#define VK_USE_PLATFORM_WIN32_KHR
#define VK_NO_PROTOTYPES
#include "vulkan.h"


For every Vulkan function we want to use we first declare and load it from the dynamic library. This process is platform-dependent. For now we'll create a win32_LoadVulkan() function. Note that we have to add similar code to the vkCreateInstance() loading code for every Vulkan function we call.

PFN_vkCreateInstance vkCreateInstance = NULL;

void win32_LoadVulkan( ) {

    HMODULE vulkan_module = LoadLibrary( "vulkan-1.dll" );
    assert( vulkan_module, "Failed to load vulkan module." );

    vkCreateInstance = (PFN_vkCreateInstance) GetProcAddress( vulkan_module, "vkCreateInstance" );    
    assert( vkCreateInstance, "Failed to load vkCreateInstance function pointer." );
    
}


I have also created the helper function assert() that does what you would expect. This will be our "debugging" facilities! Feel free to use your preferred version of this function.

void assert( bool flag, char *msg = "" ) {
							
    if( !flag ) {
        OutputDebugStringA( "ASSERT: " );
        OutputDebugStringA( msg );
        OutputDebugStringA( "\n" );
        int *base = 0;
        *base = 1;
    }
    
}


That should cover all of our Windows specific code. Next we will start talking about Vulkan and its specific quirks.

Creating a Vulkan Instance


[Commit: 52259bb]

Vulkan data structures are used as function parameters. We fill them as follows:

VkApplicationInfo applicationInfo;
applicationInfo.sType = VK_STRUCTURE_TYPE_APPLICATION_INFO; // sType is a member of all structs
applicationInfo.pNext = NULL;                               // as is pNext and flag
applicationInfo.pApplicationName = "First Test";            // The name of our application
applicationInfo.pEngineName = NULL;                         // The name of the engine
applicationInfo.engineVersion = 1;                          // The version of the engine
applicationInfo.apiVersion = VK_MAKE_VERSION(1, 0, 0);      // The version of Vulkan we're using


Now, if we take a look at what the specification has to say about VkApplicationInfo we find out that most of these fields can be zero. In all cases .sType is known (always VK_STRUCTURE_TYPE_&ltuppercase_structure_name62). While for this tutorial I will try to be explicit about most of the values we use to fill up this data structure, I might be leaving something at 0 because I will always be doing this:

VkApplicationInfo applicationInfo = { };   // notice me senpai!
applicationInfo.sType = VK_STRUCTURE_TYPE_APPLICATION_INFO;
applicationInfo.pApplicationName = "First Test";
applicationInfo.engineVersion = 1;
applicationInfo.apiVersion = VK_MAKE_VERSION(1, 0, 0);


Next, almost all functions will return a VkResult enum. So, let's write a simple helper leveraging our awesome debug facilities:

void checkVulkanResult( VkResult &result, char *msg ) {
    assert( result == VK_SUCCESS, msg );
}


During the creation of the graphics pipeline we will be setting up a whole lot of state and creating a whole lot of "context". To help us keep track of all this Vulkan state, we will create the following:

struct vulkan_context {
								
    uint32_t width;
    uint32_t height;

    VkInstance instance;
}

vulkan_context context;


This context will grow, but for now let's keep marching. You probably noticed that I have sneaked in a thing called an instance into our context. Vulkan keeps no global state at all. Every time Vulkan requires some application state you will need to pass your VkInstance. And this is true for many constructs, including our graphics pipeline. It's just one of the things we need to create, init and keep around. So let's do it.

Because this process will repeat itself for almost all function calls I will be a bit more detailed for this first instance (pun intended!).

So, checking the spec, to create a VkInstance we need to call:

VkResult vkCreateInstance( const VkInstanceCreateInfo* pCreateInfo,
                           const VkAllocationCallbacks* pAllocator, 
                           VkInstance* pInstance);


Quick note about allocators: As a rule of thumb whenever functions asks for a pAllocator you can pass NULL and Vulkan will use the default allocator. Using a custom allocator is not a topic I will be covering in this tutorial. Suffice to notice them and know that Vulkan does allow your application to control the memory allocation of Vulkan.

Now, the process I was talking about is that the function requires you to fill some data structure, generally some Vk*CreateInfo, and pass it to the Vulkan function, in this case vkCreateInstance, which will return the result in its last parameter:

VkInstanceCreateInfo instanceInfo = { };
instanceInfo.sType = VK_STRUCTURE_TYPE_INSTANCE_CREATE_INFO;
instanceInfo.pApplicationInfo = &applicationInfo;
instanceInfo.enabledLayerCount = 0;
instanceInfo.ppEnabledLayerNames = NULL;
instanceInfo.enabledExtensionCount = 0;
instanceInfo.ppEnabledExtensionNames = NULL;

result = vkCreateInstance( &instanceInfo, NULL, &context.instance );
checkVulkanResult( result, "Failed to create vulkan instance." );


You can compile and run this code but nothing new will happen. We need to fill the instance info with some validation layer we might want to be using and with the extensions we will be requiring to be present so that we can do something more interesting than a white window...

Validation Layers


[Commit: eb1cf65]

One of the core principles of Vulkan is efficiency. The counter part to this is that all validation and error checking is basically non-existent! Vulkan will indeed crash and/or result in undefined behavior if you make a mistake. This is all fine, but while developing our application we might want to know why our application is not showing what we expect or, when crashed, exactly why it crashed.

Enter Validation Layers.

Vulkan is a layered API. There is a core layer that we are calling into, but inbetween the API calls and the loader other "layers" can intercept the API calls. The ones we are interested in here are the validation layers that will help us debug and track problems with our usage of the API.
You want to develop your application with this layers on but when shipping you should disable them.

To find out the layers our loader knows about we need to call:

uint32_t layerCount = 0;
vkEnumerateInstanceLayerProperties( &layerCount, NULL );

assert( layerCount != 0, "Failed to find any layer in your system." );

VkLayerProperties *layersAvailable = new VkLayerProperties[layerCount];
vkEnumerateInstanceLayerProperties( &layerCount, layersAvailable );


(Don't forget to add the declaration at the top and the loading of the vkEnumerateInstanceLayerProperties to the win32_LoadVulkan() function.)

This is another repeating mechanism. We call the function twice. First time we pass a NULL as the parameter to the VkLayerProperties to query the layer count. Next we allocate the necessary space to hold that amount of elements and we call the function a second time to fill our data structures.

If you run this piece of code you will notice that you might have found no layer... This is because, at leat on my system, the loader could not find any layer. To get some validation layers we need the SDK and/or to compile the code in Vulkan-LoaderAndValidationLayers.git.

What I found out during the process of trying to figure out if you needed the SDK or not is that you only need the *.json and the *.dll of the layer you want somewhere on your project folder and then you can setup the VK_LAYER_PATH environment variable to the path to the folder with those files. I kinda prefer this solution over the more obscure way where the SDK sets up layer information in the windows registry key HKEY_LOCAL_MACHINE\SOFTWARE\Wow6432Node\Khronos\Vulkan\ExplicitLayers because this way you can better control which ones are loaded by your application. (I do wonder about security problems this might raise?)

The layer we will be using is called VK_LAYER_LUNARG_standard_validation. This layer works as a kind of super set of a bunch of other layers. [this one comes from the SDK]. So, I will assume you have either installed the SDK or you have moved all the VkLayer_*.dll and the VkLayer_*.json files from the ones you want to use to a layers folder and set VK_LAYER_PATH=/path/to/layers/folder.

We can now complete this validation layer section by making sure we found the VK_LAYER_LUNARG_standard_validation layer and configure the instance with this info:

bool foundValidation = false;
for( int i = 0; i < layerCount; ++i ) {
   if( strcmp( layersAvailable[i].layerName, "VK_LAYER_LUNARG_standard_validation" ) == 0 ) {
        foundValidation = true;
   }
}
assert( foundValidation, "Could not find validation layer." );
const char *layers[] = { "VK_LAYER_LUNARG_standard_validation" };
// update the VkInstanceCreateInfo with:
instanceInfo.enabledLayerCount = 1;
instanceInfo.ppEnabledLayerNames = layers;


The sad thing is, this commit will still produce the same result as before. We need to handle the extensions to start producing some debug info.

Extensions


[Commit: 9c416b3]

Much like in OpenGL and other APIs, extensions can add new functionality to Vulkan that are not part of the core API.
To start debugging our application we need the VK_EXT_debug_report extension. The following code is similar to the layers loading code, the notable difference being that we are looking for 3 specific extensions. I will sneak in two other extensions that we will need later, so don't worry about them for now.

uint32_t extensionCount = 0;
vkEnumerateInstanceExtensionProperties( NULL, &extensionCount, NULL );
VkExtensionProperties *extensionsAvailable = new VkExtensionProperties[extensionCount];
vkEnumerateInstanceExtensionProperties( NULL, &extensionCount, extensionsAvailable );

const char *extensions[] = { "VK_KHR_surface", "VK_KHR_win32_surface", "VK_EXT_debug_report" };
uint32_t numberRequiredExtensions = sizeof(extensions) / sizeof(char*);
uint32_t foundExtensions = 0;
for( uint32_t i = 0; i < extensionCount; ++i ) {
    for( int j = 0; j < numberRequiredExtensions; ++j ) {
        if( strcmp( extensionsAvailable[i].extensionName, extensions[j] ) == 0 ) {
            foundExtensions++;
        }
    }
}
assert( foundExtensions == numberRequiredExtensions, "Could not find debug extension" );


This extension adds three new functions: vkCreateDebugReportCallbackEXT(), vkDestroyDebugReportCallbackEXT(), and vkDebugReportMessageEXT().
Because this functions are not part of the core Vulkan API, we can not load them the same way we have been loading other functions. We need to use vkGetInstanceProcAddr(). Once we add that function to our win32_LoadVulkan() we can define another helper function that should look familiar:

PFN_vkCreateDebugReportCallbackEXT vkCreateDebugReportCallbackEXT = NULL;
PFN_vkDestroyDebugReportCallbackEXT vkDestroyDebugReportCallbackEXT = NULL;
PFN_vkDebugReportMessageEXT vkDebugReportMessageEXT = NULL;

void win32_LoadVulkanExtensions( vulkan_context &context ) {

    *(void **)&vkCreateDebugReportCallbackEXT = vkGetInstanceProcAddr( context.instance, 
                                                "vkCreateDebugReportCallbackEXT" );
    *(void **)&vkDestroyDebugReportCallbackEXT = vkGetInstanceProcAddr( context.instance, 
                                                "vkDestroyDebugReportCallbackEXT" );
    *(void **)&vkDebugReportMessageEXT = vkGetInstanceProcAddr( context.instance, 
                                                "vkDebugReportMessageEXT" );
}


The extension expects us to provide a callback where all debugging info will be provided. Here is our callback:

VKAPI_ATTR VkBool32 VKAPI_CALL MyDebugReportCallback( VkDebugReportFlagsEXT flags, 
    VkDebugReportObjectTypeEXT objectType, uint64_t object, size_t location, 
    int32_t messageCode, const char* pLayerPrefix, const char* pMessage, void* pUserData ) {

    OutputDebugStringA( pLayerPrefix );
    OutputDebugStringA( " " );
    OutputDebugStringA( pMessage );
    OutputDebugStringA( "\n" );
    return VK_FALSE;
}


Nothing fancy as we only need to know the layer the message is coming from and the message itself.
I have not yet talked about this, but I normally debug with Visual Studio. I told you I don't use the IDE but for debugging there really is no alternative. What I do is I just start a debugging session with devenv .\build\main.exe. You might need to load the main.cpp and then you are set to start setting breakpoints, watchs, etc...

The only thing missing is to add the call to load our Vulkan extension functions, registering our callback, and destroying it at the end of the app:
(Notice that we can control the kind of reporting we want with the callbackCreateInfo.flags and that we added a VkDebugReportCallbackEXT member to our vulkan_context structure.)

win32_LoadVulkanExtensions( context );
	                        
VkDebugReportCallbackCreateInfoEXT callbackCreateInfo = { };
callbackCreateInfo.sType = VK_STRUCTURE_TYPE_DEBUG_REPORT_CREATE_INFO_EXT;
callbackCreateInfo.flags =  VK_DEBUG_REPORT_ERROR_BIT_EXT |
                            VK_DEBUG_REPORT_WARNING_BIT_EXT |
                            VK_DEBUG_REPORT_PERFORMANCE_WARNING_BIT_EXT;
callbackCreateInfo.pfnCallback = &MyDebugReportCallback;
callbackCreateInfo.pUserData = NULL;

result = vkCreateDebugReportCallbackEXT( context.instance, &callbackCreateInfo, 
                                         NULL, &context.callback );
checkVulkanResult( result, "Failed to create debug report callback." );


When finished we can clean up with:

vkDestroyDebugReportCallbackEXT( context.instance, context.callback, NULL );


So, we are now ready to start creating our rendering surfaces, but for that I need to explain those two extra extensions.

Devices


[Commit: b5d2444]

We have everything in place to start setting up our windows rendering backend. Now we need to create a rendering surface and to find out which physical devices of our machine support this rendering surface. Therefore we use those two extra extensions we sneak in on our instance creation: VK_KHR_surface and VK_KHR_win32_surface. The VK_KHR_surface extension should be present in all systems as it abstracts each platform way of showing a native window/surface. Then we have another extension that is responsible for creation the VkSurface on a particular system. For windows this is the VK_KHR_win32_surface.

Before that though, a word about physical and logical devices, and queues. A physical device represents one single GPU on your system. You can have several on your system. A logical device is how the application keeps track of it's use of the physical device. Each physical device defines the number and type of queues it supports. (Think compute and graphics queues). What we need to do is to enumerate the physical devices in our system and pick the one we want to use. In this tutorial we will just pick the first one that we find that has a graphics queue and that can present our renderings... if we can not find any, we fail miserably!

We start by creating a surface for our rendering that is connected to the window we created: (Notice that vkCreateWin32SurfaceKHR() is an instance function provided by the VK_KHR_win32_surface extension. You must add it to the win32_LoadVulkanExtensions())

VkWin32SurfaceCreateInfoKHR surfaceCreateInfo = {};
surfaceCreateInfo.sType = VK_STRUCTURE_TYPE_WIN32_SURFACE_CREATE_INFO_KHR;
surfaceCreateInfo.hinstance = hInstance;
surfaceCreateInfo.hwnd = windowHandle;

result = vkCreateWin32SurfaceKHR( context.instance, &surfaceCreateInfo, NULL, &context.surface );
checkVulkanResult( result, "Could not create surface." );


Next, we need to iterate over all physical devices and find the one that supports rendering to this surface and has a graphics queue:

uint32_t physicalDeviceCount = 0;
vkEnumeratePhysicalDevices( context.instance, &physicalDeviceCount, NULL );
VkPhysicalDevice *physicalDevices = new VkPhysicalDevice[physicalDeviceCount];
vkEnumeratePhysicalDevices( context.instance, &physicalDeviceCount, physicalDevices );
    
for( uint32_t i = 0; i < physicalDeviceCount; ++i ) {
        
    VkPhysicalDeviceProperties deviceProperties = {};
    vkGetPhysicalDeviceProperties( physicalDevices[i], &deviceProperties );

    uint32_t queueFamilyCount = 0;
    vkGetPhysicalDeviceQueueFamilyProperties( physicalDevices[i], &queueFamilyCount, NULL );
    VkQueueFamilyProperties *queueFamilyProperties = new VkQueueFamilyProperties[queueFamilyCount];
    vkGetPhysicalDeviceQueueFamilyProperties( physicalDevices[i], 
                                              &queueFamilyCount, 
                                              queueFamilyProperties );

    for( uint32_t j = 0; j < queueFamilyCount; ++j ) {

        VkBool32 supportsPresent;
        vkGetPhysicalDeviceSurfaceSupportKHR( physicalDevices[i], j, context.surface, 
                                              &supportsPresent );

        if( supportsPresent && ( queueFamilyProperties[j].queueFlags & VK_QUEUE_GRAPHICS_BIT ) ) {
            context.physicalDevice = physicalDevices[i];
            context.physicalDeviceProperties = deviceProperties;
            context.presentQueueIdx = j;
            break;
        }
    }
    delete[] queueFamilyProperties;

    if( context.physicalDevice ) {
        break;
    }   
}
delete[] physicalDevices;
    
assert( context.physicalDevice, "No physical device detected that can render and present!" );


That is a lot of code, but for most of it we have seen something similar already. First, there are a lot of new functions that you need to load dynamically (check the repo code) and our vulkan_context gained some new members. Of notice is that we now know the queue index on the physical device where we can submit some rendering work.

What is missing is to create the logical device i.e., our connection to the physical device. I will again sneak in something we will be using for the next step: the VK_KHR_swapchain device extension:

// info for accessing one of the devices rendering queues:
VkDeviceQueueCreateInfo queueCreateInfo = {};
queueCreateInfo.sType = VK_STRUCTURE_TYPE_DEVICE_QUEUE_CREATE_INFO;
queueCreateInfo.queueFamilyIndex = context.presentQueueIdx;
queueCreateInfo.queueCount = 1;
float queuePriorities[] = { 1.0f };   // ask for highest priority for our queue. (range [0,1])
queueCreateInfo.pQueuePriorities = queuePriorities;

VkDeviceCreateInfo deviceInfo = {};
deviceInfo.sType = VK_STRUCTURE_TYPE_DEVICE_CREATE_INFO;
deviceInfo.queueCreateInfoCount = 1;
deviceInfo.pQueueCreateInfos = &queueCreateInfo;
deviceInfo.enabledLayerCount = 1;
deviceInfo.ppEnabledLayerNames = layers;
    
const char *deviceExtensions[] = { "VK_KHR_swapchain" };
deviceInfo.enabledExtensionCount = 1;
deviceInfo.ppEnabledExtensionNames = deviceExtensions;

VkPhysicalDeviceFeatures features = {};
features.shaderClipDistance = VK_TRUE;
deviceInfo.pEnabledFeatures = &features;

result = vkCreateDevice( context.physicalDevice, &deviceInfo, NULL, &context.device );
checkVulkanResult( result, "Failed to create logical device!" );


Don't forget to remove the layers information when you stop debugging your application. VkPhysicalDeviceFeatures gives us access to fine-grained optional specification features that our implementation may support. They are enabled per-feature. You can check the spec for a list of members. Our shader will require this one particular feature to be enabled. Without it our pipeline does not work properly. (By the way, I got this information out of the validation layers. So they are useful!) Next we will create our swap chain which will finally enable us to put something on the screen.

Swap Chain


[Commit: 3f07df7]

Now that we have the surface we need to get a handle of the image buffers we will be writing to. We use the swap chain extension to do this. On creation we pass the number of buffers we want (think single/double/n buffered), the resolution, color formats and color space, and the presentation mode. There is a significant amount of setup until we can create a swap chain, but there is nothing hard to understand.

We start by figuring out what color format and color space we will be using:

uint32_t formatCount = 0;
vkGetPhysicalDeviceSurfaceFormatsKHR( context.physicalDevice, context.surface, 
                                      &formatCount, NULL );
VkSurfaceFormatKHR *surfaceFormats = new VkSurfaceFormatKHR[formatCount];
vkGetPhysicalDeviceSurfaceFormatsKHR( context.physicalDevice, context.surface, 
                                      &formatCount, surfaceFormats );

// If the format list includes just one entry of VK_FORMAT_UNDEFINED, the surface has
// no preferred format. Otherwise, at least one supported format will be returned.
VkFormat colorFormat;
if( formatCount == 1 && surfaceFormats[0].format == VK_FORMAT_UNDEFINED ) {
    colorFormat = VK_FORMAT_B8G8R8_UNORM;
} else {
    colorFormat = surfaceFormats[0].format;
}
VkColorSpaceKHR colorSpace;
colorSpace = surfaceFormats[0].colorSpace;
delete[] surfaceFormats;


Next we need to check the surface capabilities to figure out the number of buffers we can ask for, the resolution we will be using. Also we need to decide if we will be applying some surface transformation (like rotating 90 degrees... we are not). We must make sure that the resolution we ask for the swap chain matches the surfaceCapabilities.currentExtent. In the case where both width and height are -1 (and they are both not -1 otherwise!) it means the surface size is undefined and can effectively be set to any value. However, if the size is set, the swap chain size MUST match!

VkSurfaceCapabilitiesKHR surfaceCapabilities = {};
vkGetPhysicalDeviceSurfaceCapabilitiesKHR( context.physicalDevice, context.surface, 
                                           &surfaceCapabilities );

// we are effectively looking for double-buffering:
// if surfaceCapabilities.maxImageCount == 0 there is actually no limit on the number of images! 
uint32_t desiredImageCount = 2;
if( desiredImageCount < surfaceCapabilities.minImageCount ) {
    desiredImageCount = surfaceCapabilities.minImageCount;
} else if( surfaceCapabilities.maxImageCount != 0 && 
           desiredImageCount > surfaceCapabilities.maxImageCount ) {
    desiredImageCount = surfaceCapabilities.maxImageCount;
}

VkExtent2D surfaceResolution =  surfaceCapabilities.currentExtent;
if( surfaceResolution.width == -1 ) {
    surfaceResolution.width = context.width;
    surfaceResolution.height = context.height;
} else {
    context.width = surfaceResolution.width;
    context.height = surfaceResolution.height;
}

VkSurfaceTransformFlagBitsKHR preTransform = surfaceCapabilities.currentTransform;
if( surfaceCapabilities.supportedTransforms & VK_SURFACE_TRANSFORM_IDENTITY_BIT_KHR ) {
    preTransform = VK_SURFACE_TRANSFORM_IDENTITY_BIT_KHR;
}


For the presentation mode we have some options. VK_PRESENT_MODE_MAILBOX_KHR maintains a single entry queue for presentation, where it removes an entry at every vertical sync if the queue is not empty. But, when a frame is committed it obviously replaces the previous. So, in a sense it does not vertically synchronise because a frame might not be displayed at all if a newer one was generated in-between syncs nor does it screen-tears. This is our preferred presentation mode if supported for it is the lowest latency non-tearing presentation mode. VK_PRESENT_MODE_IMMEDIATE_KHR does not vertical synchronise and will screen-tear if a frame is late. VK_PRESENT_MODE_FIFO_RELAXED_KHR keeps a queue and will v-sync but will screen-tear if a frame is late. VK_PRESENT_MODE_FIFO_KHR is similar to the previous one but it won't screen-tear. This is the only present mode that is required by the spec to be supported and as such it is our default value:

uint32_t presentModeCount = 0;
vkGetPhysicalDeviceSurfacePresentModesKHR( context.physicalDevice, context.surface, 
                                           &presentModeCount, NULL );
VkPresentModeKHR *presentModes = new VkPresentModeKHR[presentModeCount];
vkGetPhysicalDeviceSurfacePresentModesKHR( context.physicalDevice, context.surface, 
                                           &presentModeCount, presentModes );

VkPresentModeKHR presentationMode = VK_PRESENT_MODE_FIFO_KHR;   // always supported.
for( uint32_t i = 0; i < presentModeCount; ++i ) {
    if( presentModes[i] == VK_PRESENT_MODE_MAILBOX_KHR ) {
        presentationMode = VK_PRESENT_MODE_MAILBOX_KHR;
        break;
    }   
}
delete[] presentModes;


And the only thing missing is putting this all together and create our swap chain:

VkSwapchainCreateInfoKHR swapChainCreateInfo = {};
swapChainCreateInfo.sType = VK_STRUCTURE_TYPE_SWAPCHAIN_CREATE_INFO_KHR;
swapChainCreateInfo.surface = context.surface;
swapChainCreateInfo.minImageCount = desiredImageCount;
swapChainCreateInfo.imageFormat = colorFormat;
swapChainCreateInfo.imageColorSpace = colorSpace;
swapChainCreateInfo.imageExtent = surfaceResolution;
swapChainCreateInfo.imageArrayLayers = 1;
swapChainCreateInfo.imageUsage = VK_IMAGE_USAGE_COLOR_ATTACHMENT_BIT;
swapChainCreateInfo.imageSharingMode = VK_SHARING_MODE_EXCLUSIVE;   // <--
swapChainCreateInfo.preTransform = preTransform;
swapChainCreateInfo.compositeAlpha = VK_COMPOSITE_ALPHA_OPAQUE_BIT_KHR;
swapChainCreateInfo.presentMode = presentationMode;
swapChainCreateInfo.clipped = true;     // If we want clipping outside the extents
                                        // (remember our device features?)

result = vkCreateSwapchainKHR( context.device, &swapChainCreateInfo, NULL, &context.swapChain );
checkVulkanResult( result, "Failed to create swapchain." );


The sharing mode deserves a note. In all the code of this tutorial there is no sharing of work queues or any other resource. Managing multiple work queues and synchronisation of execution is something worth to investigate in another tutorial as this is one of the main benefits of Vulkan over other APIs, like OpenGL.

Our swap chain is now created and ready to use. But, before moving on we need to talk about image layouts which will lead us to talk about memory barriers, semaphores, and fences which are essential constructs of Vulkan that we must use and understand.
The swap chain provides us with the number of VkImages we asked for in desiredImageCount. It has allocated and owns the resources backing this images. A VkImage is created in either VK_IMAGE_LAYOUT_UNDEFINED or VK_IMAGE_LAYOUT_PREINITIALIZED layout. To be able to, for example, render to this image, the layout must change to either VK_IMAGE_LAYOUT_COLOR_ATTACHMENT_OPTIMAL or VK_IMAGE_LAYOUT_GENERAL layout.

So what are layouts and why are layouts important? The image data is stored in memory in an implementation-dependent way. By knowing the use for a specific memory beforehand and possibly applying limitations to what kind of operations are possible on the data, implementations can make decisions on the way the data is stored that make accesses more performant. Image layout transitions can be costly and require us to synchronise all access by using memory barriers when changing layouts. For example, transitioning from VK_IMAGE_LAYOUT_COLOR_ATTACHMENT_OPTIMAL to VK_IMAGE_LAYOUT_PRESENT_SRC_KHR requires us to make sure we are done writing all our color information before the image is moved to the present layout. We accomplish this by calling vkCmdPipelineBarrier(). Here is the function definition:

void vkCmdPipelineBarrier( VkCommandBuffer commandBuffer,
                           VkPipelineStageFlags srcStageMask,
                           VkPipelineStageFlags dstStageMask,
                           VkDependencyFlags dependencyFlags,
                           uint32_t memoryBarrierCount,
                           const VkMemoryBarrier* pMemoryBarriers,
                           uint32_t bufferMemoryBarrierCount,
                           const VkBufferMemoryBarrier* pBufferMemoryBarriers,
                           uint32_t imageMemoryBarrierCount,
                           const VkImageMemoryBarrier* pImageMemoryBarriers);


This one function will allow us to insert in our queues an execution dependency and a set of memory dependencies between commands before and after our barrier in the command buffer. vkCmdPipelineBarrier is part of the set of functions of the form vkCmd*() that records work to a command buffer that can later be submitted to our work queues. There is a lot going on in here... first, you must have already realised that command buffers are created asynchronously and that you must take care that at processing (submit) time your command are processed in the order you intent. We will make a small detour from our swap chain to learn about queues, command buffers and submitting work.

Queues and Command Buffers


[Commit: 6734ea6]

Command buffers are submitted to a work queue. Queues are created at logical device creation. If you look back you will see that we filled up a VkDeviceQueueCreateInfo before we created the logical device. This created our graphics queue where we can commit our rendering commands. Only thing missing is getting the queue's handle and store it in our vulkan_context structure:

vkGetDeviceQueue( context.device, context.presentQueueIdx, 0, &context.presentQueue );


To create command buffers we need to create a command pool. Command pools are opaque objects from where we allocate command buffers. They allow the Vulkan implementation to amortise the cost of resource creation across multiple command buffers.

VkCommandPoolCreateInfo commandPoolCreateInfo = {};
commandPoolCreateInfo.sType = VK_STRUCTURE_TYPE_COMMAND_POOL_CREATE_INFO;
commandPoolCreateInfo.flags = VK_COMMAND_POOL_CREATE_RESET_COMMAND_BUFFER_BIT;
commandPoolCreateInfo.queueFamilyIndex = context.presentQueueIdx;

VkCommandPool commandPool;
result = vkCreateCommandPool( context.device, &commandPoolCreateInfo, NULL, &commandPool );
checkVulkanResult( result, "Failed to create command pool." );


Commands allocated from this command pool can be reseted individually (instead of with a entire pool reset) and can only be submitted to our working queue. Finally ready to create a couple command buffers. We will create one for our setup and another one exclusively for our rendering commands:

VkCommandBufferAllocateInfo commandBufferAllocationInfo = {};
commandBufferAllocationInfo.sType = VK_STRUCTURE_TYPE_COMMAND_BUFFER_ALLOCATE_INFO;
commandBufferAllocationInfo.commandPool = commandPool;
commandBufferAllocationInfo.level = VK_COMMAND_BUFFER_LEVEL_PRIMARY;
commandBufferAllocationInfo.commandBufferCount = 1;

result = vkAllocateCommandBuffers( context.device, &commandBufferAllocationInfo, 
                                   &context.setupCmdBuffer );
checkVulkanResult( result, "Failed to allocate setup command buffer." );

result = vkAllocateCommandBuffers( context.device, &commandBufferAllocationInfo, 
                                   &context.drawCmdBuffer );
checkVulkanResult( result, "Failed to allocate draw command buffer." );


Command buffers start and end recording with:

VkResult vkBeginCommandBuffer( VkCommandBuffer commandBuffer,
                               const VkCommandBufferBeginInfo* pBeginInfo);
                               
VkResult vkEndCommandBuffer( VkCommandBuffer commandBuffer);


In-between these two functions we can call the vkCmd*() class of functions.

Too submit our command buffers we call:

VkResult vkQueueSubmit( VkQueue queue,
                        uint32_t submitCount,
                        const VkSubmitInfo* pSubmits,
                        VkFence fence );


We will take a closer look at both VkCommandBufferBeginInfo and VkSubmitInfo soon in our code to change an image layout, but there is one more very important topic we need to talk about: Synchronisation.
For this tutorial we are only worried about synching our queue submits and between commands within a command buffer. Vulkan provides a set of synchronisation primitives that include Fences, Semaphores and Events. Vulkan also offers Barriers to help with cache control and flow (exactly what we need for the image layout).

We are not using events in this tutorial. Fences and Semaphores are your typical constructs. They can be in "signaled" or "unsignaled" state.
Fences are normally used by the host to determine the completion of execution of submitted work to queues (as you saw it is a parameter of the vkQueueSubmit()). Semaphores can be used to coordinate operations between queues and between internal queue submissions. They are signaled by queues and can be waited on in the same or different queues. We will be using semaphores for our memory barrier.

I will repeat myself, but this is important. To make proper use of Vulkan you need to know about synchronisation. I advice you to read the specification chapter 6. Ok, onwards to the image layout changing!

Image Layouts


[Commit: a85127b]

[Well, this was bound to happen, wasn't it?... Even if the validation layers have nothing to say about it, there is some incorrect usage of the API in this section. We are not allowed to do the memory barrier/change layout on the swap chains before we acquire them! This does not however invalidate this chapter. While I rework it, please check this commit for a better/correct way of doing what we do here. (thanks to ratchet freak for pointing this out!)]

What we will be doing now is grabbing the images that the swap chain created for us and we will move them from the VK_IMAGE_LAYOUT_UNDEFINED that they are initialised as into VK_IMAGE_LAYOUT_PRESENT_SRC_KHR that they need to be in order to present. (At this point we are not yet talking about rendering to them. We will get there... eventually... maybe... don't lose hope! )

At some point we will need to access these images for reading/writing. We can not do that with VkImages. Image objects are not directly accessed by the pipeline. We need to create a VkImageView which represents contiguous ranges of the image as well as additional metadata that allows access to the image data. There is another significant amount of code incoming, so let's start:

uint32_t imageCount = 0;
vkGetSwapchainImagesKHR( context.device, context.swapChain, &imageCount, NULL );
context.presentImages = new VkImage[imageCount];
vkGetSwapchainImagesKHR( context.device, context.swapChain, &imageCount, context.presentImages );

VkImageViewCreateInfo presentImagesViewCreateInfo = {};
presentImagesViewCreateInfo.sType = VK_STRUCTURE_TYPE_IMAGE_VIEW_CREATE_INFO;
presentImagesViewCreateInfo.viewType = VK_IMAGE_VIEW_TYPE_2D;
presentImagesViewCreateInfo.format = colorFormat;
presentImagesViewCreateInfo.components = { VK_COMPONENT_SWIZZLE_R, 
                                           VK_COMPONENT_SWIZZLE_G, 
                                           VK_COMPONENT_SWIZZLE_B, 
                                           VK_COMPONENT_SWIZZLE_A };
presentImagesViewCreateInfo.subresourceRange.aspectMask = VK_IMAGE_ASPECT_COLOR_BIT;
presentImagesViewCreateInfo.subresourceRange.baseMipLevel = 0;
presentImagesViewCreateInfo.subresourceRange.levelCount = 1;
presentImagesViewCreateInfo.subresourceRange.baseArrayLayer = 0;
presentImagesViewCreateInfo.subresourceRange.layerCount = 1;


The first thing we do is get the swap chain images and store them in our context. We will need them later. Next we fill up a reusable structure that you should by now be familiar with. Yes, that is something we will be passing to the function that creates a VkImageView. Still need more init code:

VkCommandBufferBeginInfo beginInfo = {};
beginInfo.sType = VK_STRUCTURE_TYPE_COMMAND_BUFFER_BEGIN_INFO;
beginInfo.flags = VK_COMMAND_BUFFER_USAGE_ONE_TIME_SUBMIT_BIT;

VkFenceCreateInfo fenceCreateInfo = {};
fenceCreateInfo.sType = VK_STRUCTURE_TYPE_FENCE_CREATE_INFO;
VkFence submitFence;
vkCreateFence( context.device, &fenceCreateInfo, NULL, &submitFence );


Because we will be recording some commands and submitting them to our queue we need both a VkCommandBufferBeginInfo and a VkFence. Next, we can start looping the present images and changing their layout:

VkImageView *presentImageViews = new VkImageView[imageCount];
for( uint32_t i = 0; i < imageCount; ++i ) {

    // complete VkImageViewCreateInfo with image i:
    presentImagesViewCreateInfo.image = context.presentImages[i];

    // start recording on our setup command buffer:
    vkBeginCommandBuffer( context.setupCmdBuffer, &beginInfo );

    VkImageMemoryBarrier layoutTransitionBarrier = {};
    layoutTransitionBarrier.sType = VK_STRUCTURE_TYPE_IMAGE_MEMORY_BARRIER;
    layoutTransitionBarrier.srcAccessMask = 0; 
    layoutTransitionBarrier.dstAccessMask = VK_ACCESS_MEMORY_READ_BIT;
    layoutTransitionBarrier.oldLayout = VK_IMAGE_LAYOUT_UNDEFINED;
    layoutTransitionBarrier.newLayout = VK_IMAGE_LAYOUT_PRESENT_SRC_KHR;
    layoutTransitionBarrier.srcQueueFamilyIndex = VK_QUEUE_FAMILY_IGNORED;
    layoutTransitionBarrier.dstQueueFamilyIndex = VK_QUEUE_FAMILY_IGNORED;
    layoutTransitionBarrier.image = context.presentImages[i];
    VkImageSubresourceRange resourceRange = { VK_IMAGE_ASPECT_COLOR_BIT, 0, 1, 0, 1 };
    layoutTransitionBarrier.subresourceRange = resourceRange;

    vkCmdPipelineBarrier(   context.setupCmdBuffer, 
                            VK_PIPELINE_STAGE_TOP_OF_PIPE_BIT, 
                            VK_PIPELINE_STAGE_TOP_OF_PIPE_BIT, 
                            0,
                            0, NULL,
                            0, NULL, 
                            1, &layoutTransitionBarrier );

    vkEndCommandBuffer( context.setupCmdBuffer );

    // submitting code to the queue:
    VkPipelineStageFlags waitStageMask[] = { VK_PIPELINE_STAGE_COLOR_ATTACHMENT_OUTPUT_BIT };
    VkSubmitInfo submitInfo = {};
    submitInfo.sType = VK_STRUCTURE_TYPE_SUBMIT_INFO;
    submitInfo.waitSemaphoreCount = 0;
    submitInfo.pWaitSemaphores = NULL;
    submitInfo.pWaitDstStageMask = waitStageMask;
    submitInfo.commandBufferCount = 1;
    submitInfo.pCommandBuffers = &context.setupCmdBuffer;
    submitInfo.signalSemaphoreCount = 0;
    submitInfo.pSignalSemaphores = NULL;
    result = vkQueueSubmit( context.presentQueue, 1, &submitInfo, submitFence );

    // waiting for it to finish:
    vkWaitForFences( context.device, 1, &submitFence, VK_TRUE, UINT64_MAX );
    vkResetFences( context.device, 1, &submitFence );

    vkResetCommandBuffer( context.setupCmdBuffer, 0 );

    // create the image view:
    result = vkCreateImageView( context.device, &presentImagesViewCreateInfo, NULL, 
                                &presentImageViews[i] );
    checkVulkanResult( result, "Could not create ImageView." );
}


Don't be scared by the amount of code... this is divided in 3 sections.

The first one is the recording of our pipeline barrier command which changes the image layout from the oldLayout to the newLayout layout. The important parts are the src and dst AccessMask which places a memory access barrier between commands that will operate before and commands that will operate after this vkCmdPipelineBarrier(). Basically we are saying that commands that come after this barrier that need read access to this image memory must wait. In this case there are no other commands, but we will be doing something similar in our render functions where this is not the case!

The second part is the actual submitting of work to the queue with vkQueueSubmit() and then waiting for work to finish by waiting on the fence to be signaled. We pass in the setup command buffer we just finished recording and the fence we will wait on to be signaled.

The last part is the image view creation where we make use of the structure we created outside of the cycle. Note that we could have recorded the two vkCmdPipelineBarrier() with the same command buffer and then commit work just once.

We have covered a lot of ground already but we still have nothing to show for it... Before we go about creating our Framebuffers, we will take it easy for a bit and make the window change color just because.

Rendering Black


[Commit: 0ab9bbf]

We currently have a set of images that we can ping-pong and show in our window. No, they have nothing on them but we can already setup our rendering loop. And that nothing is actually black, which is remarkably different from white! So, we add some platform code and define our borken render function next:

void render( ) {

    uint32_t nextImageIdx;
    vkAcquireNextImageKHR( context.device, context.swapChain, UINT64_MAX,
                           VK_NULL_HANDLE, VK_NULL_HANDLE, &nextImageIdx );  

    VkPresentInfoKHR presentInfo = {};
    presentInfo.sType = VK_STRUCTURE_TYPE_PRESENT_INFO_KHR;
    presentInfo.pNext = NULL;
    presentInfo.waitSemaphoreCount = 0;
    presentInfo.pWaitSemaphores = NULL;
    presentInfo.swapchainCount = 1;
    presentInfo.pSwapchains = &context.swapChain;
    presentInfo.pImageIndices = &nextImageIdx;
    presentInfo.pResults = NULL;
    vkQueuePresentKHR( context.presentQueue, &presentInfo );
    
}


// add another case to our WindowProc() switch:
case WM_PAINT: {
    render( );
    break;
}


We call vkAcquireNextImageKHR() to get the next available swap chain image. We ask to block until one is available by passing the UINT64_MAX as the timeout. Once it returns, nextImageIdx has the index of the image we can use for our rendering.

Once we are done and want to present our results, we must call vkQueuePresentKHR() which will queue the rendering of our present image to the surface.

That was easy, wasn't it?! ...well, unfortunately, while we do have a black instead of a white window if you take a look at our validation layers debug output, there is a lot wrong with this code. I did it on purpose as to go back and explain the remaining swap chain interface and do it without the emerging complexity of our render function. Don't worry, we will be fixing all of this problems, but we will need to dive back in... I hope you got enough O2 in.

Depth image buffer


[Commit: eaeda89]

The buffers provided by the swap chains are image buffers. There is no depth buffer created for us by the swap chain. And we do need them to create our framebuffers and ultimately to render. This means we will need to go trough the process of creating image buffers, allocating and binding memory. To do memory handling we need to go back to the physical device creation and get hold on the physical device memory properties:

// Fill up the physical device memory properties: 
vkGetPhysicalDeviceMemoryProperties( context.physicalDevice, &context.memoryProperties );
Now we create a new <b>VkImage</b> that will serve as our depth image buffer:

VkImageCreateInfo imageCreateInfo = {};
imageCreateInfo.sType = VK_STRUCTURE_TYPE_IMAGE_CREATE_INFO;
imageCreateInfo.imageType = VK_IMAGE_TYPE_2D;
imageCreateInfo.format = VK_FORMAT_D16_UNORM;                          // notice me senpai!
imageCreateInfo.extent = { context.width, context.height, 1 };
imageCreateInfo.mipLevels = 1;
imageCreateInfo.arrayLayers = 1;
imageCreateInfo.samples = VK_SAMPLE_COUNT_1_BIT;                       // notice me senpai!
imageCreateInfo.tiling = VK_IMAGE_TILING_OPTIMAL;
imageCreateInfo.usage = VK_IMAGE_USAGE_DEPTH_STENCIL_ATTACHMENT_BIT;   // notice me senpai!
imageCreateInfo.sharingMode = VK_SHARING_MODE_EXCLUSIVE;
imageCreateInfo.queueFamilyIndexCount = 0;
imageCreateInfo.pQueueFamilyIndices = NULL;
imageCreateInfo.initialLayout = VK_IMAGE_LAYOUT_UNDEFINED;             // notice me senpai!

result = vkCreateImage( context.device, &imageCreateInfo, NULL, &context.depthImage );
checkVulkanResult( result, "Failed to create depth image." );


One would think this was it right? Nope. This does not allocate nor does it bind any memory to this resource. We must allocate ourselves some memory on the device and then bind it to this image. The thing is we must look in the physical device memory properties for the heap index that matches our requirements. We are asking for memory local to the device. VK_MEMORY_PROPERTY_DEVICE_LOCAL_BIT After we have that info, allocating and binding the memory to the resource is straightforward:

VkMemoryRequirements memoryRequirements = {};
vkGetImageMemoryRequirements( context.device, context.depthImage, &memoryRequirements );

VkMemoryAllocateInfo imageAllocateInfo = {};
imageAllocateInfo.sType = VK_STRUCTURE_TYPE_MEMORY_ALLOCATE_INFO;
imageAllocateInfo.allocationSize = memoryRequirements.size;

// memoryTypeBits is a bitfield where if bit i is set, it means that 
// the VkMemoryType i of the VkPhysicalDeviceMemoryProperties structure 
// satisfies the memory requirements:
uint32_t memoryTypeBits = memoryRequirements.memoryTypeBits;
VkMemoryPropertyFlags desiredMemoryFlags = VK_MEMORY_PROPERTY_DEVICE_LOCAL_BIT;
for( uint32_t i = 0; i < 32; ++i ) {
    VkMemoryType memoryType = context.memoryProperties.memoryTypes[i];
    if( memoryTypeBits & 1 ) {
        if( ( memoryType.propertyFlags & desiredMemoryFlags ) == desiredMemoryFlags ) {
            imageAllocateInfo.memoryTypeIndex = i;
            break;
        }
    }
    memoryTypeBits = memoryTypeBits >> 1;
}

VkDeviceMemory imageMemory = {};
result = vkAllocateMemory( context.device, &imageAllocateInfo, NULL, &imageMemory );
checkVulkanResult( result, "Failed to allocate device memory." );

result = vkBindImageMemory( context.device, context.depthImage, imageMemory, 0 );
checkVulkanResult( result, "Failed to bind image memory." );


This image was created in the VK_IMAGE_LAYOUT_UNDEFINED layout. We need to change it's layout to VK_IMAGE_LAYOUT_DEPTH_STENCIL_ATTACHMENT_OPTIMAL. You have already seen similar code, but there are some differences related to handling of a depth buffer instead of a color buffer:

VkCommandBufferBeginInfo beginInfo = {};
beginInfo.sType = VK_STRUCTURE_TYPE_COMMAND_BUFFER_BEGIN_INFO;
beginInfo.flags = VK_COMMAND_BUFFER_USAGE_ONE_TIME_SUBMIT_BIT;

vkBeginCommandBuffer( context.setupCmdBuffer, &beginInfo );

VkImageMemoryBarrier layoutTransitionBarrier = {};
layoutTransitionBarrier.sType = VK_STRUCTURE_TYPE_IMAGE_MEMORY_BARRIER;
layoutTransitionBarrier.srcAccessMask = 0;
layoutTransitionBarrier.dstAccessMask = VK_ACCESS_DEPTH_STENCIL_ATTACHMENT_READ_BIT | 
                                        VK_ACCESS_DEPTH_STENCIL_ATTACHMENT_WRITE_BIT;
layoutTransitionBarrier.oldLayout = VK_IMAGE_LAYOUT_UNDEFINED;
layoutTransitionBarrier.newLayout = VK_IMAGE_LAYOUT_DEPTH_STENCIL_ATTACHMENT_OPTIMAL;
layoutTransitionBarrier.srcQueueFamilyIndex = VK_QUEUE_FAMILY_IGNORED;
layoutTransitionBarrier.dstQueueFamilyIndex = VK_QUEUE_FAMILY_IGNORED;
layoutTransitionBarrier.image = context.depthImage;
VkImageSubresourceRange resourceRange = { VK_IMAGE_ASPECT_DEPTH_BIT, 0, 1, 0, 1 };
layoutTransitionBarrier.subresourceRange = resourceRange;

vkCmdPipelineBarrier(   context.setupCmdBuffer, 
                        VK_PIPELINE_STAGE_TOP_OF_PIPE_BIT, 
                        VK_PIPELINE_STAGE_TOP_OF_PIPE_BIT, 
                        0,
                        0, NULL,
                        0, NULL, 
                        1, &layoutTransitionBarrier );

vkEndCommandBuffer( context.setupCmdBuffer );

VkPipelineStageFlags waitStageMask[] = { VK_PIPELINE_STAGE_COLOR_ATTACHMENT_OUTPUT_BIT };
VkSubmitInfo submitInfo = {};
submitInfo.sType = VK_STRUCTURE_TYPE_SUBMIT_INFO;
submitInfo.waitSemaphoreCount = 0;
submitInfo.pWaitSemaphores = NULL;
submitInfo.pWaitDstStageMask = waitStageMask;
submitInfo.commandBufferCount = 1;
submitInfo.pCommandBuffers = &context.setupCmdBuffer;
submitInfo.signalSemaphoreCount = 0;
submitInfo.pSignalSemaphores = NULL;
result = vkQueueSubmit( context.presentQueue, 1, &submitInfo, submitFence );

vkWaitForFences( context.device, 1, &submitFence, VK_TRUE, UINT64_MAX );
vkResetFences( context.device, 1, &submitFence );
vkResetCommandBuffer( context.setupCmdBuffer, 0 );


And we are practically done. Only missing the VkImageView and we have ourselves the depth buffer initialised and ready to use:

VkImageAspectFlags aspectMask = VK_IMAGE_ASPECT_DEPTH_BIT;
VkImageViewCreateInfo imageViewCreateInfo = {};
imageViewCreateInfo.sType = VK_STRUCTURE_TYPE_IMAGE_VIEW_CREATE_INFO;
imageViewCreateInfo.image = context.depthImage;
imageViewCreateInfo.viewType = VK_IMAGE_VIEW_TYPE_2D;
imageViewCreateInfo.format = imageCreateInfo.format;
imageViewCreateInfo.components = { VK_COMPONENT_SWIZZLE_IDENTITY, VK_COMPONENT_SWIZZLE_IDENTITY, 
                                   VK_COMPONENT_SWIZZLE_IDENTITY, VK_COMPONENT_SWIZZLE_IDENTITY };
imageViewCreateInfo.subresourceRange.aspectMask = aspectMask;
imageViewCreateInfo.subresourceRange.baseMipLevel = 0;
imageViewCreateInfo.subresourceRange.levelCount = 1;
imageViewCreateInfo.subresourceRange.baseArrayLayer = 0;
imageViewCreateInfo.subresourceRange.layerCount = 1;

result = vkCreateImageView( context.device, &imageViewCreateInfo, NULL, &context.depthImageView );
checkVulkanResult( result, "Failed to create image view." );


Render Pass and Framebuffers


[Commit: 07dea10]

And we start setting up our rendering pipeline now. The pipeline will glue everything together. But we must first create a render pass and by consequence create all our framebuffers. A render pass binds the attachments, subpasses and the dependencies between subpasses. We will be creating a render pass with one single subpass and with two attachments, one for our color buffer and one for our depth buffer. Things can get complex when setting up renderpasses where a subpass renders into an attachment that will be the input of another subpass... but we will not get that far. So, let's first create our attachment info:

VkAttachmentDescription passAttachments[2] = { };
passAttachments[0].format = colorFormat;
passAttachments[0].samples = VK_SAMPLE_COUNT_1_BIT;
passAttachments[0].loadOp = VK_ATTACHMENT_LOAD_OP_CLEAR;
passAttachments[0].storeOp = VK_ATTACHMENT_STORE_OP_STORE;
passAttachments[0].stencilLoadOp = VK_ATTACHMENT_LOAD_OP_DONT_CARE;
passAttachments[0].stencilStoreOp = VK_ATTACHMENT_STORE_OP_DONT_CARE;
passAttachments[0].initialLayout = VK_IMAGE_LAYOUT_COLOR_ATTACHMENT_OPTIMAL;
passAttachments[0].finalLayout = VK_IMAGE_LAYOUT_COLOR_ATTACHMENT_OPTIMAL;

passAttachments[1].format = VK_FORMAT_D16_UNORM;
passAttachments[1].samples = VK_SAMPLE_COUNT_1_BIT;
passAttachments[1].loadOp = VK_ATTACHMENT_LOAD_OP_CLEAR;
passAttachments[1].storeOp = VK_ATTACHMENT_STORE_OP_DONT_CARE;
passAttachments[1].stencilLoadOp = VK_ATTACHMENT_LOAD_OP_DONT_CARE;
passAttachments[1].stencilStoreOp = VK_ATTACHMENT_STORE_OP_DONT_CARE;
passAttachments[1].initialLayout = VK_IMAGE_LAYOUT_DEPTH_STENCIL_ATTACHMENT_OPTIMAL;
passAttachments[1].finalLayout = VK_IMAGE_LAYOUT_DEPTH_STENCIL_ATTACHMENT_OPTIMAL;

VkAttachmentReference colorAttachmentReference = {};
colorAttachmentReference.attachment = 0;
colorAttachmentReference.layout = VK_IMAGE_LAYOUT_COLOR_ATTACHMENT_OPTIMAL;

VkAttachmentReference depthAttachmentReference = {};
depthAttachmentReference.attachment = 1;
depthAttachmentReference.layout = VK_IMAGE_LAYOUT_DEPTH_STENCIL_ATTACHMENT_OPTIMAL;


Next, we create a VkRenderPass with a single subpass that uses our two attachments. There is a bit more going on in here (descriptors and all that fun!) than we care about for this tutorial, and as such this is all we need for now:

VkSubpassDescription subpass = {};
subpass.pipelineBindPoint = VK_PIPELINE_BIND_POINT_GRAPHICS;
subpass.colorAttachmentCount = 1;
subpass.pColorAttachments = &colorAttachmentReference;
subpass.pDepthStencilAttachment = &depthAttachmentReference;

VkRenderPassCreateInfo renderPassCreateInfo = {};
renderPassCreateInfo.sType = VK_STRUCTURE_TYPE_RENDER_PASS_CREATE_INFO;
renderPassCreateInfo.attachmentCount = 2;
renderPassCreateInfo.pAttachments = passAttachments;
renderPassCreateInfo.subpassCount = 1;
renderPassCreateInfo.pSubpasses = &subpass;

result = vkCreateRenderPass( context.device, &renderPassCreateInfo, NULL, &context.renderPass );
checkVulkanResult( result, "Failed to create renderpass" );


That is it for the render pass. The render pass object basically defines what kind of framebuffers and pipelines we can create and that is why we created it first. We can now create the framebuffers that are compatible with this render pass:

VkImageView frameBufferAttachments[2];
frameBufferAttachments[1] = context.depthImageView;

VkFramebufferCreateInfo frameBufferCreateInfo = {};
frameBufferCreateInfo.sType = VK_STRUCTURE_TYPE_FRAMEBUFFER_CREATE_INFO;
frameBufferCreateInfo.renderPass = context.renderPass;
frameBufferCreateInfo.attachmentCount = 2;  // must be equal to the attachment count on render pass
frameBufferCreateInfo.pAttachments = frameBufferAttachments;
frameBufferCreateInfo.width = context.width;
frameBufferCreateInfo.height = context.height;
frameBufferCreateInfo.layers = 1;

// create a framebuffer per swap chain imageView:
context.frameBuffers = new VkFramebuffer[ imageCount ];
for( uint32_t i = 0; i < imageCount; ++i ) {
    frameBufferAttachments[0] = presentImageViews[ i ];
    result = vkCreateFramebuffer( context.device, &frameBufferCreateInfo, 
                                  NULL, &context.frameBuffers[i] );
    checkVulkanResult( result, "Failed to create framebuffer.");
}


Notice that we create 2 framebuffers but always use the same depth buffer for both while we set the color attachment to the swap chain present images.

Vertex Buffer


[Commit: 8e2efed]

Time to define our vertex info. Our goal is to render a triangle, so we need to somehow define our vertex info, allocate sufficient memory for 3 vertices, and upload them to some kinda buffer. Let's start with defining a simple struct and creating a buffer for 3 vertices:

struct vertex {
    float x, y, z, w;
};

// create our vertex buffer:
VkBufferCreateInfo vertexInputBufferInfo = {};
vertexInputBufferInfo.sType = VK_STRUCTURE_TYPE_BUFFER_CREATE_INFO;
vertexInputBufferInfo.size = sizeof(vertex) * 3; // size in Bytes
vertexInputBufferInfo.usage = VK_BUFFER_USAGE_VERTEX_BUFFER_BIT;
vertexInputBufferInfo.sharingMode = VK_SHARING_MODE_EXCLUSIVE;

result = vkCreateBuffer( context.device, &vertexInputBufferInfo, NULL, 
                         &context.vertexInputBuffer );  
checkVulkanResult( result, "Failed to create vertex input buffer." );


Buffer is created. Like we did for the VkImage, we need to do something similar to allocate memory for this VkBuffer. Difference being that we now actually need memory on an heap that we can write to from the host: (VK_MEMORY_PROPERTY_HOST_VISIBLE_BIT)

VkMemoryRequirements vertexBufferMemoryRequirements = {};
vkGetBufferMemoryRequirements( context.device, context.vertexInputBuffer, 
                               &vertexBufferMemoryRequirements );

VkMemoryAllocateInfo bufferAllocateInfo = {};
bufferAllocateInfo.sType = VK_STRUCTURE_TYPE_MEMORY_ALLOCATE_INFO;
bufferAllocateInfo.allocationSize = vertexBufferMemoryRequirements.size;

uint32_t vertexMemoryTypeBits = vertexBufferMemoryRequirements.memoryTypeBits;
VkMemoryPropertyFlags vertexDesiredMemoryFlags = VK_MEMORY_PROPERTY_HOST_VISIBLE_BIT;
for( uint32_t i = 0; i < 32; ++i ) {
    VkMemoryType memoryType = context.memoryProperties.memoryTypes[i];
    if( vertexMemoryTypeBits & 1 ) {
        if( ( memoryType.propertyFlags & vertexDesiredMemoryFlags ) == vertexDesiredMemoryFlags ) {
            bufferAllocateInfo.memoryTypeIndex = i;
            break;
        }
    }
    vertexMemoryTypeBits = vertexMemoryTypeBits >> 1;
}

VkDeviceMemory vertexBufferMemory;
result = vkAllocateMemory( context.device, &bufferAllocateInfo, NULL, &vertexBufferMemory );
checkVulkanResult( result, "Failed to allocate buffer memory." );


Even if we ask for host accessible memory, this memory is not directly accessible by the host. What it does is to create a mappable memory. To be able to write to this memory we must first retrieve a host virtual address pointer to a mappable memory object by calling vkMapMemory() So lets us map this memory so we can write to it and bind it:

void *mapped;
result = vkMapMemory( context.device, vertexBufferMemory, 0, VK_WHOLE_SIZE, 0, &mapped );
checkVulkanResult( result, "Failed to map buffer memory." );

vertex *triangle = (vertex *) mapped;
vertex v1 = { -1.0f, -1.0f, 0, 1.0f };
vertex v2 = {  1.0f, -1.0f, 0, 1.0f };
vertex v3 = {  0.0f,  1.0f, 0, 1.0f };
triangle[0] = v1;
triangle[1] = v2;
triangle[2] = v3;

vkUnmapMemory( context.device, vertexBufferMemory );

result = vkBindBufferMemory( context.device, context.vertexInputBuffer, vertexBufferMemory, 0 );
checkVulkanResult( result, "Failed to bind buffer memory." );


There you go. One triangle set to go through our pipeline. Thing is, we don't have a pipeline, do we mate? We are almost there.. we just need to talk about shaders!

Shaders


[Commit: d2cf6be]

Our goal is to setup a simple vertex and fragment shader. Vulkan expects the shader code to be in SPIR-V format but that is not such a big problem because we can use some freely available tools to convert our GLSL shaders to SPIR-V shaders: glslangValidator. You can get access to the git repo here:

git clone https://github.com/KhronosGroup/glslang


So, for example, if for our simple.vert vertex shader we have the following code:

#version 400
#extension GL_ARB_separate_shader_objects : enable
#extension GL_ARB_shading_language_420pack : enable

layout (location = 0) in vec4 pos;

void main() {
    gl_Position = pos;
}


we can call:

glslangValidator -V simple.vert


and this will create a vert.spv in the same folder. Neat, right?

And the same for our simple.frag fragment shader:

#version 400
#extension GL_ARB_separate_shader_objects : enable
#extension GL_ARB_shading_language_420pack : enable

layout (location = 0) out vec4 uFragColor;

void main() {
    uFragColor = vec4( 0.0, 0.5, 1.0, 1.0 );
}

glslangValidator -V simple.frag


And we end up with our frag.spv.

Keeping to our principle of showing all the code in place, to load it up to Vulkan we can go and do the following:

uint32_t codeSize;
char *code = new char[10000];
HANDLE fileHandle = 0;

// load our vertex shader:
fileHandle = CreateFile( "..\\vert.spv", GENERIC_READ, 0, NULL, 
                         OPEN_EXISTING, FILE_ATTRIBUTE_NORMAL, NULL );
if( fileHandle == INVALID_HANDLE_VALUE ) {
    OutputDebugStringA( "Failed to open shader file." );
    exit(1);
}
ReadFile( (HANDLE)fileHandle, code, 10000, (LPDWORD)&codeSize, 0 );
CloseHandle( fileHandle );

VkShaderModuleCreateInfo vertexShaderCreationInfo = {};
vertexShaderCreationInfo.sType = VK_STRUCTURE_TYPE_SHADER_MODULE_CREATE_INFO;
vertexShaderCreationInfo.codeSize = codeSize;
vertexShaderCreationInfo.pCode = (uint32_t *)code;

VkShaderModule vertexShaderModule;
result = vkCreateShaderModule( context.device, &vertexShaderCreationInfo, NULL, &vertexShaderModule );
checkVulkanResult( result, "Failed to create vertex shader module." );

// load our fragment shader:
fileHandle = CreateFile( "..\\frag.spv", GENERIC_READ, 0, NULL, 
                         OPEN_EXISTING, FILE_ATTRIBUTE_NORMAL, NULL );
if( fileHandle == INVALID_HANDLE_VALUE ) {
    OutputDebugStringA( "Failed to open shader file." );
    exit(1);
}
ReadFile( (HANDLE)fileHandle, code, 10000, (LPDWORD)&codeSize, 0 );
CloseHandle( fileHandle );

VkShaderModuleCreateInfo fragmentShaderCreationInfo = {};
fragmentShaderCreationInfo.sType = VK_STRUCTURE_TYPE_SHADER_MODULE_CREATE_INFO;
fragmentShaderCreationInfo.codeSize = codeSize;
fragmentShaderCreationInfo.pCode = (uint32_t *)code;

VkShaderModule fragmentShaderModule;
result = vkCreateShaderModule( context.device, &fragmentShaderCreationInfo, NULL, &fragmentShaderModule );
checkVulkanResult( result, "Failed to create vertex shader module." );


Notice that we fail miserably if we can not find the shader code and that we expect to find it in the parent folder of where we run. This is fine if you run it from the Visual Studio devenv, but it will simply crash and not report anything if you run from the command line. I suggest you change this to whatever fits you better.

A cursory glance at this code and you should be calling me all kinds of names... I will endure it. I know what you are complaining about but, for the purpose of this tutorial, I don't care. Believe me this is not the code I use in my own internal engines. ;)
Hopefully, after you stop calling me names, you should by now know what you need to do to load your own shaders.

Ok. I think we are finally ready to start setting up our rendering pipeline.

Graphics Pipeline


[Commit: 0baeb96]

A graphics pipeline keeps track of all the state required to render. It is a collection of multiple shader stages, multiple fixed-function pipeline stages and pipeline layout. Everything that we have been creating up to this point is so that we can config the pipeline in one way or another. We need to set everything up front. Remember that Vulkan keeps no state and as such we need to config and store all the state we want/need and we do it by creating a VkPipeline.

As you know, or at least imagine, there is a whole lot of state in a graphics pipeline. From the viewport to the blend functions, from the shader stages, to the bindings... As such, what follows is setting up all this state. (In this instance, we will be leaving out some big parts, like the descriptor sets, bindings, etc...) So, let's start by creating an empty layout:

VkPipelineLayoutCreateInfo layoutCreateInfo = {};
layoutCreateInfo.sType = VK_STRUCTURE_TYPE_PIPELINE_LAYOUT_CREATE_INFO;
layoutCreateInfo.setLayoutCount = 0;
layoutCreateInfo.pSetLayouts = NULL;    // Not setting any bindings!
layoutCreateInfo.pushConstantRangeCount = 0;
layoutCreateInfo.pPushConstantRanges = NULL;

result = vkCreatePipelineLayout( context.device, &layoutCreateInfo, NULL, 
                                 &context.pipelineLayout );
checkVulkanResult( result, "Failed to create pipeline layout." );


We might return to this stage later so that we can, for example, set a uniform buffer object to pass some uniform values to our shaders, But for this first tutorial empty is fine! Next we setup our shader stages with the shader modules we loaded:

VkPipelineShaderStageCreateInfo shaderStageCreateInfo[2] = {};
shaderStageCreateInfo[0].sType = VK_STRUCTURE_TYPE_PIPELINE_SHADER_STAGE_CREATE_INFO;
shaderStageCreateInfo[0].stage = VK_SHADER_STAGE_VERTEX_BIT;
shaderStageCreateInfo[0].module = vertexShaderModule;
shaderStageCreateInfo[0].pName = "main";        // shader entry point function name
shaderStageCreateInfo[0].pSpecializationInfo = NULL;

shaderStageCreateInfo[1].sType = VK_STRUCTURE_TYPE_PIPELINE_SHADER_STAGE_CREATE_INFO;
shaderStageCreateInfo[1].stage = VK_SHADER_STAGE_FRAGMENT_BIT;
shaderStageCreateInfo[1].module = fragmentShaderModule;
shaderStageCreateInfo[1].pName = "main";        // shader entry point function name
shaderStageCreateInfo[1].pSpecializationInfo = NULL;


Nothing special going on here. To configure the vertex input handling we follow with:

VkVertexInputBindingDescription vertexBindingDescription = {};
vertexBindingDescription.binding = 0;
vertexBindingDescription.stride = sizeof(vertex);
vertexBindingDescription.inputRate = VK_VERTEX_INPUT_RATE_VERTEX;

VkVertexInputAttributeDescription vertexAttributeDescritpion = {};
vertexAttributeDescritpion.location = 0;
vertexAttributeDescritpion.binding = 0;
vertexAttributeDescritpion.format = VK_FORMAT_R32G32B32A32_SFLOAT;
vertexAttributeDescritpion.offset = 0;

VkPipelineVertexInputStateCreateInfo vertexInputStateCreateInfo = {};
vertexInputStateCreateInfo.sType = VK_STRUCTURE_TYPE_PIPELINE_VERTEX_INPUT_STATE_CREATE_INFO;
vertexInputStateCreateInfo.vertexBindingDescriptionCount = 1;
vertexInputStateCreateInfo.pVertexBindingDescriptions = &vertexBindingDescription;
vertexInputStateCreateInfo.vertexAttributeDescriptionCount = 1;
vertexInputStateCreateInfo.pVertexAttributeDescriptions = &vertexAttributeDescritpion;

// vertex topology config:
VkPipelineInputAssemblyStateCreateInfo inputAssemblyStateCreateInfo = {};
inputAssemblyStateCreateInfo.sType = VK_STRUCTURE_TYPE_PIPELINE_INPUT_ASSEMBLY_STATE_CREATE_INFO;
inputAssemblyStateCreateInfo.topology = VK_PRIMITIVE_TOPOLOGY_TRIANGLE_LIST;
inputAssemblyStateCreateInfo.primitiveRestartEnable = VK_FALSE;


Ok, some explanations required here. In the first part we bind the vertex position (our (x,y,z,w)) to location = 0, binding = 0. And then we are configuring the vertex topology to interpret our vertex buffer as a triangle list.

Next, the viewport and scissors clipping is configured. We will later make this state dynamic so that we can change it per frame.

VkViewport viewport = {};
viewport.x = 0;
viewport.y = 0;
viewport.width = context.width;
viewport.height = context.height;
viewport.minDepth = 0;
viewport.maxDepth = 1;

VkRect2D scissors = {};
scissors.offset = { 0, 0 };
scissors.extent = { context.width, context.height };

VkPipelineViewportStateCreateInfo viewportState = {};
viewportState.sType = VK_STRUCTURE_TYPE_PIPELINE_VIEWPORT_STATE_CREATE_INFO;
viewportState.viewportCount = 1;
viewportState.pViewports = &viewport;
viewportState.scissorCount = 1;
viewportState.pScissors = &scissors;


Here we can set our rasterization configurations. Most of this are self explanatory:

VkPipelineRasterizationStateCreateInfo rasterizationState = {};
rasterizationState.sType = VK_STRUCTURE_TYPE_PIPELINE_RASTERIZATION_STATE_CREATE_INFO;
rasterizationState.depthClampEnable = VK_FALSE;
rasterizationState.rasterizerDiscardEnable = VK_FALSE;
rasterizationState.polygonMode = VK_POLYGON_MODE_FILL;
rasterizationState.cullMode = VK_CULL_MODE_NONE;
rasterizationState.frontFace = VK_FRONT_FACE_COUNTER_CLOCKWISE;
rasterizationState.depthBiasEnable = VK_FALSE;
rasterizationState.depthBiasConstantFactor = 0;
rasterizationState.depthBiasClamp = 0;
rasterizationState.depthBiasSlopeFactor = 0;
rasterizationState.lineWidth = 1;


Next, sampling configuration:

VkPipelineMultisampleStateCreateInfo multisampleState = {};
multisampleState.sType = VK_STRUCTURE_TYPE_PIPELINE_MULTISAMPLE_STATE_CREATE_INFO;
multisampleState.rasterizationSamples = VK_SAMPLE_COUNT_1_BIT;
multisampleState.sampleShadingEnable = VK_FALSE;
multisampleState.minSampleShading = 0;
multisampleState.pSampleMask = NULL;
multisampleState.alphaToCoverageEnable = VK_FALSE;
multisampleState.alphaToOneEnable = VK_FALSE;


At this stage we enable depth testing and disable stencil:

VkStencilOpState noOPStencilState = {};
noOPStencilState.failOp = VK_STENCIL_OP_KEEP;
noOPStencilState.passOp = VK_STENCIL_OP_KEEP;
noOPStencilState.depthFailOp = VK_STENCIL_OP_KEEP;
noOPStencilState.compareOp = VK_COMPARE_OP_ALWAYS;
noOPStencilState.compareMask = 0;
noOPStencilState.writeMask = 0;
noOPStencilState.reference = 0;

VkPipelineDepthStencilStateCreateInfo depthState = {};
depthState.sType = VK_STRUCTURE_TYPE_PIPELINE_DEPTH_STENCIL_STATE_CREATE_INFO;
depthState.depthTestEnable = VK_TRUE;
depthState.depthWriteEnable = VK_TRUE;
depthState.depthCompareOp = VK_COMPARE_OP_LESS_OR_EQUAL;
depthState.depthBoundsTestEnable = VK_FALSE;
depthState.stencilTestEnable = VK_FALSE;
depthState.front = noOPStencilState;
depthState.back = noOPStencilState;
depthState.minDepthBounds = 0;
depthState.maxDepthBounds = 0;


Color blending, which is disabled for this tutorial, can be configured here:

VkPipelineColorBlendAttachmentState colorBlendAttachmentState = {};
colorBlendAttachmentState.blendEnable = VK_FALSE;
colorBlendAttachmentState.srcColorBlendFactor = VK_BLEND_FACTOR_SRC_COLOR;
colorBlendAttachmentState.dstColorBlendFactor = VK_BLEND_FACTOR_ONE_MINUS_DST_COLOR;
colorBlendAttachmentState.colorBlendOp = VK_BLEND_OP_ADD;
colorBlendAttachmentState.srcAlphaBlendFactor = VK_BLEND_FACTOR_ZERO;
colorBlendAttachmentState.dstAlphaBlendFactor = VK_BLEND_FACTOR_ZERO;
colorBlendAttachmentState.alphaBlendOp = VK_BLEND_OP_ADD;
colorBlendAttachmentState.colorWriteMask = 0xf;

VkPipelineColorBlendStateCreateInfo colorBlendState = {};
colorBlendState.sType = VK_STRUCTURE_TYPE_PIPELINE_COLOR_BLEND_STATE_CREATE_INFO;
colorBlendState.logicOpEnable = VK_FALSE;
colorBlendState.logicOp = VK_LOGIC_OP_CLEAR;
colorBlendState.attachmentCount = 1;
colorBlendState.pAttachments = &colorBlendAttachmentState;
colorBlendState.blendConstants[0] = 0.0;
colorBlendState.blendConstants[1] = 0.0;
colorBlendState.blendConstants[2] = 0.0;
colorBlendState.blendConstants[3] = 0.0;


All these configurations are now constant for the entirety of the pipeline's life. We might want to change some of this state per frame, like our viewport/scissors. To make a state dynamic we can:

VkDynamicState dynamicState[2] = { VK_DYNAMIC_STATE_VIEWPORT, VK_DYNAMIC_STATE_SCISSOR };
VkPipelineDynamicStateCreateInfo dynamicStateCreateInfo = {};
dynamicStateCreateInfo.sType = VK_STRUCTURE_TYPE_PIPELINE_DYNAMIC_STATE_CREATE_INFO;
dynamicStateCreateInfo.dynamicStateCount = 2;
dynamicStateCreateInfo.pDynamicStates = dynamicState;


And finally, we put everything together to create our graphics pipeline:

VkGraphicsPipelineCreateInfo pipelineCreateInfo = {};
pipelineCreateInfo.sType = VK_STRUCTURE_TYPE_GRAPHICS_PIPELINE_CREATE_INFO;
pipelineCreateInfo.stageCount = 2;
pipelineCreateInfo.pStages = shaderStageCreateInfo;
pipelineCreateInfo.pVertexInputState = &vertexInputStateCreateInfo;
pipelineCreateInfo.pInputAssemblyState = &inputAssemblyStateCreateInfo;
pipelineCreateInfo.pTessellationState = NULL;
pipelineCreateInfo.pViewportState = &viewportState;
pipelineCreateInfo.pRasterizationState = &rasterizationState;
pipelineCreateInfo.pMultisampleState = &multisampleState;
pipelineCreateInfo.pDepthStencilState = &depthState;
pipelineCreateInfo.pColorBlendState = &colorBlendState;
pipelineCreateInfo.pDynamicState = &dynamicStateCreateInfo;
pipelineCreateInfo.layout = context.pipelineLayout;
pipelineCreateInfo.renderPass = context.renderPass;
pipelineCreateInfo.subpass = 0;
pipelineCreateInfo.basePipelineHandle = NULL;
pipelineCreateInfo.basePipelineIndex = 0;

result = vkCreateGraphicsPipelines( context.device, VK_NULL_HANDLE, 1, &pipelineCreateInfo, NULL, 
                                   &context.pipeline );
checkVulkanResult( result, "Failed to create graphics pipeline." );


That was a lot of code... but it's just setting state. The good news is that we are now ready to start rendering our triangle. We will update our render method to do just that.

Final Render


[Commit: 5613c5d]

We are FINALLY ready to update our render code to put a blue-ish triangle on the screen. Can you believe it? Well, let me show you how:

void render( ) {

    vkSemaphore presentCompleteSemaphore, renderingCompleteSemaphore;
    VkSemaphoreCreateInfo semaphoreCreateInfo = { VK_STRUCTURE_TYPE_SEMAPHORE_CREATE_INFO, 0, 0 };
    vkCreateSemaphore( context.device, &semaphoreCreateInfo, NULL, &presentCompleteSemaphore );
    vkCreateSemaphore( context.device, &semaphoreCreateInfo, NULL, &renderingCompleteSemaphore );
	
    uint32_t nextImageIdx;
    vkAcquireNextImageKHR(  context.device, context.swapChain, UINT64_MAX,
                            presentCompleteSemaphore, VK_NULL_HANDLE, &nextImageIdx );


First we will need to care about synchronising our render calls, so we create a couple semaphores and update our vkAcquireNextImageKHR() call. We need to change the presentation image from the VK_IMAGE_LAYOUT_PRESENT_SRC_KHR layout to the VK_IMAGE_LAYOUT_COLOR_ATTACHMENT_OPTIMAL layout. We already know how to do this, so here is the code:

    VkCommandBufferBeginInfo beginInfo = {};
    beginInfo.sType = VK_STRUCTURE_TYPE_COMMAND_BUFFER_BEGIN_INFO;
    beginInfo.flags = VK_COMMAND_BUFFER_USAGE_ONE_TIME_SUBMIT_BIT;
	
    vkBeginCommandBuffer( context.drawCmdBuffer, &beginInfo );
	
    // change image layout from VK_IMAGE_LAYOUT_PRESENT_SRC_KHR
    // to VK_IMAGE_LAYOUT_COLOR_ATTACHMENT_OPTIMAL
    VkImageMemoryBarrier layoutTransitionBarrier = {};
    layoutTransitionBarrier.sType = VK_STRUCTURE_TYPE_IMAGE_MEMORY_BARRIER;
    layoutTransitionBarrier.srcAccessMask = VK_ACCESS_MEMORY_READ_BIT;
    layoutTransitionBarrier.dstAccessMask = VK_ACCESS_COLOR_ATTACHMENT_READ_BIT | 
                                            VK_ACCESS_COLOR_ATTACHMENT_WRITE_BIT;
    layoutTransitionBarrier.oldLayout = VK_IMAGE_LAYOUT_PRESENT_SRC_KHR;
    layoutTransitionBarrier.newLayout = VK_IMAGE_LAYOUT_COLOR_ATTACHMENT_OPTIMAL;
    layoutTransitionBarrier.srcQueueFamilyIndex = VK_QUEUE_FAMILY_IGNORED;
    layoutTransitionBarrier.dstQueueFamilyIndex = VK_QUEUE_FAMILY_IGNORED;
    layoutTransitionBarrier.image = context.presentImages[ nextImageIdx ];
    VkImageSubresourceRange resourceRange = { VK_IMAGE_ASPECT_COLOR_BIT, 0, 1, 0, 1 };
    layoutTransitionBarrier.subresourceRange = resourceRange;
	
    vkCmdPipelineBarrier(   context.drawCmdBuffer, 
                            VK_PIPELINE_STAGE_TOP_OF_PIPE_BIT, 
                            VK_PIPELINE_STAGE_TOP_OF_PIPE_BIT, 
                            0,
                            0, NULL,
                            0, NULL, 
                            1, &layoutTransitionBarrier );


This is code you should by now be familiar with. Next we will activate our render pass:

    VkClearValue clearValue[] = { { 1.0f, 1.0f, 1.0f, 1.0f }, { 1.0, 0.0 } };
    VkRenderPassBeginInfo renderPassBeginInfo = {};
    renderPassBeginInfo.sType = VK_STRUCTURE_TYPE_RENDER_PASS_BEGIN_INFO;
    renderPassBeginInfo.renderPass = context.renderPass;
    renderPassBeginInfo.framebuffer = context.frameBuffers[ nextImageIdx ];
    renderPassBeginInfo.renderArea = { 0, 0, context.width, context.height };
    renderPassBeginInfo.clearValueCount = 2;
    renderPassBeginInfo.pClearValues = clearValue;
    vkCmdBeginRenderPass( context.drawCmdBuffer, &renderPassBeginInfo, 
                          VK_SUBPASS_CONTENTS_INLINE );


Nothing special here. Just telling it which framebuffer to use and the clear values to set both for both attachments. Next we bind all our rendering state by binding our graphics pipeline:

    vkCmdBindPipeline( context.drawCmdBuffer, VK_PIPELINE_BIND_POINT_GRAPHICS, context.pipeline );    

    // take care of dynamic state:
    VkViewport viewport = { 0, 0, context.width, context.height, 0, 1 };
    vkCmdSetViewport( context.drawCmdBuffer, 0, 1, &viewport );

    VkRect2D scissor = { 0, 0, context.width, context.height };
    vkCmdSetScissor( context.drawCmdBuffer, 0, 1, &scissor);


Notice how we setup the dynamic state at this stage. Next we render our beautiful triangle by binding our vertex buffer and asking Vulkan to draw one instance of it:

    VkDeviceSize offsets = { };
    vkCmdBindVertexBuffers( context.drawCmdBuffer, 0, 1, &context.vertexInputBuffer, &offsets );

    vkCmdDraw( context.drawCmdBuffer,
               3,   // vertex count
               1,   // instance count
               0,   // first vertex
               0 ); // first instance

    vkCmdEndRenderPass( context.drawCmdBuffer );


We are almost done. Guess what is missing? Right, we need to change from VK_IMAGE_LAYOUT_COLOR_ATTACHMENT_OPTIMAL to VK_IMAGE_LAYOUT_PRESENT_SRC_KHR and we need to make sure all rendering work is done before we do that!

   VkImageMemoryBarrier prePresentBarrier = {};
    prePresentBarrier.sType = VK_STRUCTURE_TYPE_IMAGE_MEMORY_BARRIER;
    prePresentBarrier.srcAccessMask = VK_ACCESS_COLOR_ATTACHMENT_WRITE_BIT;
    prePresentBarrier.dstAccessMask = VK_ACCESS_MEMORY_READ_BIT;
    prePresentBarrier.oldLayout = VK_IMAGE_LAYOUT_COLOR_ATTACHMENT_OPTIMAL;
    prePresentBarrier.newLayout = VK_IMAGE_LAYOUT_PRESENT_SRC_KHR;
    prePresentBarrier.srcQueueFamilyIndex = VK_QUEUE_FAMILY_IGNORED;
    prePresentBarrier.dstQueueFamilyIndex = VK_QUEUE_FAMILY_IGNORED;
    prePresentBarrier.subresourceRange = {VK_IMAGE_ASPECT_COLOR_BIT, 0, 1, 0, 1};
    prePresentBarrier.image = context.presentImages[ nextImageIdx ];
    
    vkCmdPipelineBarrier( context.drawCmdBuffer, 
                          VK_PIPELINE_STAGE_ALL_COMMANDS_BIT, 
                          VK_PIPELINE_STAGE_BOTTOM_OF_PIPE_BIT, 
                          0, 
                          0, NULL, 
                          0, NULL, 
                          1, &prePresentBarrier );

    vkEndCommandBuffer( context.drawCmdBuffer );


And that is it. Only need to submit and we are done:

    VkFence renderFence;
    VkFenceCreateInfo fenceCreateInfo = {};
    fenceCreateInfo.sType = VK_STRUCTURE_TYPE_FENCE_CREATE_INFO;
    vkCreateFence( context.device, &fenceCreateInfo, NULL, &renderFence );

    VkPipelineStageFlags waitStageMash = { VK_PIPELINE_STAGE_BOTTOM_OF_PIPE_BIT };
    VkSubmitInfo submitInfo = {};
    submitInfo.sType = VK_STRUCTURE_TYPE_SUBMIT_INFO;
    submitInfo.waitSemaphoreCount = 1;
    submitInfo.pWaitSemaphores = &presentCompleteSemaphore;
    submitInfo.pWaitDstStageMask = &waitStageMash;
    submitInfo.commandBufferCount = 1;
    submitInfo.pCommandBuffers = &context.drawCmdBuffer;
    submitInfo.signalSemaphoreCount = 1;
    submitInfo.pSignalSemaphores = &renderingCompleteSemaphore;
    vkQueueSubmit( context.presentQueue, 1, &submitInfo, renderFence );

    vkWaitForFences( context.device, 1, &renderFence, VK_TRUE, UINT64_MAX );
    vkDestroyFence( context.device, renderFence, NULL );

    VkPresentInfoKHR presentInfo = {};
    presentInfo.sType = VK_STRUCTURE_TYPE_PRESENT_INFO_KHR;
    presentInfo.waitSemaphoreCount = 1;
    presentInfo.pWaitSemaphores = &renderingCompleteSemaphore;
    presentInfo.swapchainCount = 1;
    presentInfo.pSwapchains = &context.swapChain;
    presentInfo.pImageIndices = &nextImageIdx;
    presentInfo.pResults = NULL;
    vkQueuePresentKHR( context.presentQueue, &presentInfo );

    vkDestroySemaphore( context.device, presentCompleteSemaphore, NULL );
    vkDestroySemaphore( context.device, renderingCompleteSemaphore, NULL );
}


We made it! We now have a basic skeleton Vulkan application running. Hopefully you could learn enough about Vulkan to figure out how to proceed from here. This is anyway a code repo that I would have liked to have when I started... so maybe this will be helpful to someone else.

I am currently writing another tutorial where I go into more details about the topics I left open. (It includes shader uniforms, texture mapping and basic illumination). So, do check regularly for the new content. I will also post it on my twitter once I finish and publish it here. Feel free to contact me for suggestions and feedback at jhenriques@gmail.com.

Have a nice one, JH.

Find more information on my blog at http://av.dfki.de/~jhenriques/development.html.
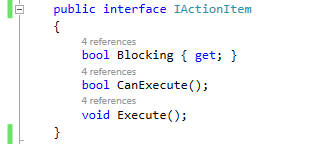

Load Testing with Locust.io

$
0
0

This article was originally posted on Kongregate's Developer Blog.


Overview


With more and more developers utilizing cloud services for hosting, it is critical to understand the performance metrics and limits of your application. First and foremost, this knowledge helps you keep your infrastructure up and running. Just as important, however, is the fact that this will ensure you are not allocating too many resources and wasting money in the process.


This post will describe how Kongregate utilizes Locust.io for internal load testing of our infrastructure on AWS, and give you an idea of how you can do similar instrumentation within your organization in order to gain a deeper knowledge of how your system will hold up under various loads.


What Is Locust.io?


Locust is a code-driven, distributed load testing suite built in Python. Locust makes it very simple to create customizable clients, and gives you plenty of options to allow them to emulate real users and traffic.


The fact that Locust is distributed means it is easy to test your system with hundreds of thousands of concurrent users, and the intuitive web-based UI makes it trivial to manage starting and stopping of tests.


For more information on Locust, see their documentation and GitHub repository.


How We Defined Our Tests


We wanted to create a test that would allow us to determine how many more web and mobile users we could support on our current production stack before we needed to either add more web servers or upgrade to a larger database instance.


In order to create a useful test suite for this purpose, we took a look at both our highest throughput and slowest requests in NewRelic. We split those out into web and mobile requests, and started adding Locust tasks for each one until we were satisfied that we had an acceptable test suite.


We configured the weights for each task so that the relative frequencies were correct, and tweaked the rate at which tasks were performed until the number of requests per second for a given number of concurrent users was similar to what we see in production. We also set weights for web vs. mobile traffic so that we could predict what might happen if a mobile game goes viral and starts generating a lot of load on those specific endpoints.


Our application also has vastly different performance metrics for authenticated users (they are more expensive), so we added a configurable random chance for users to create an authenticated session in our on_start function. The Locust HTTP client persists cookies across requests, so maintaining a session is quite simple.


How We Ran Our Tests


We have all of our infrastructure represented as code, mostly via CloudFormation. With this methodology we were able to bring up a mirror of our production stack with a recent database snapshot to test against. Once we had this stack running we created several thousand test users with known usernames and passwords so that we could initiate authenticated sessions as needed.


Initially, we just ran Locust locally with several hundred clients to ensure that we had the correct behavior. After we were convinced that our tests were working properly, we created a pool of EC2 Spot Instances for running Locust on Amazon Linux. We knew we would need a fairly large pool of machines to run the test suite, and we wanted use more powerful instance types for their robust networking capabilities. There is a cost associated with load testing a lot of users, and using spot instances helped us mitigate that.


In order to ensure we had everything we needed on the nodes, we simply used the following user data script for instance creation on our stock Amazon Linux AMI:


#!/bin/bash
sudo yum -y update
sudo yum -y install python
sudo yum -y groupinstall 'Development Tools'
sudo pip install pyzmq
sudo pip install locustio

To start the Locust instances on these nodes we used Capistrano along with cap-ec2 to orchestrate starting the master node and getting the slaves to attach to it. Capistrano also allowed us to easily upload our test scripts on every run so we could rapidly iterate.


Note: If you use EC2 for your test instances, you’ll need to ensure your security group is set up properly to allow traffic between the master and slave nodes. By default, Locust needs to communicate on ports 5557 and 5558.


Test Iteration


While attempting to hit our target number of concurrent users, we ran into a few snags. Here are some of the problems we ran into, along with some potential solutions:

  • Locust Web UI would lock up when requests had dynamic URLs
    • Make sure to group these requests to keep the UI manageable.

  • Ramping up too aggressively:
    • Don’t open the flood gates full force, unless that’s what you’re testing.
    • If you’re on AWS this can overload your ELB and push requests into the surge queue, where they are in danger of being discarded.
    • This can overload your backend instances with high overhead setup tasks (session, authentication, etc.).

  • High memory usage (~1MB per active client):
    • We did not find a solution for this, but instead just brute-forced the problem by adding nodes with more memory.

  • Errors due to too many open files:
    • Increase the open files limit for the user running Locust.
    • Alternatively, you can run your Locust processes as root, and increase the limit directly from your script:
      try:resource.setrlimit(resource.RLIMIT_NOFILE, (1000000, 1000000))except:print "Couldn't raise resource limit"


Miscellaneous Tips and Tricks


Share a session cookie between HTTP/HTTPS requests:

r = self.client.post('https://k.io/session', {'username': u, 'password': p})
self.cookies = { '_session': r.cookies['_session'] }
self.client.get('http://k.io/account', cookies=self.cookies)

Debug request output to verify correctness locally before ramping up:

r = self.client.get('/some_request')
print r.text

Outcome


After all was said and done, we ended up running a test with roughly 450,000 concurrent users. This allowed us to discover some Linux Kernel settings that were improperly tuned and causing <code>502 Bad Gateway</code> errors, and also let us discover breaking points for both our web servers and our database. The test also helped us confirm that we made correct choices in regard to the number of web server processes per instance, and instance types.


We now have a better idea how our system will respond to viral game launches and other events, we can perform regression tests to ensure that large features don’t slow things down unexpectedly, and we can use the information gathered to further optimize our architecture and reduce overall costs.

Custom Deleters for C++ Smart Pointers

$
0
0

Originally posted at Bartek's Code and Graphics blog.


Let’s say we have the following code:


LegacyList* pMyList = new LegacyList();
...
pMyList->ReleaseElements();
delete pMyList;

In order to fully delete an object we need to do some additional action.


How to make it more C++11? How to use unique_ptr or shared_ptr here?


Intro


We all know that smart pointers are really nice things and we should be using them instead of raw new and delete. But what if deleting a pointer is not only the thing we need to call before the object is fully destroyed? In our short example we have to call ReleaseElements() to completely clear the list.


Side Note: we could simply redesign LegacyList so that it properly clears its data inside its destructor. But for this exercise we need to assume that LegacyList cannot be changed (it’s some legacy, hard to fix code, or it might come from a third party library).


ReleaseElements is only my invention for this article. Other things might be involved here instead: logging, closing a file, terminating a connection, returning object to C style library… or in general: any resource releasing procedure, RAII.


To give more context to my example, let’s discuss the following use of LegacyList:


class WordCache {
public:
    WordCache() { m_pList = nullptr; }
    ~WordCache() { ClearCache(); }

    void UpdateCache(LegacyList *pInputList) { 
        ClearCache();
        m_pList = pInputList;
        if (m_pList)
        {
            // do something with the list...
        }
    }

private:
    void ClearCache() { 
        if (m_pList) { 
            m_pList->ReleaseElements();
            delete m_pList; 
            m_pList = nullptr; 
        } 
    }

    LegacyList *m_pList; // owned by the object
};

You can play with the source code here: using Coliru online compiler.


This is a bit old style C++ class. The class owns the m_pList pointer, so it has to be cleared in the constructor. To make life easier there is ClearCache() method that is called from the destructor or from UpdateCache().


The main method UpdateCache() takes pointer to a list and gets ownership of that pointer. The pointer is deleted in the destructor or when we update the cache again.


Simplified usage:


WordCache myTestClass;

LegacyList* pList = new LegacyList();
// fill the list...
myTestClass.UpdateCache(pList);

LegacyList* pList2 = new LegacyList();
// fill the list again
// pList should be deleted, pList2 is now owned
myTestClass.UpdateCache(pList2);

With the above code there shouldn’t be any memory leaks, but we need to carefully pay attention what’s going on with the pList pointer. This is definitely not modern C++!


Let’s update the code so it’s modernized and properly uses RAII (smart pointers in these cases). Using unique_ptr or shared_ptr seems to be easy, but here we have a slight complication: how to execute this additional code that is required to fully delete LegacyList ?


What we need is a Custom Deleter


Custom Deleter for shared_ptr


I’ll start with shared_ptr because this type of pointer is more flexible and easier to use.


What should you do to pass a custom deleter? Just pass it when you create a pointer:


std::shared_ptr<int> pIntPtr(new int(10), 
    [](int *pi) { delete pi; }); // deleter 

The above code is quite trivial and mostly redundant. If fact, it’s more or less a default deleter - because it’s just calling delete on a pointer. But basically, you can pass any callable thing (lambda, functor, function pointer) as deleter while constructing a shared pointer.


In the case of LegacyList let’s create a function:


void DeleteLegacyList(LegacyList* p) {
    p->ReleaseElements(); 
    delete p;
}

The modernized class is super simple now:


class ModernSharedWordCache {
public:
    void UpdateCache(std::shared_ptr<LegacyList> pInputList) { 
        m_pList = pInputList;
        // do something with the list...
    }

private:
    std::shared_ptr<LegacyList> m_pList;
};

  • No need for constructor - the pointer is initialized to nullptr by default
  • No need for destructor - pointer is cleared automatically
  • No need for helper ClearCache - just reset pointer and all the memory and resources are properly cleared.

When creating the pointer we need to pass that function:


ModernSharedWordCache mySharedClass;
std::shared_ptr<LegacyList> ptr(new LegacyList(),
                                DeleteLegacyList)
mySharedClass.UpdateCache(ptr);


As you can see there is no need to take care about the pointer, just create it (remember about passing a proper deleter) and that’s all.

Where is custom deleter stored?


When you use a custom deleter it won’t affect the size of your shared_ptr type. If you remember, that should be roughly 2 x sizeof(ptr) (8 or 16 bytes)… so where does this deleter hide?

shared_ptr consists of two things: pointer to the object and pointer to the control block (that contains reference counter for example). Control block is created only once per given pointer, so two shared_pointers (for the same pointer) will point to the same control block.


Inside control block there is a space for custom deleter and allocator.


Can I use make_shared?


Unfortunately you can pass a custom deleter only in the constructor of shared_ptr there is no way to use make_shared. This might be a bit of disadvantage, because as I described in Why create shared_ptr with make_shared? - from my old blog post, make_shared allocates the object and its control block for it next to each other in memory. Without make_shared you get two, probably separate, blocks of allocated mem.


Update: I got a very good comment on reddit: from quicknir saying that I am wrong in this point and there is something you can use instead of make_shared.


Indeed, you can use allocate_shared and leverage both the ability to have custom deleter and being able to share the same memory block. However, that requires you to write custom allocator, so I considered it to be too advanced for the original article.


Custom Deleter for unique_ptr


With unique_ptr there is a bit more complication. The main thing is that a deleter type will be part of unique_ptr type.


By default we get std::default_delete:


template <
    class T,
    class Deleter = std::default_delete<T>
> class unique_ptr;

Deleter is part of the pointer, heavy deleter (in terms of memory consumption) means larger pointer type.


What to chose as deleter?


What is best to use as a deleter? Let’s consider the following options:


  1. std::function
  2. Function pointer
  3. Stateless functor
  4. State-full functor
  5. Lambda

What is the smallest size of unique_ptr with the above deleter types? Can you guess? (Answer at the end of the article)


How to use?


For our example problem let’s use a functor:


struct LegacyListDeleterFunctor {  
    void operator()(LegacyList* p) {
        p->ReleaseElements(); 
        delete p;
    }
};


And here is a usage in the updated class:


class ModernWordCache {
public:
    using unique_legacylist_ptr = 
       std::unique_ptr<LegacyList,  
          LegacyListDeleterFunctor>;

public:
    void UpdateCache(unique_legacylist_ptr pInputList) { 
        m_pList = std::move(pInputList);
        // do something with the list...
    }

private:
    unique_legacylist_ptr m_pList;
};


Code is a bit more complex than the version with `shared_ptr` - we need to define a proper pointer type. Below I show how to use that new class:


ModernWordCache myModernClass;
ModernWordCache::unique_legacylist_ptr pUniqueList(new LegacyList());
myModernClass.UpdateCache(std::move(pUniqueList));

All we have to remember, since it’s a unique pointer, is to move the pointer rather than copy it.


Can I use make_unique?


Similarly as with shared_ptr you can pass a custom deleter only in the constructor of unique_ptr and thus you cannot use make_unique. Fortunately, make_unique is only for convenience (wrong!) and doesn’t give any performance/memory benefits over normal construction.


Update: I was too confident about make_unique :) There is always a purpose for such functions. Look here GotW #89 Solution: Smart Pointers - guru question 3:


make_unique is important because:
First of all:


Guideline: Use make_unique to create an object that isn’t shared (at
least not yet), unless you need a custom deleter or are adopting a raw
pointer from elsewhere.


Secondly:
make_unique gives exception safety: Exception safety and make_unique


So, by using a custom deleter we lose a bit of security. It’s worth knowig the risk behind that choice. Still, custom deleter with unique_ptr is far more better than playing with raw pointers.


Things to remember:

Custom Deleters give a lot of flexibility that improves resource
management in your apps.


Summary


In this post I’ve shown you how to use custom deleters with C++ smart pointer: shared_ptr and unique_ptr. Those deleters can be used in all the places wher ‘normal’ delete ptr is not enough: when you wrap FILE*, some kind of a C style structure ( SDL_FreeSurface, free(), destroy_bitmap from Allegro library, etc).
Remember that proper garbage collection is not only related to memory destruction, often some other actions needs to be invoked. With custom deleters you have that option.


Gist with the code is located here: fenbf/smart_ptr_deleters.cpp


Let me know what are your common problems with smart pointers?
What blocks you from using them?


References


Answer to the question about pointer size
1. std::function - heavy stuff, on 64 bit, gcc it showed me 40 bytes.
2. Function pointer - it’s just a pointer, so now unique_ptr contains two pointers: for the object and for that function… so 2*sizeof(ptr) = 8 or 16 bytes.
3. Stateless functor (and also stateless lambda) - it’s actually very tircky thing. You would probably say: two pointers… but it’s not. Thanks to empty base optimization - EBO the final size is just a size of one pointer, so the smallest possible thing.
4. State-full functor - if there is some state inside the functor then we cannot do any optimizations, so it will be the size of ptr + sizeof(functor)
5. Lambda (statefull) - similar to statefull functor

Long-Awaited Check of CryEngine V

$
0
0

image1.png


In May 2016, German game-development company Crytek made a decision to upload the source code of their game engine CryEngine V to Github. The engine is written in C++ and has immediately attracted attention of both the open-source developer community and the team of developers of PVS-Studio static analyzer who regularly scan the code of open-source projects to estimate its quality. A lot of great games were created by a number of video-game development studios using various versions of CryEngine, and now the engine has become available to even more developers. This article gives an overview of errors found in the project by PVS-Studio static analyzer.


Introduction


CryEngine is a game engine developed by German company Crytek in 2002 and originally used in first-person shooter Far Cry. A lot of great games were created by a number of video-game development studios using various licensed versions of CryEngine: Far Cry, Crysis, Entropia Universe, Blue Mars, Warface, Homefront: The Revolution, Sniper: Ghost Warrior, Armored Warfare, Evolve, and many others. In March 2016, Crytek announced a release date for their new engine CryEngine V and uploaded its source code to Github soon after.


The project's source code was checked by PVS-Studio static analyzer, version 6.05. This is a tool designed for detecting software errors in program source code in C, C++, and C#. The only true way of using static analysis is to regularly scan code on developers' computers and build-servers. However, in order to demonstrate PVS-Studio's diagnostic capabilities, we run single-time checks of open-source projects and then write articles about errors found. If we like a project, we might scan it again a couple of years later. Such recurring checks are in fact the same as single-time checks since the code accumulates a lot of changes during that time.


For our checks, we pick projects that are simply popular and wide-known as well as projects suggested by our readers via e-mail. That's why CryEngine V was by no means the first game engine among those scanned by our analyzer. Other engines that we have already checked include:


We also checked CryEngine 3 SDK once.


I'd like to elaborate on the check of Unreal Engine 4 engine in particular. Using that project as an example allowed us to demonstrate in every detail what the right way of using static analysis on a real project should look like, covering the whole process from the phase of integrating the analyzer into the project to the phase of cutting warnings to zero with subsequent control over bug elimination in new code. Our work on Unreal Engine 4 project developed into collaboration with Epic Games company, in terms of which our team fixed all the defects found in the engine's source code and wrote a joint article with Epic Games on the accomplished work (it was posted on Unreal Engine Blog). Epic Games also purchased a PVS-Studio license to be able to maintain the quality of their code on their own. Collaboration of this kind is something that we would like to try with Crytek, too.


Analyzer-report structure


In this article, I'd like to answer a few frequently asked questions concerning the number of warnings and false positives, for example, "What is the ratio of false positives?" or "Why are there so few bugs in so large a project?"


To begin with, all PVS-Studio warnings are classified into three severity levels: High, Medium, and Low. The High level holds the most critical warnings, which are almost surely real errors, while the Low level contains the least critical warnings or warnings that are very likely to be false positives. Keep in mind that the codes of errors do not tie them firmly to particular severity levels: distribution of warnings across the levels very much depends on the context.


This is how the warnings of the General Analysis module are distributed across the severity levels for CryEngine V project:

  • High: 576 warnings;
  • Medium: 814 warnings,
  • Low: 2942 warnings.

Figure 1 shows distribution of the warnings across the levels in the form of a pie chart.


image2.png


Figure 1 - Percentage distribution of warnings across severity levels


It is impossible to include all the warning descriptions and associated code fragments in an article. Our articles typically discuss 10-40 commented cases; some warnings are given as a list; and most have to be left unexamined. In the best-case scenario, project authors, after we inform them, ask for a complete analysis report for close study. The bitter truth is that in most cases the number of High-level warnings alone is more than enough for an article, and CryEngine V is no exception. Figure 2 shows the structure of the High-level warnings issued for this project.


image3.png


Figure 2 - Structure of High-level warnings


Let's take a closer look at the sectors of this chart:

  • Described in the article (6%) - warnings cited in the article and accompanied by code fragments and commentary.
  • Presented as a list (46%) - warnings cited as a list. These warnings refer to the same pattern as some of the errors already discussed, so only the warning text is given.
  • False Positives (8%) - a certain ratio of false positives we have taken into account for future improvement of the analyzer.
  • Other (40%) - all the other warnings issued. These include warnings that we had to leave out so that the article wouldn't grow too large, non-critical warnings, or warnings whose validity could be estimated only by a member of the developer team. As our experience of working on Unreal Engine 4 has shown, such code still "smells" and those warnings get fixed anyway.

Analysis results


Annoying copy-paste

image4.png


V501 There are identical sub-expressions to the left and to the right of the '-' operator: q2.v.z - q2.v.z entitynode.cpp 93


bool
CompareRotation(const Quat& q1, const Quat& q2, float epsilon)
{
  return (fabs_tpl(q1.v.x - q2.v.x) <= epsilon)
      && (fabs_tpl(q1.v.y - q2.v.y) <= epsilon)
      && (fabs_tpl(q2.v.z - q2.v.z) <= epsilon) // <=
      && (fabs_tpl(q1.w - q2.w) <= epsilon);
}

A mistyped digit is probably one of the most annoying typos one can make. In the function above, the analyzer detected a suspicious expression, (q2.v.z - q2.v.z), where variables q1 and q2 seem to have been mixed up.


V501 There are identical sub-expressions '(m_eTFSrc == eTF_BC6UH)' to the left and to the right of the '||' operator. texturestreaming.cpp 919


//! Texture formats.
enum ETEX_Format : uint8
{
  ....
  eTF_BC4U,     //!< 3Dc+.
  eTF_BC4S,
  eTF_BC5U,     //!< 3Dc.
  eTF_BC5S,
  eTF_BC6UH,
  eTF_BC6SH,
  eTF_BC7,
  eTF_R9G9B9E5,
  ....
};

bool CTexture::StreamPrepare(CImageFile* pIM)
{
  ....
  if ((m_eTFSrc == eTF_R9G9B9E5) ||
      (m_eTFSrc == eTF_BC6UH) ||     // <=
      (m_eTFSrc == eTF_BC6UH))       // <=
  {
    m_cMinColor /= m_cMaxColor.a;
    m_cMaxColor /= m_cMaxColor.a;
  }
  ....
}

Another kind of typos deals with copying of constants. In this case, the m_eTFSrc variable is compared twice with the eTF_BC6UH constant. The second of these checks must compare the variable with some other constant whose name differs from the copied one in just one character, for example, eTF_BC6SH.


Two more similar issues:


  • V501 There are identical sub-expressions '(td.m_eTF == eTF_BC6UH)' to the left and to the right of the '||' operator. texture.cpp 1214
  • V501 There are identical sub-expressions 'geom_colltype_solid' to the left and to the right of the '|' operator. attachmentmanager.cpp 1004

V517 The use of 'if (A) {...} else if (A) {...}' pattern was detected. There is a probability of logical error presence. Check lines: 266, 268. d3dhwshader.cpp 266


int SD3DShader::Release(EHWShaderClass eSHClass, int nSize)
{
  ....
  if (eSHClass == eHWSC_Pixel)
    return ((ID3D11PixelShader*)pHandle)->Release();
  else if (eSHClass == eHWSC_Vertex)
    return ((ID3D11VertexShader*)pHandle)->Release();
  else if (eSHClass == eHWSC_Geometry)                   // <=
    return ((ID3D11GeometryShader*)pHandle)->Release();  // <=
  else if (eSHClass == eHWSC_Geometry)                   // <=
    return ((ID3D11GeometryShader*)pHandle)->Release();  // <=
  else if (eSHClass == eHWSC_Hull)
    return ((ID3D11HullShader*)pHandle)->Release();
  else if (eSHClass == eHWSC_Compute)
    return ((ID3D11ComputeShader*)pHandle)->Release();
  else if (eSHClass == eHWSC_Domain)
    return ((ID3D11DomainShader*)pHandle)->Release()
  ....
}

This is an example of lazy copying of a cascade of conditional statements, one of which was left unchanged.


V517 The use of 'if (A) {...} else if (A) {...}' pattern was detected. There is a probability of logical error presence. Check lines: 970, 974. environmentalweapon.cpp 970


void CEnvironmentalWeapon::UpdateDebugOutput() const
{
  ....
  const char* attackStateName = "None";
  if(m_currentAttackState &                       // <=
     EAttackStateType_EnactingPrimaryAttack)      // <=
  {
    attackStateName = "Primary Attack";
  }
  else if(m_currentAttackState &                  // <=
          EAttackStateType_EnactingPrimaryAttack) // <=
  {
    attackStateName = "Charged Throw";
  }
  ....
}

In the previous example, there was at least a small chance that an extra condition resulted from making too many copies of a code fragment, while the programmer simply forgot to remove one of the checks. In this code, however, the attackStateName variable will never take the value "Charged Throw" because of identical conditional expressions.


V519 The 'BlendFactor[2]' variable is assigned values twice successively. Perhaps this is a mistake. Check lines: 1265, 1266. ccrydxgldevicecontext.cpp 1266


void CCryDXGLDeviceContext::
OMGetBlendState(...., FLOAT BlendFactor[4], ....)
{
  CCryDXGLBlendState::ToInterface(ppBlendState, m_spBlendState);
  if ((*ppBlendState) != NULL)
    (*ppBlendState)->AddRef();
  BlendFactor[0] = m_auBlendFactor[0];
  BlendFactor[1] = m_auBlendFactor[1];
  BlendFactor[2] = m_auBlendFactor[2]; // <=
  BlendFactor[2] = m_auBlendFactor[3]; // <=
  *pSampleMask = m_uSampleMask;
}

In this function, a typo in the element index prevents the element with index '3', BlendFactor[3], from being filled with a value. This fragment would have remained just one of the many interesting examples of typos, had not the analyzer found two more copies of the same incorrect fragment:


V519 The 'm_auBlendFactor[2]' variable is assigned values twice successively. Perhaps this is a mistake. Check lines: 904, 905. ccrydxgldevicecontext.cpp 905


void CCryDXGLDeviceContext::
  OMSetBlendState(....const FLOAT BlendFactor[4], ....)
{
  ....
  m_uSampleMask = SampleMask;
  if (BlendFactor == NULL)
  {
    m_auBlendFactor[0] = 1.0f;
    m_auBlendFactor[1] = 1.0f;
    m_auBlendFactor[2] = 1.0f;                   // <=
    m_auBlendFactor[2] = 1.0f;                   // <=
  }
  else
  {
    m_auBlendFactor[0] = BlendFactor[0];
    m_auBlendFactor[1] = BlendFactor[1];
    m_auBlendFactor[2] = BlendFactor[2];         // <=
    m_auBlendFactor[2] = BlendFactor[3];         // <=
  }

  m_pContext->SetBlendColor(m_auBlendFactor[0],
                            m_auBlendFactor[1],
                            m_auBlendFactor[2],
                            m_auBlendFactor[3]);
  m_pContext->SetSampleMask(m_uSampleMask);
  ....
}

Here's that fragment where the element with index '3' is skipped again. I even thought for a moment that there was some intentional pattern to it, but this thought quickly vanished as I saw that the programmer attempted to access all the four elements of the m_auBlendFactor array at the end of the function. It looks like the same code with a typo was simply copied several times in the file ccrydxgldevicecontext.cpp.


V523 The 'then' statement is equivalent to the 'else' statement. d3dshadows.cpp 1410


void CD3D9Renderer::ConfigShadowTexgen(....)
{
  ....
  if ((pFr->m_Flags & DLF_DIRECTIONAL) ||
    (!(pFr->bUseHWShadowMap) && !(pFr->bHWPCFCompare)))
  {
    //linearized shadows are used for any kind of directional
    //lights and for non-hw point lights
    m_cEF.m_TempVecs[2][Num] = 1.f / (pFr->fFarDist);
  }
  else
  {
    //hw point lights sources have non-linear depth for now
    m_cEF.m_TempVecs[2][Num] = 1.f / (pFr->fFarDist);
  }
  ....
}

To finish the section on copy-paste, here is one more interesting error. No matter what result the conditional expression produces, the value m_cEF.m_TempVecs[2][Num] is always computed by the same formula. Judging by the surrounding code, the index is correct: it's exactly the element with index '2' that must be filled with a value. It's just that the formula itself was meant to be different in each case, and the programmer forgot to change the copied code.


Troubles with initialization

image5.png


V546 Member of a class is initialized by itself: 'eConfigMax(eConfigMax)'. particleparams.h 1013


ParticleParams() :
  ....
  fSphericalApproximation(1.f),
  fVolumeThickness(1.0f),
  fSoundFXParam(1.f),
  eConfigMax(eConfigMax.VeryHigh), // <=
  fFadeAtViewCosAngle(0.f)
{}

The analyzer detected a potential typo that causes a class field to be initialized to its own value.


V603 The object was created but it is not being used. If you wish to call constructor, 'this->SRenderingPassInfo::SRenderingPassInfo(....)' should be used. i3dengine.h 2589

SRenderingPassInfo()
  : pShadowGenMask(NULL)
  , nShadowSide(0)
  , nShadowLod(0)
  , nShadowFrustumId(0)
  , m_bAuxWindow(0)
  , m_nRenderStackLevel(0)
  , m_eShadowMapRendering(static_cast<uint8>(SHADOW_MAP_NONE))
  , m_bCameraUnderWater(0)
  , m_nRenderingFlags(0)
  , m_fZoomFactor(0.0f)
  , m_pCamera(NULL)
  , m_nZoomInProgress(0)
  , m_nZoomMode(0)
  , m_pJobState(nullptr)
{
  threadID nThreadID = 0;
  gEnv->pRenderer->EF_Query(EFQ_MainThreadList, nThreadID);
  m_nThreadID = static_cast<uint8>(nThreadID);
  m_nRenderFrameID = gEnv->pRenderer->GetFrameID();
  m_nRenderMainFrameID = gEnv->pRenderer->GetFrameID(false);
}
  
SRenderingPassInfo(threadID id)
{
  SRenderingPassInfo(); // <=
  SetThreadID(id);
}

In this code, incorrect use of constructor was detected. The programmer probably assumed that calling a constructor in a way like that - without parameters - inside another constructor would initialize the class fields, but this assumption was wrong.


Instead, a new unnamed object of type SRenderingPassInfo will be created and immediately destroyed. The class fields, therefore, will remain uninitialized. One way to fix this error is to create a separate initialization function and call it from different constructors.


V688 The 'm_cNewGeomMML' local variable possesses the same name as one of the class members, which can result in a confusion. terrain_node.cpp 344


void CTerrainNode::Init(....)
{
  ....
  m_nOriginX = m_nOriginY = 0; // sector origin
  m_nLastTimeUsed = 0;         // basically last time rendered

  uint8 m_cNewGeomMML = m_cCurrGeomMML = m_cNewGeomMML_Min ....

  m_pLeafData = 0;

  m_nTreeLevel = 0;
  ....
}

The name of the local variable cNewGeomMML coincides with that of a class field. It's usually not an error, but in this particular case it does look strange in comparison to how the other class fields are initialized.


V575 The 'memset' function processes '0' elements. Inspect the third argument. crythreadutil_win32.h 294

void EnableFloatExceptions(....)
{
  ....
  CONTEXT ctx;
  memset(&ctx, sizeof(ctx), 0);  // <=
  ....
}

This error is a very interesting one. When calling the memset() function, two arguments were swapped by mistake, which resulted in calling the function to fill 0 bytes. This is the function prototype:

void * memset ( void * ptr, int value, size_t num );

The function expects to receive the buffer size as the third argument and the value the buffer is to be filled with as the second.


The fixed version:


void EnableFloatExceptions(....)
{
  ....
  CONTEXT ctx;
  memset(&ctx, 0, sizeof(ctx));
  ....
}

V630 The '_alloca' function is used to allocate memory for an array of objects which are classes containing constructors. command_buffer.cpp 62

void CBuffer::Execute()
{
  ....
  QuatT * pJointsTemp = static_cast<QuatT*>(
    alloca(m_state.m_jointCount * sizeof(QuatT)));
  ....
}

In some parts of the project's code, the alloca() function is used to allocate memory for an array of objects. In the example above, with memory allocated in such a way, neither the constructor, nor the destructor will be called for objects of class QuatT. This defect may result in handling uninitialized variables, and other errors.


Here's a complete list of other defects of this type:


  • V630 The '_alloca' function is used to allocate memory for an array of objects which are classes containing constructors. command_buffer.cpp 67
  • V630 The '_alloca' function is used to allocate memory for an array of objects which are classes containing constructors. posematching.cpp 144
  • V630 The '_alloca' function is used to allocate memory for an array of objects which are classes containing constructors. characterinstance.cpp 280
  • V630 The '_alloca' function is used to allocate memory for an array of objects which are classes containing constructors. characterinstance.cpp 282
  • V630 The '_alloca' function is used to allocate memory for an array of objects which are classes containing constructors. scriptbind_entity.cpp 6252
  • V630 The '_alloca' function is used to allocate memory for an array of objects which are classes containing constructors. jobmanager.cpp 1016
  • V630 The '_alloca' function is used to allocate memory for an array of objects which are classes containing constructors. driverd3d.cpp 5859

V583 The '?:' operator, regardless of its conditional expression, always returns one and the same value: -1.8f. posealignerc3.cpp 330


ILINE bool InitializePoseAlignerPinger(....)
{
  ....
  chainDesc.offsetMin = Vec3(0.0f, 0.0f, bIsMP ? -1.8f : -1.8f);
  chainDesc.offsetMax = Vec3(0.0f, 0.0f, bIsMP ? +0.75f : +1.f);
  ....
}

A few fragments were found where the ternary operator ?: returns one and the same value. While in the previous example it could have been done for aesthetic reasons, the reason for doing so in the following fragment is unclear.

float predictDelta = inputSpeed &lt; 0.0f ? 0.1f : 0.1f; // &lt;=
float dict = angle + predictDelta * ( angle - m_prevAngle) / dt ;

A complete list of other defects of this type:

  • V583 The '?:' operator, regardless of its conditional expression, always returns one and the same value: -1.8f. posealignerc3.cpp 313
  • V583 The '?:' operator, regardless of its conditional expression, always returns one and the same value: -2.f. posealignerc3.cpp 347
  • V583 The '?:' operator, regardless of its conditional expression, always returns one and the same value: D3D11_RTV_DIMENSION_TEXTURE2DARRAY. d3dtexture.cpp 2277
  • V583 The '?:' operator, regardless of its conditional expression, always returns one and the same value: 255U. renderer.cpp 3389
  • V583 The '?:' operator, regardless of its conditional expression, always returns one and the same value: D3D12_RESOURCE_STATE_GENERIC_READ. dx12device.cpp 151
  • V583 The '?:' operator, regardless of its conditional expression, always returns one and the same value: 0.1f. vehiclemovementstdboat.cpp 720

V570 The 'runtimeData.entityId' variable is assigned to itself. behaviortreenodes_ai.cpp 1771


void ExecuteEnterScript(RuntimeData&amp; runtimeData)
{
  ExecuteScript(m_enterScriptFunction, runtimeData.entityId);

  runtimeData.entityId = runtimeData.entityId; // <=
  runtimeData.executeExitScriptIfDestructed = true;
}

A variable is assigned to itself, which doesn't look right. The authors should check this code.


Operation precedence

image6.png


V502 Perhaps the '?:' operator works in a different way than it was expected. The '?:' operator has a lower priority than the '+' operator. gpuparticlefeaturespawn.cpp 79

bool HasDuration() { return m_useDuration; }

void CFeatureSpawnRate::SpawnParticles(....)
{
  ....
  SSpawnData& spawn = pRuntime->GetSpawnData(i);
  const float amount = spawn.amount;
  const int spawnedBefore = int(spawn.spawned);
  const float endTime = spawn.delay +
                        HasDuration() ? spawn.duration : fHUGE;
  ....
}

The function above seems to measure time in a wrong way. The precedence of the addition operator is higher than that of the ternary operator :?, so the value 0 or 1 is added to spawn.delay first, and then the value spawn.duration or fHUGE is written into the endTime variable. This error is quite a common one. To learn more about interesting patterns of errors involving operation precedence collected from the PVS-Studio bug database, see my article: Logical Expressions in C/C++. Mistakes Made by Professionals.


V634 The priority of the '*' operation is higher than that of the '<' operation. It's possible that parentheses should be used in the expression. model.cpp 336

enum joint_flags
{
  angle0_locked = 1,
  ....
};

bool CDefaultSkeleton::SetupPhysicalProxies(....)
{
  ....
  for (int j = 0; .... ; j++)
  {
    // lock axes with 0 limits range
    m_arrModelJoints[i]....flags |= (....) * angle0_locked << j;
  }
  ....
}

This is another very interesting error that has to do with the precedence of the multiplication and bitwise shift operations. The latter has lower precedence, so the whole expression is multiplied by one at each iteration (as the angle0_locked constant has the value one), which looks very strange.


This is what the programmer must have wanted that code to look like:

m_arrModelJoints[i]....flags |= (....) * (angle0_locked &lt;&lt; j);

The following file contains a list of 35 suspicious fragments involving precedence of shift operations: CryEngine5_V634.txt.


Undefined behavior

Undefined behavior is the result of executing computer code written in a certain programming language that depends on a number of random factors such as memory state or triggered interrupts. In other words, this result is not prescribed by the language specification. It is considered to be an error to let such a situation occur in your program. Even if it can successfully execute on some compiler, it is not guaranteed to be cross-platform and may fail on another machine, operating system, and even other settings of the same compiler.


image7.png


V610 Undefined behavior. Check the shift operator '<'. The left operand '-1' is negative. physicalplaceholder.h 25

#ifndef physicalplaceholder_h
#define physicalplaceholder_h
#pragma once
....
const int NO_GRID_REG = -1<<14;
const int GRID_REG_PENDING = NO_GRID_REG+1;
....

Under the modern C++ standard, a left shift of a negative value is undefined behavior. The analyzer found a few more similar issues in CryEngine V's code:

  • V610 Undefined behavior. Check the shift operator '<'. The left operand '~(TFragSeqStorage(0))' is negative. udpdatagramsocket.cpp 757
  • V610 Undefined behavior. Check the shift operator '<'. The left operand '-1' is negative. tetrlattice.cpp 324
  • V610 Undefined behavior. Check the shift operator '<'. The left operand '-1' is negative. tetrlattice.cpp 350
  • V610 Undefined behavior. Check the shift operator '<'. The left operand '-1' is negative. tetrlattice.cpp 617
  • V610 Undefined behavior. Check the shift operator '<'. The left operand '-1' is negative. tetrlattice.cpp 622
  • V610 Undefined behavior. Check the shift operator '<'. The left operand '(~(0xF))' is negative. d3ddeferredrender.cpp 876
  • V610 Undefined behavior. Check the shift operator '<'. The left operand '(~(0xF))' is negative. d3ddeferredshading.cpp 791
  • V610 Undefined behavior. Check the shift operator '<'. The left operand '(~(1 < 0))' is negative. d3dsprites.cpp 1038

V567 Undefined behavior. The 'm_current' variable is modified while being used twice between sequence points. operatorqueue.cpp 105

bool COperatorQueue::Prepare(....)
{
  ++m_current &= 1;
  m_ops[m_current].clear();
  return true;
}

The analyzer detected an expression that causes undefined behavior. A variable is used multiple times between two sequence points, while its value changes. The result of executing such an expression, therefore, can't be determined.


Other similar issues:

  • V567 Undefined behavior. The 'itail' variable is modified while being used twice between sequence points. trimesh.cpp 3101
  • V567 Undefined behavior. The 'ihead' variable is modified while being used twice between sequence points. trimesh.cpp 3108
  • V567 Undefined behavior. The 'ivtx' variable is modified while being used twice between sequence points. boolean3d.cpp 1194
  • V567 Undefined behavior. The 'ivtx' variable is modified while being used twice between sequence points. boolean3d.cpp 1202
  • V567 Undefined behavior. The 'ivtx' variable is modified while being used twice between sequence points. boolean3d.cpp 1220
  • V567 Undefined behavior. The 'm_commandBufferIndex' variable is modified while being used twice between sequence points. xconsole.cpp 180
  • V567 Undefined behavior. The 'm_FrameFenceCursor' variable is modified while being used twice between sequence points. ccrydx12devicecontext.cpp 952
  • V567 Undefined behavior. The 'm_iNextAnimIndex' variable is modified while being used twice between sequence points. hitdeathreactionsdefs.cpp 192

Errors in conditions

image8.png


V579 The memcmp function receives the pointer and its size as arguments. It is possibly a mistake. Inspect the third argument. graphicspipelinestateset.h 58

bool
operator==(const SComputePipelineStateDescription& other) const
{
  return 0 == memcmp(this, &other, sizeof(this)); // <=
}

The programmer made a mistake in the equality operation in the call to the memcmp() function, which leads to passing the pointer size instead of the object size as a function argument. As a result, only the first several bytes of the objects are compared.


The fixed version:

memcmp(this, &amp;other, sizeof(*this));

Unfortunately, three more similar issues were found in the project:

  • V579 The memcpy function receives the pointer and its size as arguments. It is possibly a mistake. Inspect the third argument. geomcacherendernode.cpp 286
  • V579 The AddObject function receives the pointer and its size as arguments. It is possibly a mistake. Inspect the second argument. clipvolumemanager.cpp 145
  • V579 The memcmp function receives the pointer and its size as arguments. It is possibly a mistake. Inspect the third argument. graphicspipelinestateset.h 34

V640 The code's operational logic does not correspond with its formatting. The second statement will always be executed. It is possible that curly brackets are missing. livingentity.cpp 181

CLivingEntity::~CLivingEntity()
{
  for(int i=0;i<m_nParts;i++) {
    if (!m_parts[i].pPhysGeom || ....)
      delete[] m_parts[i].pMatMapping; m_parts[i].pMatMapping=0;
  }
  ....
}

I spotted a huge number of code blocks with statements written in one line. These include not only ordinary assignments, but rather loops, conditions, function calls, and sometimes a mixture of all of these (see Figure 3).


image9.png


Figure 3 - Poor code formatting


In code of size like that, this programming style almost inevitably leads to errors. In the example above, the memory block occupied by an array of objects was to be freed and the pointer was to be cleared when a certain condition was met. However, incorrect code formatting causes the m_parts[i].pMatMapping pointer to be cleared at every loop iteration. The implications of this problem can't be predicted, but the code does look strange.


Other fragments with strange formatting:

  • V640 The code's operational logic does not correspond with its formatting. The second statement will always be executed. It is possible that curly brackets are missing. physicalworld.cpp 2449
  • V640 The code's operational logic does not correspond with its formatting. The second statement will always be executed. It is possible that curly brackets are missing. articulatedentity.cpp 1723
  • V640 The code's operational logic does not correspond with its formatting. The second statement will always be executed. It is possible that curly brackets are missing. articulatedentity.cpp 1726

V695 Range intersections are possible within conditional expressions. Example: if (A < 5) { ... } else if (A < 2) { ... }. Check lines: 538, 540. statobjrend.cpp 540


bool CStatObj::RenderDebugInfo(....)
{
  ....
  ColorB clr(0, 0, 0, 0);
  if (nRenderMats == 1)
    clr = ColorB(0, 0, 255, 255);
  else if (nRenderMats == 2)
    clr = ColorB(0, 255, 255, 255);
  else if (nRenderMats == 3)
    clr = ColorB(0, 255, 0, 255);
  else if (nRenderMats == 4)
    clr = ColorB(255, 0, 255, 255);
  else if (nRenderMats == 5)
    clr = ColorB(255, 255, 0, 255);
  else if (nRenderMats >= 6)          // <=
    clr = ColorB(255, 0, 0, 255);
  else if (nRenderMats >= 11)         // <=
    clr = ColorB(255, 255, 255, 255);
  ....
}

The programmer made a mistake that prevents the color ColorB(255, 255, 255, 255) from ever being selected. The values nRenderMats are first compared one by one with the numbers from 1 to 5, but when comparing them with value ranges, the programmer didn't take into account that values larger than 11 already belong to the range of values larger than 6, so the last condition will never execute.


This cascade of conditions was copied in full into one more fragment:

  • V695 Range intersections are possible within conditional expressions. Example: if (A < 5) { ... } else if (A < 2) { ... }. Check lines: 338, 340. modelmesh_debugpc.cpp 340

V695 Range intersections are possible within conditional expressions. Example: if (A < 5) { ... } else if (A < 2) { ... }. Check lines: 393, 399. xmlcpb_nodelivewriter.cpp 399

enum eNodeConstants
{
  ....
  CHILDBLOCKS_MAX_DIST_FOR_8BITS = BIT(7) - 1,    // 127
  CHILDBLOCKS_MAX_DIST_FOR_16BITS   = BIT(6) - 1, // 63
  ....
};

void CNodeLiveWriter::Compact()
{
  ....
  if (dist <= CHILDBLOCKS_MAX_DIST_FOR_8BITS) // dist <= 127
  {
    uint8 byteDist = dist;
    writeBuffer.AddData(&byteDist, sizeof(byteDist));
    isChildBlockSaved = true;
  }
  else if (dist <= CHILDBLOCKS_MAX_DIST_FOR_16BITS) // dist <= 63
  {
    uint8 byteHigh = CHILDBLOCKS_USING_MORE_THAN_8BITS | ....);
    uint8 byteLow = dist & 255;
    writeBuffer.AddData(&byteHigh, sizeof(byteHigh));
    writeBuffer.AddData(&byteLow, sizeof(byteLow));
    isChildBlockSaved = true;
  }
  ....
}

A similar mistake inside a condition was also found in the fragment above, except that this time the code that fails to get control is larger. The values of the constants CHILDBLOCKS_MAX_DIST_FOR_8BITS and CHILDBLOCKS_MAX_DIST_FOR_16BITS are such that the second condition will never be true.


V547 Expression 'pszScript[iSrcBufPos] != '=='' is always true. The value range of char type: [-128, 127]. luadbg.cpp 716

bool CLUADbg::LoadFile(const char* pszFile, bool bForceReload)
{
  FILE* hFile = NULL;
  char* pszScript = NULL, * pszFormattedScript = NULL;
  ....
  while (pszScript[iSrcBufPos] != ' ' &&
    ....
    pszScript[iSrcBufPos] != '=' &&
    pszScript[iSrcBufPos] != '==' &&  // <=
    pszScript[iSrcBufPos] != '*' &&
    pszScript[iSrcBufPos] != '+' &&
    pszScript[iSrcBufPos] != '/' &&
    pszScript[iSrcBufPos] != '~' &&
    pszScript[iSrcBufPos] != '"')
  {}
  ....
}

A large conditional expression contains a subexpression that is always true. The '==' literal will have type int and correspond to the value 15677. The pszScript array consists of elements of type char, and a value of type char can't be equal to 15677, so the pszScript[iSrcBufPos] != '==' expression is always true.


V734 An excessive expression. Examine the substrings "_ddn" and "_ddna". texture.cpp 4212

void CTexture::PrepareLowResSystemCopy(byte* pTexData, ....)
{
  ....
  // make sure we skip non diffuse textures
  if (strstr(GetName(), "_ddn")              // <=
      || strstr(GetName(), "_ddna")          // <=
      || strstr(GetName(), "_mask")
      || strstr(GetName(), "_spec.")
      || strstr(GetName(), "_gloss")
      || strstr(GetName(), "_displ")
      || strstr(GetName(), "characters")
      || strstr(GetName(), "$")
      )
    return;
  ....
}

The strstr() function looks for the first occurrence of the specified substring within another string and returns either a pointer to the first occurrence or an empty pointer. The string "_ddn" is the first to be searched, and "_ddna" is the second, which means that the condition will be true if the shorter string is found. This code might not work as expected; or perhaps this expression is redundant and could be simplified by removing the extra check.


V590 Consider inspecting this expression. The expression is excessive or contains a misprint. goalop_crysis2.cpp 3779

void COPCrysis2FlightFireWeapons::ParseParam(....)
{
  ....
  else if (!paused &&
          (m_State == eFP_PAUSED) &&        // <=
          (m_State != eFP_PAUSED_OVERRIDE)) // <=
  ....
}

The conditional expression in the ParseParam() function is written in such a way that its result does not depend on the (m_State != eFP_PAUSED_OVERRIDE) subexpression.


Here's a simpler example:

if ( err == code1 &amp;&amp; err != code2)
{
  ....
}

The result of the whole conditional expression does not depend on the result of the (err != code2) subexpression, which can be clearly seen from the truth table for this example (see Figure 4)


image10.png


Figure 4 - Truth table for a logical expression


Comparing unsigned values with zero

image11.png


When scanning projects, we often come across comparisons of unsigned values with zero, which produce either true or false every time. Such code does not always contain a critical bug; it is often a result of too much caution or changing a variable's type from signed to unsigned. Anyway, such comparisons need to be checked.


V547 Expression 'm_socket < 0' is always false. Unsigned type value is never < 0. servicenetwork.cpp 585

typedef SOCKET CRYSOCKET;
// Internal socket data
CRYSOCKET m_socket;

bool CServiceNetworkConnection::TryReconnect()
{
  ....
  // Create new socket if needed
  if (m_socket == 0)
  {
    m_socket = CrySock::socketinet();
    if (m_socket < 0)
    {
      ....
      return false;
    }
  }
  ....
}

I'd like to elaborate on the SOCKET type. It can be both signed and unsigned depending on the platforms, so it is strongly recommended that you use special macros and constants specified in the standard headers when working with this type.


In cross-platform projects, comparisons with 0 or -1 are common that result in misinterpretation of error codes. CryEngine V project is no exception, although some checks are done correctly, for example:

if (m_socket == CRY_INVALID_SOCKET)

Nevertheless, many parts of the code use different versions of these checks.


See the file CryEngine5_V547.txt for other 47 suspicious comparisons of unsigned variables with zero. The code authors need to check these warnings.


Dangerous pointers

image12.png


Diagnostic V595 detects pointers that are tested for null after they have been dereferenced. In practice, this diagnostic catches very tough bugs. On rare occasions, it issues false positives, which is explained by the fact that pointers are checked indirectly, i.e. through one or several other variables, but figuring such code out isn't an easy task for a human either, is it? Three code samples are given below that trigger this diagnostic and look especially surprising, as it's not clear why they work at all. For the other warnings of this type see the file CryEngine5_V595.txt.

<h4>Example 1</h4>

V595 The 'm_pPartManager' pointer was utilized before it was verified against nullptr. Check lines: 1441, 1442. 3denginerender.cpp 1441

void C3DEngine::RenderInternal(....)
{
  ....
  m_pPartManager->GetLightProfileCounts().ResetFrameTicks();
  if (passInfo.IsGeneralPass() && m_pPartManager)
    m_pPartManager->Update();
  ....
}

The m_pPartManager pointer is dereferenced and then checked.


<h4>Example 2</h4>

V595 The 'gEnv->p3DEngine' pointer was utilized before it was verified against nullptr. Check lines: 1477, 1480. gameserialize.cpp 1477

bool CGameSerialize::LoadLevel(....)
{
  ....
  // can quick-load
  if (!gEnv->p3DEngine->RestoreTerrainFromDisk())
    return false;

  if (gEnv->p3DEngine)
  {
    gEnv->p3DEngine->ResetPostEffects();
  }
  ....
}

The gEnv->p3DEngine pointer is dereferenced and then checked.


<h4>Example 3</h4>

V595 The 'pSpline' pointer was utilized before it was verified against nullptr. Check lines: 158, 161. facechannelkeycleanup.cpp 158

void FaceChannel::CleanupKeys(....)
{

  CFacialAnimChannelInterpolator backupSpline(*pSpline);

  // Create the key entries array.
  int numKeys = (pSpline ? pSpline->num_keys() : 0);
  ....
}

The pSpline pointer is dereferenced and then checked.


Miscellaneous

image13.png


V622 Consider inspecting the 'switch' statement. It's possible that the first 'case' operator is missing. mergedmeshrendernode.cpp 999

static inline void ExtractSphereSet(....)
{
  ....
  switch (statusPos.pGeom->GetType())
  {
    if (false)
    {
    case GEOM_CAPSULE:
      statusPos.pGeom->GetPrimitive(0, &cylinder);
    }
    if (false)
    {
    case GEOM_CYLINDER:
      statusPos.pGeom->GetPrimitive(0, &cylinder);
    }
    for (int i = 0; i < 2 && ....; ++i)
    {
      ....
    }
    break;
  ....
}

This fragment is probably the strangest of all found in CryEngine V. Whether or not the case label will be selected does not depend on the if statement, even in case of if (false). In the switch statement, an unconditional jump to the label occurs if the condition of the switch statement is met. Without the break statement, one could use such code to "bypass" irrelevant statements, but, again, maintaining such obscure code isn't easy. One more question is, why does the same code execute when jumping to the labels GEOM_CAPSULE and GEOM_CYLINDER?


V510 The 'LogError' function is not expected to receive class-type variable as second actual argument. behaviortreenodes_action.cpp 143

typedef CryStringT&lt;char&gt; string;
// The actual fragment name.
string m_fragName;
//! cast to C string.
const value_type* c_str() const { return m_str; }
const value_type* data() const  { return m_str; };
  
void LogError(const char* format, ...) const
{ .... }
  
void QueueAction(const UpdateContext& context)
{
  ....
  ErrorReporter(*this, context).LogError("....'%s'", m_fragName);
  ....
}

When it is impossible to specify the number and types of all acceptable parameters to a function, one puts ellipsis (...) at the end of the list of parameters in the function declaration, which means "and perhaps a few more". Only POD (Plain Old Data) types can be used as actual parameters to the ellipsis. If an object of a class is passed as an argument to a function's ellipsis, it almost always signals the presence of a bug. In the code above, it is the contents of the object that get to the stack, not the pointer to a string. Such code results in forming "gibberish" in the buffer or a crash. The code of CryEngine V uses a string class of its own, and it already has an appropriate method, c_str().


The fixed version:

LogError("....'%s'", m_fragName.c_str();

A few more suspicious fragments:


  • V510 The 'LogError' function is not expected to receive class-type variable as second actual argument. behaviortreenodes_core.cpp 1339
  • V510 The 'Format' function is not expected to receive class-type variable as second actual argument. behaviortreenodes_core.cpp 2648
  • V510 The 'CryWarning' function is not expected to receive class-type variable as sixth actual argument. crypak.cpp 3324
  • V510 The 'CryWarning' function is not expected to receive class-type variable as fifth actual argument. crypak.cpp 3333
  • V510 The 'CryWarning' function is not expected to receive class-type variable as fifth actual argument. shaderfxparsebin.cpp 4864
  • V510 The 'CryWarning' function is not expected to receive class-type variable as fifth actual argument. shaderfxparsebin.cpp 4931
  • V510 The 'Format' function is not expected to receive class-type variable as third actual argument. featuretester.cpp 1727

V529 Odd semicolon ';' after 'for' operator. boolean3d.cpp 1314

int CTriMesh::Slice(....)
{
  ....
  bop_meshupdate *pmd = new bop_meshupdate, *pmd0;
  pmd->pMesh[0]=pmd->pMesh[1] = this;  AddRef();AddRef();
  for(pmd0=m_pMeshUpdate; pmd0->next; pmd0=pmd0->next); // <=
    pmd0->next = pmd;
  ....
}

This code is very strange. The programmer put a semicolon after the for loop, while the code formatting suggests that it should have a body.

V535 The variable 'j' is being used for this loop and for the outer loop. Check lines: 3447, 3490. physicalworld.cpp 3490

void CPhysicalWorld::SimulateExplosion(....)
{
  ....
  for(j=0;j<pmd->nIslands;j++)                 // <= line 3447
  {
    ....
    for(j=0;j<pcontacts[ncont].nborderpt;j++)  // <= line 3490
    {
  ....
}

The project's code is full of other unsafe fragments; for example, there are cases of using one counter for both nested and outer loops. Large source files contain code with intricate formatting and fragments where the same variables are changed in different parts of the code - you just can't do without static analysis there!


A few more strange loops:

  • V535 The variable 'i' is being used for this loop and for the outer loop. Check lines: 1630, 1683. entity.cpp 1683
  • V535 The variable 'i1' is being used for this loop and for the outer loop. Check lines: 1521, 1576. softentity.cpp 1576
  • V535 The variable 'i' is being used for this loop and for the outer loop. Check lines: 2315, 2316. physicalentity.cpp 2316
  • V535 The variable 'i' is being used for this loop and for the outer loop. Check lines: 1288, 1303. shadercache.cpp 1303

V539 Consider inspecting iterators which are being passed as arguments to function 'erase'. frameprofilerender.cpp 1090


float CFrameProfileSystem::RenderPeaks()
{
  ....
  std::vector<SPeakRecord>& rPeaks = m_peaks;
  
  // Go through all peaks.
  for (int i = 0; i < (int)rPeaks.size(); i++)
  {
    ....
    if (age > fHotToColdTime)
    {
      rPeaks.erase(m_peaks.begin() + i); // <=
      i--;
    }
  ....
}

The analyzer suspected that the function handling a container would receive an iterator from another container. It's a wrong assumption, and there is no error here: the rPeaks variable is a reference to m_peaks. This code, however, may confuse not only the analyzer, but also other programmers who will maintain it. One shouldn't write code in a way like that.


V713 The pointer pCollision was utilized in the logical expression before it was verified against nullptr in the same logical expression. actiongame.cpp 4235


int CActionGame::OnCollisionImmediate(const EventPhys* pEvent)
{
  ....
  else if (pMat->GetBreakability() == 2 &&
   pCollision->idmat[0] != pCollision->idmat[1] &&
   (energy = pMat->GetBreakEnergy()) > 0 &&
   pCollision->mass[0] * 2 > energy &&
   ....
   pMat->GetHitpoints() <= FtoI(min(1E6f, hitenergy / energy)) &&
   pCollision) // <=
    return 0;
  ....
}

The if statement includes a rather lengthy conditional expression where the pCollision pointer is used multiple times. What is wrong about this code is that the pointer is tested for null at the very end, i.e. after multiple dereference operations.


V758 The 'commandList' reference becomes invalid when smart pointer returned by a function is destroyed. renderitemdrawer.cpp 274

typedef std::shared_ptr&lt;....&gt; CDeviceGraphicsCommandListPtr;

CDeviceGraphicsCommandListPtr
CDeviceObjectFactory::GetCoreGraphicsCommandList() const
{
  return m_pCoreCommandList;
}

void CRenderItemDrawer::DrawCompiledRenderItems(....) const
{
  ....
  {
    auto& RESTRICT_REFERENCE commandList = *CCryDeviceWrapper::
      GetObjectFactory().GetCoreGraphicsCommandList();

    passContext....->PrepareRenderPassForUse(commandList);
  }
  ....
}

The commandList variable receives a reference to the value stored in a smart pointer. When this pointer destroys the object, the reference will become invalid.


A few more issues of this type:

  • V758 The 'commandList' reference becomes invalid when smart pointer returned by a function is destroyed. renderitemdrawer.cpp 384
  • V758 The 'commandList' reference becomes invalid when smart pointer returned by a function is destroyed. renderitemdrawer.cpp 368
  • V758 The 'commandList' reference becomes invalid when smart pointer returned by a function is destroyed. renderitemdrawer.cpp 485
  • V758 The 'commandList' reference becomes invalid when smart pointer returned by a function is destroyed. renderitemdrawer.cpp 553

Conclusion


It costs almost nothing to fix bugs caught during the coding phase unlike those that get to the testers, while fixing bugs that have made it to the end users involves huge expenses. No matter what analyzer you use, the static analysis technology itself has long proved to be an extremely effective and efficient means to control the quality of program code and software products in general.


Our collaboration with Epic Games has shown very well how integration of our analyzer into Unreal Engine 4 has benefited the project. We helped the developers in every aspect of analyzer integration and even fixed the bugs found in the project so that the developer team could continue scanning new code regularly on their own. We've shown that similar collaboration can be achieved with Crytek.


Try PVS-Studio on your own C/C++/C# project!

Pupping - a method for serializing data

$
0
0

Introduction

Serialization is the process of taking structures and objects along with their states and converting them to data that is reproducable with any computer environment. There are many ways to do this - it can be a struggle to figure out something that consistantly works. Here I will talk about a pattern or method I like to call pupping, and it is very similar to the method boost uses for its serialization library.


Packing and Unpacking


Pup stands for pack-unpack, and so pupping is packing/unpacking. The ideas is this; rather than create serialize/de-serialize functions for each object type and/or each type of medium (file, network, GUI widgets), create pupper objects for each type of medium bundled with a set of read/write functions for each fundamental data type. A pupper object contains the data and functions necessary to handle reading/writing to/from the specific medium. For example, a binary file pupper might contain a file stream that each pup function would use to read/write from/to.


Explanation


This pattern is fairly similar boost serialization, though I was using it before hearing of boost. It is useful in any case to understand it and possibly use a custom implementation so that no boost dependency is needed. The "pupper" is somewhat equivalent to the boost archive, and pup functions are equivalent to boost serialize functions. The code presented here is more simple than boost, and does not overload operators as boost does. It is as non-invasive as possible, and not template heavy.

The idea is that any object, no matter how complex, can be serialized to a stream of bytes by recursively breaking down the object until reaching fundamental data types. Any fundamental data type can be directly represented by bytes. The process of saving/loading/transmitting the raw data is separable from serializing objects. It is only necessary, then, to write the code to serialize an object once and anything can be done with the raw data.

The pupper pattern differs from most serialization methods in a few ways:

1) Read and write operations are not separated except at the lowest level (in the pupper object)

2) Objects that need to be serialized do not need to inherit from any special classes

3) Can be implemented with very small overhead, using no external libraries, while remaining extendable and flexible

4) Writing class methods, virtual or otherwise, is largely not necessary

If polymorphic serialization is required, a virtual method is needed in base classes. CRTP can be used to aid in this process. This case is covered later.

Instead of creating a class method in each object to provide for serialization, a global function is created for each object. All global functions should have the same name and parameters, except the parameter for the object that should be serialized. Making any object “serializable” is then just a matter of writing a global function. These functions can be named whatever as long as they all have the same name, but I find “pup” fitting. Some examples of pup prototypes for stl containers are shown below.


template<class T, class T2>
pup(pupper * p, std::map<T,T2> & map, const var_info & info);

template<class T >
pup(pupper * p, std::vector<T> & vec, const var_info & info);

template<class T >
pup(pupper * p, std::set<T> & set, const var_info & info);

The pupper pointer and var_info reference parameters will be explained later. The important thing is that the serialization work is done in a global function, not a member function.

The pup pattern is easiest shown by example. In this article pupper objects for binary and text file saving/loading are coded, and a few example objects are saved/loaded using them. An example is given using the pupper pattern along with CRTP to serialize polymorphic objects. Also, a std::vector of polymorphic base objects is saved/loaded illustrating the flexibility this pattern allows when using other library defined types (std::vector).

So without further ado, take a look at the pupper header file.


#define PUP_OUT 1
#define PUP_IN 2

#include <string>
#include <fstream>
#include <inttypes.h>

struct var_info
{
	var_info(const std::string & name_):
    name(name_)
	{}

	virtual ~var_info() {}

	std::string name;
};

struct pupper
{
    pupper(int32_t io_):
    io(io_)
    {}

	virtual ~pupper() {}

	virtual void pup(char & val_, const var_info & info_) = 0;
	virtual void pup(wchar_t & val_, const var_info & info_) = 0;
	virtual void pup(int8_t & val_, const var_info & info_) = 0;
	virtual void pup(int16_t & val_, const var_info & info_) = 0;
	virtual void pup(int32_t & val_, const var_info & info_) = 0;
	virtual void pup(int64_t & val_, const var_info & info_) = 0;
	virtual void pup(uint8_t & val_, const var_info & info_) = 0;
	virtual void pup(uint16_t & val_, const var_info & info_) = 0;
	virtual void pup(uint32_t & val_, const var_info & info_) = 0;
	virtual void pup(uint64_t & val_, const var_info & info_) = 0;
	virtual void pup(float & val_, const var_info & info_) = 0;
	virtual void pup(double & val_, const var_info & info_) = 0;
	virtual void pup(long double & val_, const var_info & info_) = 0;
	virtual void pup(bool & val_, const var_info & info_) = 0;

	int32_t io;
};

void pup(pupper * p, char & val_, const var_info & info_);
void pup(pupper * p, wchar_t & val_, const var_info & info_);
void pup(pupper * p, int8_t & val_, const var_info & info_);
void pup(pupper * p, int16_t & val_, const var_info & info_);
void pup(pupper * p, int32_t & val_, const var_info & info_);
void pup(pupper * p, int64_t & val_, const var_info & info_);
void pup(pupper * p, uint8_t & val_, const var_info & info_);
void pup(pupper * p, uint16_t & val_, const var_info & info_);
void pup(pupper * p, uint32_t & val_, const var_info & info_);
void pup(pupper * p, uint64_t & val_, const var_info & info_);
void pup(pupper * p, float & val_, const var_info & info_);
void pup(pupper * p, double & val_, const var_info & info_);
void pup(pupper * p, long double & val_, const var_info & info_);
void pup(pupper * p, bool & val_, const var_info & info_);

A var_info struct is declared first which simply has a name field for now – this is where information about the pupped variable belongs. It is filled out during the pupping process, and so a constructor requiring field information is made so that it isn’t later forgotten.

The pupper base class defines the set of methods that any type of pupper must implement – a method to handle reading/writing each fundamental data type from/to the medium. A set of global functions named “pup” are declared and defined, establishing the fundamental usage of the pupping pattern. The idea is to be able to call pup(pupper, object, description) almost anywhere in code in order to serialize/de-serialize any object (that should be serializable).

Creating a new pupper object type includes implementing a pup method for each fundamental data type. These methods are then used by the pup global functions, which in turn are used by pup functions for more complicated types. No matter how many new pupper types are created, the pup functions to serialize each object need only be written once. This is exactly what makes this pattern useful.

To make all objects serializable to file in binary, create a binary file pupper. To make all objects serializable to file in text, create a text file pupper. To make all objects serializable to a Qt dialog, create a Qt dialog pupper.

Some types of pupper objects may require additional information about the variables. For example, there are multiple ways a double can be represented in a GUI – a vertical slider, horizontal slider, spin box, etc. The var_info struct allows new information about variables to be added. Any pupper object that does not need that information can just ignore it. With the Qt example, a flag could be added to the var_info struct and used by the Qt pupper object. The objects that need to be shown in a GUI would then need to set the flag, and all pupper objects that don’t have use for the flag ignore it.

By making the destructor of var_info virtual, the var_info struct can be extended. This is useful, again, if creating a library that others will be using. It allows the user to create their own pupper object types and add any necessary data to var_info without needing to edit the library source code.

There are a few reasons for using pup(pupper, object, description) instead of pupper->pup(object, description) or object->pup(pupper, description).

The reasons for not using pupper->pup(object, description) are:

1) The base pupper class would have to be extended for every new type of object. If creating a library with extendable classes, the user of the library would have to edit the base pupper class for every class they extended in which the library is still responsible for serializing

2) The pack/unpack code would be separated from the object making it prone to bugs when changes are made to the object

And the reasons for not using object->pup(pupper, description) are:

1) You cannot easily extend third party library objects (such as std::vector) to include a pup function – they would require a special function or wrapper class

2) Since many objects would not include a “pup” function, there would be inconsistencies with the pup usage. This is purely an aesthetics/convenience argument, and is of course an opinion. But I would argue that writing:


pup(pupper,obj1,desc1);
pup(pupper,obj2,desc2);
pup(pupper,obj3,desc3);
pup(pupper,obj4,desc4);
//etc...

is both easier to understand and remember than:


obj1->pup(pupper,desc1);
pup(pupper,obj2,desc2);
obj3->pup(pupper,desc3);
pup(pupper,obj4,desc4);
//etc...

If the same pup function format is used for everything, writing pup functions becomes trivial because they are just combinations of other pup functions of the same format.

Creating concrete pupper objects can be easy - binary and text file pupper objects are included as an example. The definition code for them is boring so it won’t be shown here - but the declarations are below.


//binary_file_pupper header
#include "pupper.h"

struct binary_file_pupper : public pupper
{
    binary_file_pupper(std::fstream & fstrm, int mode);
    std::fstream & fs;
    void pup(char & val_, const var_info & info_);
	void pup(wchar_t & val_, const var_info & info_);
	void pup(int8_t & val_, const var_info & info_);
	void pup(int16_t & val_, const var_info & info_);
	void pup(int32_t & val_, const var_info & info_);
    void pup(int64_t & val_, const var_info & info_);
	void pup(uint8_t & val_, const var_info & info_);
	void pup(uint16_t & val_, const var_info & info_);
	void pup(uint32_t & val_, const var_info & info_);
	void pup(uint64_t & val_, const var_info & info_);
	void pup(float & val_, const var_info & info_);
	void pup(double & val_, const var_info & info_);
	void pup(long double & val_, const var_info & info_);
	void pup(bool & val_, const var_info & info_);
};

template <class T>
void pup_bytes(binary_file_pupper * p, T & val_)
{
    if (p->io == PUP_IN)
        p->fs.read((char*)&val_, sizeof(T));
    else
        p->fs.write((char*)&val_, sizeof(T));
}

//text_file_pupper header
#include "pupper.h"

struct text_file_pupper : public pupper
{
    text_file_pupper(std::fstream & fstrm, int mode);
    std::fstream & fs;
    void pup(char & val_, const var_info & info_);
    void pup(wchar_t & val_, const var_info & info_);
	void pup(int8_t & val_, const var_info & info_);
	void pup(int16_t & val_, const var_info & info_);
	void pup(int32_t & val_, const var_info & info_);
	void pup(int64_t & val_, const var_info & info_);
	void pup(uint8_t & val_, const var_info & info_);
	void pup(uint16_t & val_, const var_info & info_);
	void pup(uint32_t & val_, const var_info & info_);
	void pup(uint64_t & val_, const var_info & info_);
	void pup(float & val_, const var_info & info_);
	void pup(double & val_, const var_info & info_);
	void pup(long double & val_, const var_info & info_);
	void pup(bool & val_, const var_info & info_);
};

template<class T>
void pup_text(text_file_pupper * p, T val, const var_info & info, std::string & line)
{
    std::string begtag, endtag;
    begtag = "<" + info.name + ">"; endtag = "</" + info.name + ">";

    if (p->io == PUP_OUT)
    {
        p->fs << begtag << val << endtag << "\n";
    }
    else
    {
        std::getline(p->fs, line);
        size_t beg = begtag.size(); size_t loc = line.find(endtag);
        line = line.substr(beg, loc - beg);
    }
}

The template functions are there as a convenience – all of the pupper methods use them. The pup_text template function fills in the string “line” with the variable being read if the pupper is set to read mode, but if it is set to write mode the variable is written to the file stream and the line is left empty. The pup_bytes function is self-explanatory (I know it’s not multi-platform safe).

Writing pup functions to serialize objects using the pupper objects requires no specific knowledge of the pupper object; it just needs to be passed along. Take a look at the header and definition file for an example object (obj_a).


#include "pupper.h"
#include "math_structs.h"

class obj_a
{
    public:
    
	friend void pup(pupper * p_, obj_a & oa, const var_info & info);

	void set_transform(const fmat4 & tform);
	void set_velocity(const fvec4 & vel);
	const fvec4 & get_velocity() const;
	const fmat4 & get_transform() const;
    
    private:

	fmat4 transform;
	fvec4 velocity;

};

void pup(pupper * p_, obj_a & oa, const var_info & info)
{
	pup(p_, oa.transform, var_info(info.name + ".transform"));
	pup(p_, oa.velocity, var_info(info.name + ".velocity"));
}

The pup function responsible for serializing obj_a calls the pup functions responsible for serializing fmat4’s and fvec4’s. Take a look at the code defining fmat4 and fvec4.


struct fvec4
{
    fvec4(float x_=0.0f, float y_=0.0f, float z_=0.0f, float w_=0.0f);

	union
	{
		struct
		{
			float x;
			float y;
			float z;
			float w;
		};
		
		struct
		{
			float r;
			float g;
			float b;
			float a;
		};

		float data[4];
	};

    fvec4 operator+(const fvec4 & rhs);
    fvec4 operator-(const fvec4 & rhs);
    fvec4 & operator+=(const fvec4 & rhs);
    fvec4 & operator-=(const fvec4 & rhs);
};

void pup(pupper * p_, fvec4 & vc, const var_info & info)
{
    pup(p_, vc.data[0], var_info(info.name + ".x"));
    pup(p_, vc.data[1], var_info(info.name + ".y"));
    pup(p_, vc.data[2], var_info(info.name + ".z"));
    pup(p_, vc.data[3], var_info(info.name + ".w"));
}

struct fmat4
{	
	fmat4(fvec4 row1_ = fvec4(1.0f,0.0f,0.0f,0.0f), 
	      fvec4 row2_ = fvec4(0.0f,1.0f,0.0f,0.0f),
	      fvec4 row3_ = fvec4(0.0f,0.0f,1.0f,0.0f),
          fvec4 row4_ = fvec4(0.0f,0.0f,0.0f,1.0f));
    
    union
	{
		struct
		{
			fvec4 rows[4];
		};
		float data[16];
	};
};

void pup(pupper * p_, fmat4 & tf, const var_info & info)
{
    pup(p_, tf.rows[0], var_info(info.name + ".row1"));
    pup(p_, tf.rows[1], var_info(info.name + ".row2"));
    pup(p_, tf.rows[2], var_info(info.name + ".row3"));
    pup(p_, tf.rows[3], var_info(info.name + ".row4"));
}

The pup function for fvec4 calls the pup function for floats four times, which was defined in pupper.h. The fmat4 pup function calls the fvec4 pup function for fvec4 four times. Notice that no matter what concrete pupper is used, none of these functions change.

It is easy to write pup functions for other library types also. As an example, take a look at the pup function for a std::vector.


template<class T>
void pup(pupper * p_, std::vector<T> & vec, const var_info & info)
{
    uint32_t size = static_cast<uint32_t>(vec.size());
    pup(p_, size, var_info(info.name + ".size"));
    vec.resize(size);
    for (uint32_t i = 0; i < size; ++i)
        pup(p_, vec[i], var_info(info.name + "[" + std::to_string(i) + "]"));
}

There are some disadvantages with this particular function – mainly it won’t work for types of T that don’t have a default constructor. There are ways to write this function so that it will work – like with parameter packs – but they aren’t needed here.

With a pup function to handle std::vector, it can be used to pup any vectors contained in an object. Take a look at the obj_a_container, which owns the obj_a’s it contains.


#include "pupper.h"
#include "derived_obj_a.h"
#include <vector>

struct obj_a_desc
{
	obj_a_desc();
    
	int8_t type;
	obj_a * ptr;
};

struct obj_a_container
{
	~obj_a_container();

	void release();

	std::vector<obj_a_desc> obj_a_vec;
};

void pup(pupper * p_, obj_a_desc & oa_d, const var_info & info)
{
	pup(p_, oa_d.type, var_info(info.name + ".type"));
	if (oa_d.ptr == nullptr)
	{
		// This is a bit of a cheat because I don't feel like writing factory code
		if (oa_d.type == 1)
            oa_d.ptr = new obj_a;
		else
            oa_d.ptr = new derived_obj_a;
	}
    pup(p_, *oa_d.ptr, info);
}

void pup(pupper * p_, obj_a_container & oa, const var_info & info)
{
    pup(p_, oa.obj_a_vec, var_info("obj_a_vec"));
}

By creating a pup function for an obj_a *, memory can be allocated if need be. The vector pup function will call the pup obj_a* function on every element – which allocates memory if the pointer is null.

But how does the pupper pattern handle polymorphic class types which should still be serialized by the library? For example, if it should be possible to derive from obj_a and still have obj_a_container be able to pup the derived object given a pointer to the base object.

Well, it may be apparent that something strange is going on in the pup pointer to obj_a function – there is this obj_a_desc struct wrapping each obj_a pointer along with a type field that is checked against 1. This is a makeshift way to allow the obj_a_container to allocate derived_obj_a’s (which will be defined shortly). Normally this would be done with some type of factory – but that’s not the focus of the article. Instead, the description struct is serialized so that the pup function knows which object to allocate. It’s serialized using a – you guessed it – pup function.

After allocation, the pup function for obj_a is called - there is no special pup function for derived_obj_a and no pointer casting is done. To accomplish this a bit of curiously recurring template pattern (CRTP) code is needed.

First, a virtual pack/unpack method needs to be added to obj_a. Instead of requiring every derived object to implement this method, a template class is created which inherits from obj_a and implements it. The derived classes then inherit from the template class, with their type as the template parameter. For clarity the virtual method will be called pack_unpack instead of pup. The new header file for obj_a is shown below.


#include "pupper.h"
#include "math_structs.h"

class obj_a
{
public:
	friend void pup(pupper * p_, obj_a & oa, const var_info & info);

	void set_transform(const fmat4 & tform);
	void set_velocity(const fvec4 & vel);
	const fvec4 & get_velocity() const;
	const fmat4 & get_transform() const;

protected:

	virtual void pack_unpack(pupper * p, const var_info & info) {}

private:

	fmat4 transform;
	fvec4 velocity;

};

template<class T>
class puppable_obj_a : public obj_a
{
public:

    puppable_obj_a(T & derived_):
    derived(derived_)
    {}

protected:
	void pack_unpack(pupper * p, const var_info & info)
	{
        pup(p, derived, info);
    }

private:

    T & derived;
};

void pup(pupper * p_, obj_a & oa, const var_info & info)
{
    oa.pack_unpack(p_,info);
	pup(p_, oa.transform, var_info(info.name + ".transform"));
	pup(p_, oa.velocity, var_info(info.name + ".velocity"));
}

The oa.pack_unpack(p, info) will call the derived pack_unpack function, which in turn will call the correct pup function for the derived type. This means that the pup function for derived_obj_a will be called first, followed by the pup functions to serialize transform (fmat4) and velocity (fvec4). The code for derived_obj_a is shown below.


class derived_obj_a : public puppable_obj_a<derived_obj_a>
{
public:
	derived_obj_a(float health_=100.0f, float max_health_=100.0f):
    puppable_obj_a<derived_obj_a>(*this),
    health(health_),
    max_health(max_health_)
	{}

	float health;
	float max_health;
};

void pup(pupper * p, derived_obj_a & oa, const var_info & info)
{
    pup(p, oa.health, var_info(info.name + ".health"));
    pup(p, oa.health, var_info(info.name + ".max_health"));
}

The derived class, as stated earlier, inherits from the template class puppable_obj_a with its own type as the template parameter, which in turn inherits from obj_a and overwrites the pack_unpack method. Doing this allows the correct pup function to be called, pupping the health and max_health fields of derived_obj_a.

From the outside looking in, only a pup call is needed to serialize obj_a – even if it is a polymorphic pointer which actually points to derived_obj_a storage. An example program is included illustrating this fact. The read and write to file functions show the pup pattern in action.


void read_data_from_file(obj_a_container * a_cont, const std::string & fname, int save_mode)
{
	std::fstream file;
    pupper * p = nullptr;
    std::ios_base::openmode flags = std::fstream::in;

	if (save_mode)
	{
        flags |= std::fstream::binary;
		p = new binary_file_pupper(file, PUP_IN);

	}
	else
	{
		p = new text_file_pupper(file, PUP_IN);
	}

    file.open(fname, flags);
	if (!file.is_open())
	{
		std::cout << "Error opening file " << fname << std::endl;
		delete p;
		return;
	}

	a_cont->release();
	pup(p, *a_cont, var_info(""));
	std::cout << "Finished reading data from file " << fname << std::endl;
}

void write_data_to_file(obj_a_container * a_cont, const std::string & fname, int save_mode)
{
	std::fstream file;
	pupper * p;
    std::ios_base::openmode flags = std::fstream::out;

	if (save_mode) // if save mode is one then write in binary mode
	{
        flags |= std::fstream::binary;
		p = new binary_file_pupper(file, PUP_OUT);

	}
	else
	{
		p = new text_file_pupper(file, PUP_OUT);
	}

	file.open(fname, flags);
	if (!file.is_open())
	{
		std::cout << "Error opening file " << fname << std::endl;
		delete p;
		return;
	}

	pup(p, *a_cont, var_info(""));
	std::cout << "Finished writing data to file" << fname << std::endl;
}

Saving all of the obj_a’s within the obj_a_container is as simple as creating a pupper object and calling pup passing in the pupper object, the object to be serialized, and a var_info describing the object. The pupper object can be as simple or as complicated as it needs to be. The binary pupper, for example, could make sure (and probably should) that endianness is consistent for multi-byte chunks. It could also hold a buffer and only write to file once the buffer was full. Whatever – do what you gotta do. There is definitely some flexibility though.


Conclusion


Serialization can be daunting, but if it is broken down in to small enough pieces, then its easy to handle. The main benefit of using the methods presented in this article is that serialization code only needs to be written once, and different puppers can be created as needed. Doing this using global functions is non-intrusive and easy to understand. Ousting templates (mostly) makes for easier error messages when a pup function is forgotton. Lastly, the code presented here has virtually no dependencies and can be extended with minimal or no changes to existing code.

I hope this article has provided something useful. I look forward to hearing your feedback and thoughts.

All source code is attached along with a CMakeLists.txt for easy compilation. Cmake should make the compilation process painless. Even without cmake – no external libraries are needed so just add the files to a project and it should be good to go.

Feel free to use, copy/paste, or redistribute any of the source code in any way desired.

Here is the git repo, the zip is also attached.


Credits


I did not invent this serialization method - it was introduced to my by my simulations class professor Orion Lawlor at University of Alaska Fairbanks. He showed this to me after watching me give a presentation where I had painfully hand-created dialog fields to edit attributes of a particle system. There were a lot of fields, and after class he showed me some code examples he'd written using the method and suggested I use it instead of manually making such dialogs. I followed his advice and tweaked the method for my own use, and it has been great! I'm hoping to get a link for the original code samples he gave me soon.

Viewing all 17925 articles
Browse latest View live


<script src="https://jsc.adskeeper.com/r/s/rssing.com.1596347.js" async> </script>